I was halfway through a midnight snack binge when the kitchen exploded into a chocolatey storm. A melted chocolate bar slipped from my hand, splattering the counter like a crimson paint palette. The smell of cocoa instantly pulled me in, but the real temptation was the promise of fudgy, gooey bliss. I had always been the skeptical type, thinking brownies were either dry or gooey, but this disaster turned into a revelation. That night, I dared myself to create a brownie that would make my friends question their own baking skills. By the end, I was convinced: this is hands down the best version you'll ever make at home.
The first bite was a revelation of texture—soft, almost molten, yet with a hint of caramelized sugar that cracked the surface like fine glass. The aroma of toasted cocoa mingled with the sweet, tart whisper of cherries, creating a symphony that danced in my nose. The sound of the batter swirling in the bowl was a comforting lullaby, a rhythm that promised something delicious. I could feel the heat from the oven rising like a gentle wave, the air thick with anticipation. The moment the timer buzzed, the kitchen filled with an almost sacred silence, as if the world paused to taste the moment. The visual of the brownies, dark and glossy, was a promise that the flavor would be equally decadent.
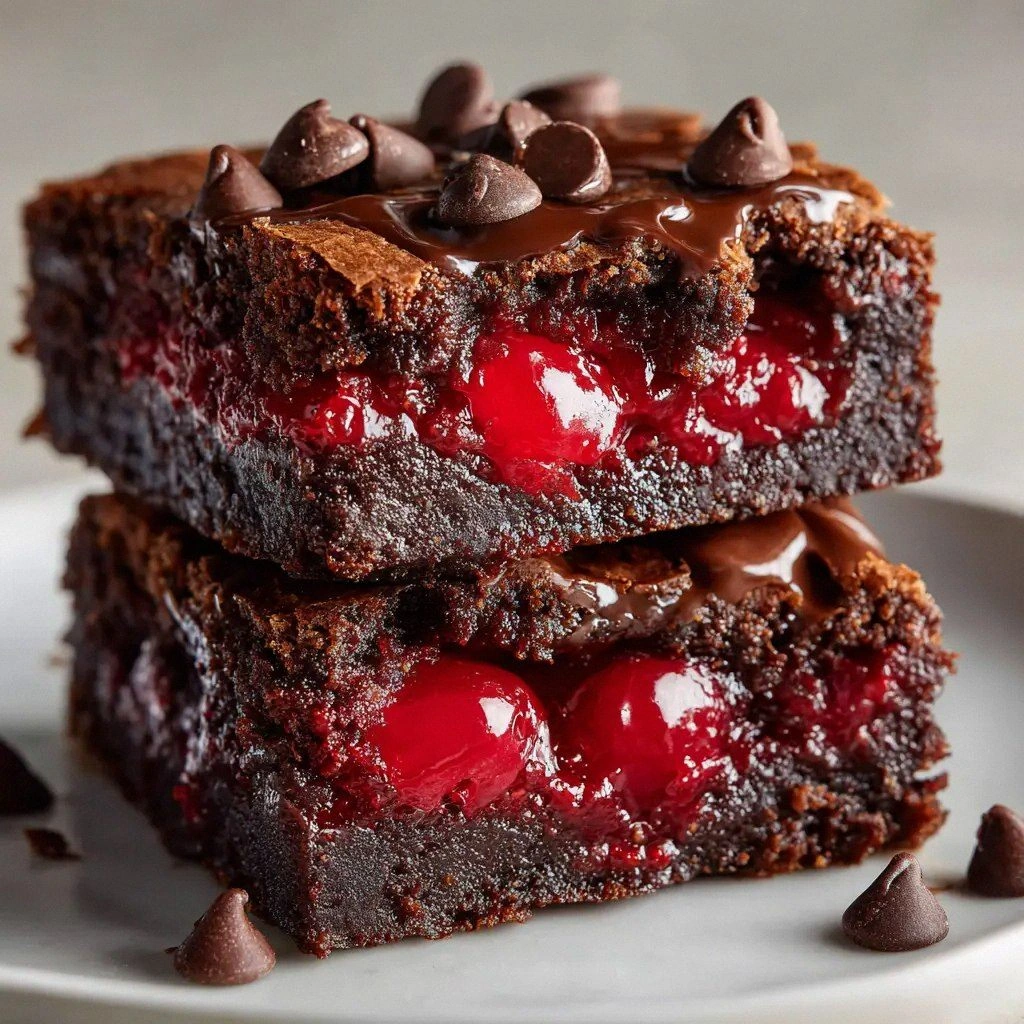
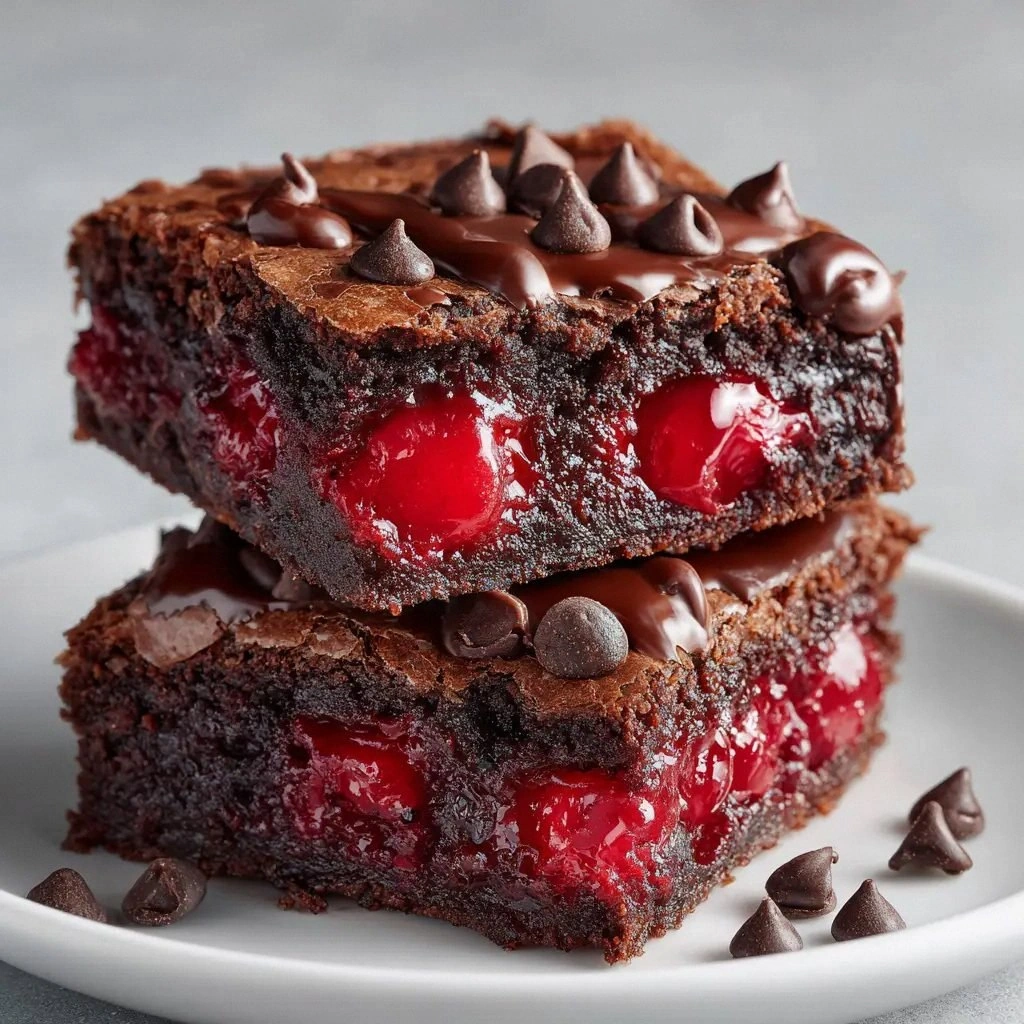
I confess that the first time I tasted the finished product, I was already reaching for a second square. The cherries burst like miniature fireworks, their juicy sweetness cutting through the deep chocolate. The crumb was dense enough to hold its shape, yet the center remained a velvety, almost liquid dream. It felt like a hug in edible form, a comforting reminder that even the simplest ingredients can become extraordinary. The experience left me craving more, and I knew I had to share this secret with anyone who has ever settled for average brownies. The kitchen was no longer a place of frustration; it became a laboratory of delicious possibilities.
Picture yourself pulling this out of the oven, the whole kitchen smelling incredible, as the steam curls like a fragrant mist. The first square you break apart reveals a glossy, dark center that oozes chocolate like a slow, rich river. The cherries, nestled within, add a pop of color and a burst of tartness that balances the sweetness perfectly. If you’ve ever struggled with brownies that turn out cakey or too dense, you’re not alone—this recipe is the fix you’ve been waiting for. I dare you to taste this and not go back for seconds, because the first bite will have you hooked. Stay with me here—this is worth it.
Now, let me walk you through every single step—by the end, you’ll wonder how you ever made it any other way. The journey from raw ingredients to a decadent dessert is a story of science, art, and a touch of daring. Each element has been chosen to maximize flavor, texture, and visual appeal. The cherries are the unexpected star, the chocolate the heart, and the butter the silent binder that keeps everything together. Together, they form a masterpiece that will impress family, friends, or anyone who dares to taste. Prepare your kitchen, gather your tools, and let’s dive into this culinary adventure.
What Makes This Version Stand Out
- Texture: The combination of melted butter and cocoa powder creates a dense, fudgy crumb that feels luxurious on the tongue. The cherries add a pleasant chew and a burst of freshness that breaks up the chocolate intensity. If you prefer a lighter brownie, this recipe can be tweaked, but the richness is what makes it unforgettable.
- Flavor: The semi-sweet chocolate balances the natural tartness of the cherries, producing a layered taste profile. The vanilla extract lifts the overall sweetness, giving the brownies a subtle depth that elevates them beyond ordinary chocolate desserts.
- Ingredient Quality: Using high‑grade chocolate and fresh pitted cherries ensures that each bite is packed with flavor. The recipe doesn’t rely on artificial flavors or additives—just pure, honest ingredients that taste like home.
- Visual Appeal: The glossy dark surface with visible cherry chunks makes the brownies Instagram‑ready. The contrast between the deep brown and bright red cherries adds a pop of color that is as pleasing to the eye as it is to the palate.
- Ease of Preparation: All steps are straightforward, with no need for complex techniques or specialized equipment. Even a novice baker can follow along and produce a professional‑looking result.
- Make‑Ahead Potential: Once baked, the brownies keep wonderfully in the fridge or freezer, making them perfect for parties or last‑minute treats. The cherries retain their texture, and the chocolate remains silky, even after storage.
Alright, let's break down exactly what goes into this masterpiece…
Inside the Ingredient List
The Flavor Base
The unsalted butter is the heart of this recipe, providing a silky mouthfeel and a buttery richness that melts into every bite. Butter’s natural fats coat the chocolate and cherries, creating a cohesive, indulgent experience. If you’re aiming for a lower fat version, you could substitute half the butter with Greek yogurt, but the texture will shift slightly toward a denser crumb.
Semi‑sweet chocolate is the cornerstone of the flavor profile, offering a balanced sweetness that doesn’t overpower the cherries. Choosing a chocolate with a 60–65% cacao content ensures a robust chocolate taste without a bitter aftertaste. If you prefer a sweeter brownie, you can swap in milk chocolate, but be prepared for a lighter, less complex flavor.
The Texture Crew
Unsweetened cocoa powder is the secret to that deep, chocolatey color and a slightly bitter edge that cuts through the sweetness. It also adds body to the batter, preventing it from becoming too runny. If you can’t find cocoa powder, you might use espresso powder as a substitute, but it will introduce a coffee undertone.
Granulated sugar is the sweetener that balances the bitterness of cocoa and the tartness of cherries. It also helps to create a tender crumb by absorbing moisture during baking. For a caramelized twist, consider substituting half the sugar with brown sugar.
The Unexpected Star
Pitted cherries are the star that sets this brownie apart. Their juicy burst of tartness provides contrast to the deep chocolate, creating a layered taste that excites the palate. If cherries are out of season, you can use frozen cherries or even dried cherry pieces; just rehydrate them in warm water before adding to the batter.
The Final Flourish
All‑purpose flour provides structure, ensuring the brownies hold together while still remaining tender. Using a light-colored flour gives a subtle, almost chocolatey color to the batter, enhancing the visual appeal. If you prefer a gluten‑free version, try a 1:1 gluten‑free flour blend, but expect a slightly different crumb texture.
A pinch of salt is essential; it amplifies the chocolate flavor and balances the sweetness. Salt is a flavor enhancer that brings out the best in every ingredient. For a savory twist, a tiny dash of smoked sea salt can add a new dimension.
Eggs act as the binder, holding all the components together while adding richness. They also provide structure through coagulation when heated. If you’re vegan, you can replace the eggs with flaxseed meal mixed with water, but the texture will be denser.
Vanilla extract is the subtle aromatherapeutic element that lifts the overall flavor profile. It’s a classic ingredient that adds warmth and depth. A small splash of almond extract can create a nutty undertone for those who love a twist.
Everything's prepped? Good. Let's get into the real action…
The Method — Step by Step
- Preheat your oven to 350°F (175°C) and line a 9x9 inch baking pan with parchment paper, leaving a small overhang on each side for easy removal. Grease the parchment lightly with butter or non‑stick spray, so the brownies don’t stick. Place the pan on the middle rack to ensure even heat distribution. This step is crucial for a uniform bake; uneven heat can result in a dry top and a gooey center. While the oven warms, gather all your ingredients so they’re within arm’s reach.
- Melt the butter and semi‑sweet chocolate together in a heat‑proof bowl set over a pot of simmering water (double boiler method). Stir constantly until the mixture is smooth and glossy, then remove from heat. Let the chocolate butter blend cool for a minute; this prevents the eggs from scrambling when added later. The aroma that fills the kitchen at this point is a promise of decadence. This step sets the foundation for the fudgy texture.
- Whisk the sugar, cocoa powder, and salt in a separate bowl until fully combined. The dry mixture should be free of lumps, ensuring a silky batter. Add the cooled chocolate butter to the dry ingredients, mixing until just incorporated. The batter will look thick and slightly glossy. This is the moment where the flavors begin to mingle. The batter’s consistency should be smooth enough to pour but not runny.
- Beat the eggs and vanilla extract together in a small bowl until the mixture is pale and slightly frothy. This aeration helps the brownies rise a bit, creating a tender crumb. Pour the egg mixture into the batter, stirring gently with a spatula. The batter will become slightly lighter in color, signaling that the eggs are fully incorporated. Be careful not to overmix; a few streaks are fine. The batter should still be thick but pourable.
- Fold in the pitted cherries, distributing them evenly throughout the batter. If you’re using frozen cherries, thaw them first and pat dry to avoid excess moisture. The cherries will sink slightly during baking, creating pockets of juicy burst. The batter should now have a speckled appearance, like a dark ocean dotted with bright stars. This step adds a playful element to the texture.
- Pour the batter into the prepared pan, smoothing the top with a spatula. Tap the pan gently on the counter to release any air bubbles, preventing uneven rising. Place the pan in the preheated oven and bake for 25–30 minutes, or until a toothpick inserted in the center comes out with a few moist crumbs. The edges should pull away from the parchment, indicating doneness. Overbaking will dry out the brownies, so keep a close eye on the timer.
- Remove the pan from the oven and let the brownies cool in the pan for 10 minutes. This allows the structure to set, preventing them from breaking apart when cut. After 10 minutes, lift the brownies out using the parchment overhang. Place them on a wire rack to cool completely. The cooling time is essential for the fudgy center to firm up slightly, creating that perfect bite. The aroma during this time is irresistible.
- Once cooled, cut the brownies into squares using a sharp knife. A clean cut ensures each piece has a consistent shape and size. Store the brownies in an airtight container at room temperature for up to three days, or refrigerate for longer freshness. If you plan to serve them later, a quick reheat in the microwave (10–15 seconds) can revive their softness. This final step transforms the brownies from a batch to a ready‑to‑serve dessert.
That’s it — you did it. But hold on, I've got a few more tricks that'll take this to another level…
Insider Tricks for Flawless Results
The Temperature Rule Nobody Follows
Many bakers set their oven to a high temperature, hoping for a quick bake. In reality, a moderate 350°F is perfect for brownies; it ensures a uniform bake and a moist center. If your oven runs hot, set it 25°F lower and use an oven thermometer to verify. This trick saves you from burnt edges and a dry interior. I once baked at 375°F, and the brownies were a sad, dry mess. The lesson? Keep it low and steady.
Why Your Nose Knows Best
During baking, trust your sense of smell. The moment you notice a deep, chocolatey aroma with a hint of vanilla, you’re in the sweet spot. If the scent feels too sweet or overly cocoa, the brownies are likely overbaked. Conversely, a faint aroma suggests they need more time. Smell is a reliable guide that even seasoned bakers overlook.
The 5‑Minute Rest That Changes Everything
After removing the brownies from the oven, let them rest for exactly five minutes before cutting. This short rest lets the batter set, making it easier to slice cleanly. A longer rest can cause the brownies to become too firm, while a shorter one might result in a messy mess. I’ve found that a 5‑minute rest is the sweet spot for this recipe. It’s a tiny tweak that pays huge dividends.
Use a Baking Sheet for Even Heat
If you’re baking in a deep pan, place a sheet of parchment paper on the bottom of the oven. This creates an even heat source, preventing the bottom from scorching. It also makes cleanup easier, as the paper catches any drips. A simple sheet of parchment is a game‑changer for consistency.
The Secret to a Silky Finish
Before pouring the batter, lightly coat the bottom of the pan with melted chocolate. This creates a glossy, chocolatey crust that looks professional and tastes divine. It also helps the brownies release from the parchment more easily. I use a small amount of chocolate, just enough to coat the surface. The result is a brownie that looks as good as it tastes.
Creative Twists and Variations
This recipe is a playground. Here are some of my favorite ways to switch things up:
Nutty Surprise
Add a cup of chopped walnuts or pecans to the batter for a crunchy contrast. The nuts provide a delightful bite and a buttery flavor that complements the chocolate. They also add a subtle earthy note, making each square a multi‑sensory experience. This variation is perfect for a holiday gathering.
Minty Freshness
Incorporate a teaspoon of peppermint extract into the batter. The mint pairs wonderfully with chocolate, creating a refreshing undertone. The result is a brownie that feels lighter and more invigorating. It’s an excellent choice for summer dessert tables.
Citrus Kick
Replace half of the cherries with orange‑scented candied peel. The citrus zest adds brightness and a chewy texture that balances the fudgy base. The combination of orange and chocolate is classic, yet rarely attempted in brownies. This twist is ideal for brunch or a brunch‑themed party.
Almond Dream
Swap the all‑purpose flour for almond flour and add a tablespoon of almond butter to the batter. The result is a nutty, slightly chewy brownie with a lower carb profile. Almonds also enhance the chocolate flavor, creating a harmonious blend. This version is great for those who prefer gluten‑free options.
Chocolate‑Covered Delight
After baking, drizzle melted dark chocolate over the top of the brownies. Let the chocolate set before cutting into squares. The glossy coating adds an extra layer of chocolatey richness and a pleasing visual effect. This simple addition turns an already decadent dessert into a showstopper.
Storing and Bringing It Back to Life
Fridge Storage
Store brownies in an airtight container at room temperature for up to three days. If you plan to keep them longer, refrigerate them in a sealed container for up to a week. The cold environment preserves moisture, keeping the brownies fudgy. Before serving, let them sit at room temperature for 10–15 minutes to soften.
Freezer Friendly
Wrap each brownie square in plastic wrap, then place them in a freezer bag. They can be frozen for up to three months without loss of flavor. When ready to eat, thaw at room temperature or microwave on low for 10–15 seconds. Freezing adds convenience without compromising quality.
Best Reheating Method
To revive a frozen or chilled brownie, microwave on low for 10–15 seconds or place in a preheated oven at 300°F for 5 minutes. Add a tiny splash of water to the center before reheating; the steam will restore moisture and keep the brownie from drying out. This trick ensures each bite remains as luscious as freshly baked.