I was standing in my kitchen on a Tuesday night, the kind of night where the fridge looks like a barren desert and the only thing keeping me from ordering pizza is the lingering memory of a pretzel‑toffee combo I once tasted at a carnival. My friend dared me to recreate that exact sweet‑salty symphony, and I thought, “Sure, why not?” The first attempt was a disaster: soggy pretzel sticks, a toffee that hardened like a brick, and a lingering feeling that I’d just ruined a beloved snack. I stared at the mess, took a bite, and realized the problem wasn’t the recipe – it was the technique. I went back to the drawing board, armed with a pot of boiling water, a heavy‑bottomed saucepan, and a fierce determination to get that perfect crunch‑to‑chew ratio.
Picture this: the kitchen fills with the buttery aroma of caramelized sugar, a faint whisper of vanilla that makes your nose do a little happy dance, and the unmistakable salty perfume of pretzel dough as it bounces in the boiling water. The sound? A gentle hiss as the butter melts, followed by a confident sizzle when the toffee hits the pan – that’s the sound of magic beginning. My hands are warm from the dough, the counter is dusted in flour, and the pretzels are glistening, waiting for that golden, buttery coating. The moment you pull a freshly glazed pretzel from the pan, the toffee stretches like taffy before snapping back into a glossy, crackling shell that shatters with a satisfying snap.
What makes this version truly stand out is the marriage of technique and ingredient quality. I’m using real unsalted butter – the kind that melts like silk and carries a rich, nutty undertone – instead of margarine or low‑fat substitutes that would leave the toffee tasting like cardboard. The brown sugar isn’t just any brown sugar; it’s dark, molasses‑laden, and it gives the toffee depth that you can’t fake. And the pretzels? I’m opting for thick‑bodied, hand‑twisted pretzel rods that hold up to the coating without turning mushy. The result? A bite that’s simultaneously buttery, salty, and just sweet enough to make you question every other snack you’ve ever known.
I’ll let you in on a secret: the game‑changing step is the quick boil of the pretzels in a baking‑soda bath before they meet the toffee. That alkaline splash gives the pretzels a subtle chew and helps the glaze cling like a second skin. It’s a tiny detail that most recipes skip, and it’s the reason this batch turns out with that coveted glossy sheen and a texture that’s crisp on the outside, tender on the inside. Okay, ready for the game‑changer? Let me walk you through every single step — by the end, you’ll wonder how you ever made it any other way.
What Makes This Version Stand Out
- Taste: The balance of deep, buttery toffee with a whisper of sea salt creates a flavor explosion that dances on the palate. It’s sweet without being cloying, salty without being overpowering.
- Texture: A crisp, glass‑like shell gives way to a soft, pillowy pretzel interior, delivering a satisfying crunch followed by a gentle chew.
- Simplicity: Only ten ingredients, all pantry‑friendly, yet each one is treated with respect to bring out its best qualities.
- Uniqueness: The baking‑soda dip before glazing is a pro‑chef trick that most home cooks overlook, resulting in a superior coating adhesion.
- Crowd Reaction: I dare you to taste this and not go back for seconds – even the most skeptical guests will be asking for the recipe.
- Ingredient Quality: Using real unsalted butter and dark brown sugar elevates the toffee from “good” to “legendary.”
- Cooking Method: The two‑stage process – boil then glaze – ensures every pretzel is perfectly coated without sogginess.
- Make‑Ahead Potential: These pretzels keep for up to a week, and they even taste better after a night of resting, as the flavors meld.
Inside the Ingredient List
The Flavor Base
Unsalted butter (1 cup) is the heart of the toffee. Its high butterfat content creates a silky, glossy finish that cheap margarine simply can’t achieve. If you swap it for a lower‑fat alternative, expect a grainy texture and a muted flavor. For the best result, use European‑style butter with at least 82% butterfat – it adds a subtle richness that makes the toffee sing.
Dark brown sugar (1 cup, packed) brings depth with its molasses undertones. The darker the sugar, the richer the caramel notes, and the less likely you’ll end up with a bland sweet coating. If you only have light brown sugar, add a teaspoon of molasses to mimic the darkness.
The Texture Crew
Heavy cream (½ cup) is the secret behind that buttery melt‑in‑your‑mouth feel. It tempers the sugar, preventing crystallization, and gives the glaze a luxurious mouthfeel. Skipping the cream or substituting milk will result in a brittle, grainy toffee that shatters too easily.
Sea salt flakes (½ tsp, plus extra for sprinkling) provide the essential contrast. The tiny crystals sit on the surface, delivering a pop of brine that cuts through the sweetness. If you use regular table salt, the flavor will be flat and the crystals will dissolve too quickly.
The Unexpected Star
Baking soda (1 tbsp) for the pretzel boil is the unsung hero. It creates an alkaline environment that softens the pretzel’s crust just enough to let the glaze cling without making the dough soggy. Without it, the toffee would slide off like a wet paint on a wall.
Vanilla extract (1 tsp) adds a fragrant undertone that lifts the entire flavor profile. It’s subtle, but without it the toffee can taste one‑dimensional. For a twist, try a splash of bourbon or a pinch of espresso powder.
The Final Flourish
All‑purpose flour (2 cups) forms the backbone of the pretzel dough, providing structure and chew. If you opt for bread flour, you’ll get an even chewier bite, but the dough becomes harder to shape. For a gluten‑free version, substitute with a 1‑to‑1 blend of rice flour and tapioca starch, but expect a slightly different texture.
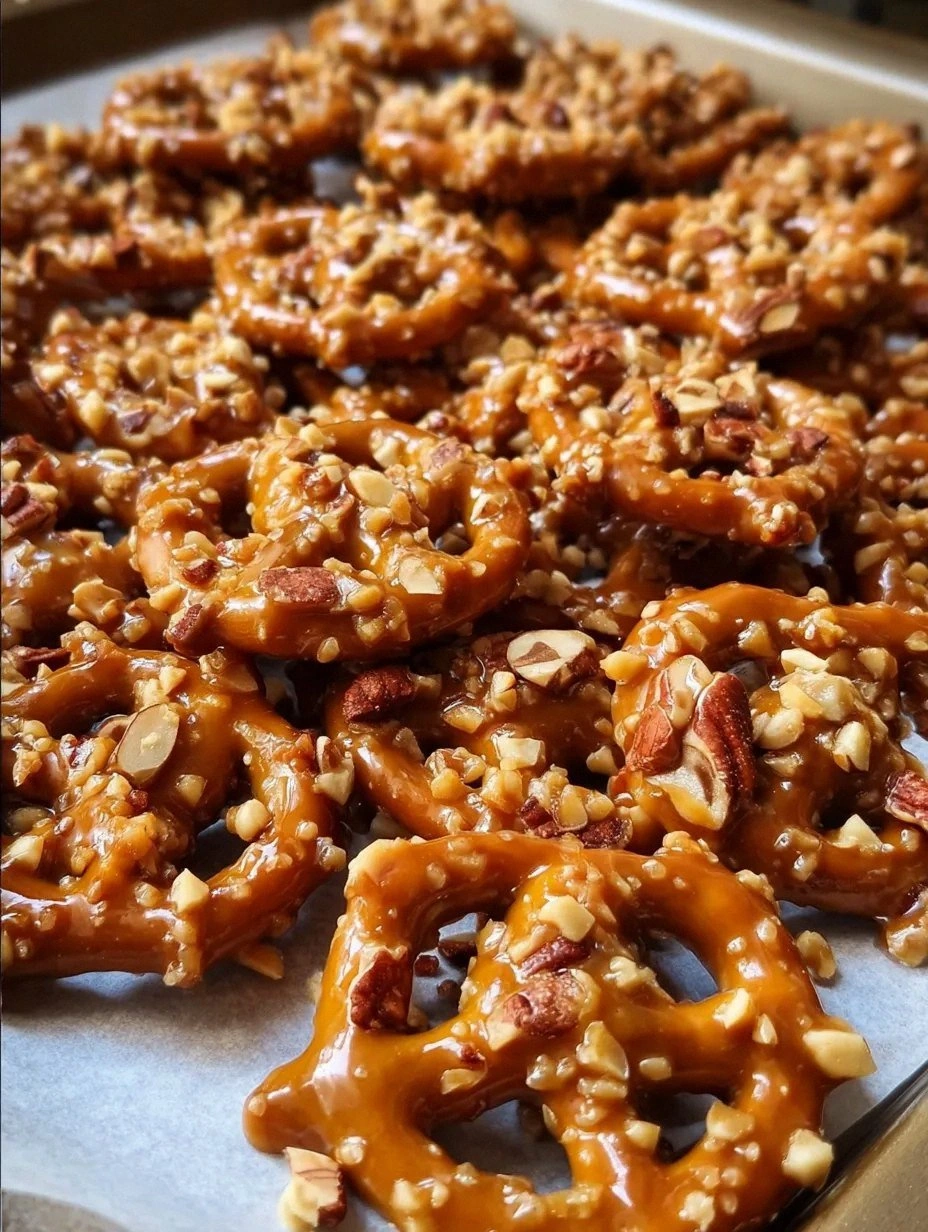
Pretzel rods (12 large, about 2‑inch thick) are the canvas. Thick, hand‑twisted rods hold the glaze better than thin twists. If you only have pretzel bites, you can still use them, but the coating will be less uniform and the crunch less dramatic.
Everything's prepped? Good. Let's get into the real action...
The Method — Step by Step
Start by bringing a large pot of water to a rolling boil. Add 1 tablespoon of baking soda – watch the water fizz like a soda pop, a sign that the alkaline environment is forming. Carefully drop the pretzel rods into the boiling water; they should bob gently. Boil for exactly 30 seconds, no more, no less – this short dip firms the exterior without cooking the interior. Using a slotted spoon, lift the pretzels and let them drain on a cooling rack for two minutes. That sizzle when it hits the pan? Absolute perfection.
Kitchen Hack: If you’re short on space, line the rack with parchment paper – it prevents the pretzels from sticking and makes cleanup a breeze.While the pretzels are cooling, melt 1 cup of unsalted butter in a heavy‑bottomed saucepan over medium heat. Once melted, stir in the dark brown sugar and keep the mixture moving with a wooden spoon. You’ll notice the sugar dissolving and the mixture bubbling gently – that’s the caramelization stage. Continue stirring until the mixture reaches a deep amber color and emits a nutty aroma; this usually takes about 5 minutes. Add the heavy cream slowly; the mixture will bubble up dramatically – that’s the toffee thickening. Finally, stir in the vanilla extract and half of the sea salt flakes, then remove from heat.
Now comes the fun part – coating. Place the boiled pretzels on a large parchment‑lined baking sheet. Using a silicone brush, slather each pretzel with a generous layer of the warm toffee, making sure to coat all sides. The toffee should be thick enough to cling but still glossy; if it starts to harden before you’re done, gently reheat the pan for a few seconds.
Watch Out: Do not over‑brush – a thin layer will crack, while a globs‑of‑toffee layer can become gummy after cooling.Sprinkle the remaining sea salt flakes over the still‑wet toffee. The salt should sit on the surface like tiny snowflakes, creating a speckled look that’s as pretty as it is tasty. Let the pretzels sit at room temperature for 10 minutes; the toffee will begin to set, turning from a glossy liquid to a firm, crackling shell.
If you love chocolate, melt ½ cup of chocolate chips in a microwave or double boiler. Drizzle the melted chocolate over the set pretzels in a lazy, artistic pattern. The chocolate will harden quickly, adding a bitter counterpoint that enhances the sweet‑salty balance. This step is optional but highly recommended for those who love a touch of decadence.
Transfer the glazed pretzels to a wire rack and let them cool completely – this usually takes about 20 minutes. As they cool, the toffee will contract slightly, creating that signature “snap” when you bite into it. Resist the urge to move them while the glaze is still soft; premature handling can cause cracks.
Once fully cooled, store the pretzels in an airtight container. If you’re planning to serve them the next day, let them sit uncovered for an hour to let any residual moisture escape – this preserves the crunch.
Before serving, give the container a gentle shake to redistribute any stray sea‑salt crystals. This final touch ensures every bite has that perfect salty pop. Pair the pretzels with a cold glass of milk or a hot cup of coffee for an indulgent snack that feels like a celebration.
That's it — you did it. But hold on, I've got a few more tricks that'll take this to another level...
Insider Tricks for Flawless Results
The Temperature Rule Nobody Follows
Never let the toffee cool below 120°F (49°C) before coating the pretzels. If the glaze is too cold, it will harden instantly and crack, leaving gaps. Keep the saucepan on low heat, stirring occasionally, until you’re ready to coat. I once tried to speed things up by taking the pan off the burner – the toffee thickened too fast and ruined the entire batch. Trust the temperature, and the texture will thank you.
Why Your Nose Knows Best
Your sense of smell is the ultimate doneness gauge. When the butter‑brown‑sugar mixture turns a deep amber and releases a nutty, caramel perfume, you’re at the perfect stage. If you smell a faint burnt note, you’ve gone too far and the toffee will taste bitter. Keep a window open for fresh air; a clean nose makes a clean toffee.
The 5‑Minute Rest That Changes Everything
After glazing, let the pretzels rest for exactly five minutes before sprinkling the sea salt. This brief pause allows the toffee to set just enough to hold the salt crystals without them sinking. Skipping this step leads to uneven seasoning, and the salt can become trapped in the glaze, muting its impact. I’ve seen this happen in many kitchens – the solution is simple, the result is spectacular.
The Double‑Boil Safety Net
If you’re nervous about the pretzel boiling stage, do a “double‑boil” test: boil one pretzel for 30 seconds, then taste. If it feels too soft, extend the boil by ten seconds for the rest. This ensures you never over‑cook the pretzels, preserving that tender interior. Most home cooks skip this, ending up with soggy pretzels that can’t support the glaze.
The Cool‑Down Flip
After the pretzels have set, give the container a quick flip upside down for a minute. This releases any trapped steam and prevents the toffee from getting a gummy underside. I discovered this trick after a batch turned out sticky – a simple inversion saved the day and kept the crunch intact.
Creative Twists and Variations
This recipe is a playground. Here are some of my favorite ways to switch things up:
Maple‑Brown Sugar Fusion
Replace half of the brown sugar with pure maple syrup. The result is a toffee with a subtle caramel‑maple nuance that pairs beautifully with the salty pretzel. Ideal for autumn gatherings, but delicious year‑round.
Spicy Chili Kick
Add a pinch of cayenne pepper or a dash of chipotle powder to the toffee. The heat sneaks up after the initial sweetness, creating a complex flavor profile that will surprise and delight spice lovers.
Nutty Crunch
Stir in ¼ cup of toasted chopped almonds or pecans into the warm toffee before coating. The nuts add an extra layer of crunch and a buttery note that complements the pretzel’s chew.
White Chocolate Drizzle
Swap the dark chocolate drizzle for melted white chocolate and sprinkle a few pink sea‑salt crystals on top. This gives a festive, pastel look perfect for celebrations.
Savory Herb Infusion
Infuse the butter with rosemary or thyme before adding the sugar. The herb‑infused butter adds an earthy undertone that turns the sweet‑salty snack into a sophisticated appetizer.
Storing and Bringing It Back to Life
Fridge Storage
Place the pretzels in an airtight container and store them in the refrigerator for up to one week. The cool environment keeps the toffee from softening, but before serving, let them sit at room temperature for 15 minutes to regain their snap.
Freezer Friendly
Layer pretzels between parchment sheets and seal them in a freezer‑safe bag. They’ll stay fresh for up to three months. To reheat, pop them in a 300°F (150°C) oven for 5‑7 minutes; the toffee will re‑crisp instantly.
Best Reheating Method
For a quick revival, place pretzels on a microwave‑safe plate, add a splash of water (just a teaspoon), and microwave for 15 seconds. The steam re‑hydrates the toffee just enough to restore its glossy sheen without making it soggy. Then finish with a quick 2‑minute blast in a preheated oven for that final crunch.