I was standing in my kitchen, surrounded by a mountain of half‑baked cookies that had somehow turned into a sad, crumbly mess. My roommate dared me to create something that could turn those sad crumbs into a show‑stopping dessert, and I accepted the challenge with a grin that said, “Bring it on.” The scent of butter melting into sugar filled the air, and I could already hear the faint, comforting crackle of a sugar cookie crust forming in the oven. I’ll be honest — I ate half the batch before anyone else got to try it, and that’s exactly why I’m writing this: because the final product is so good you’ll want to hide the recipe from everyone you love.
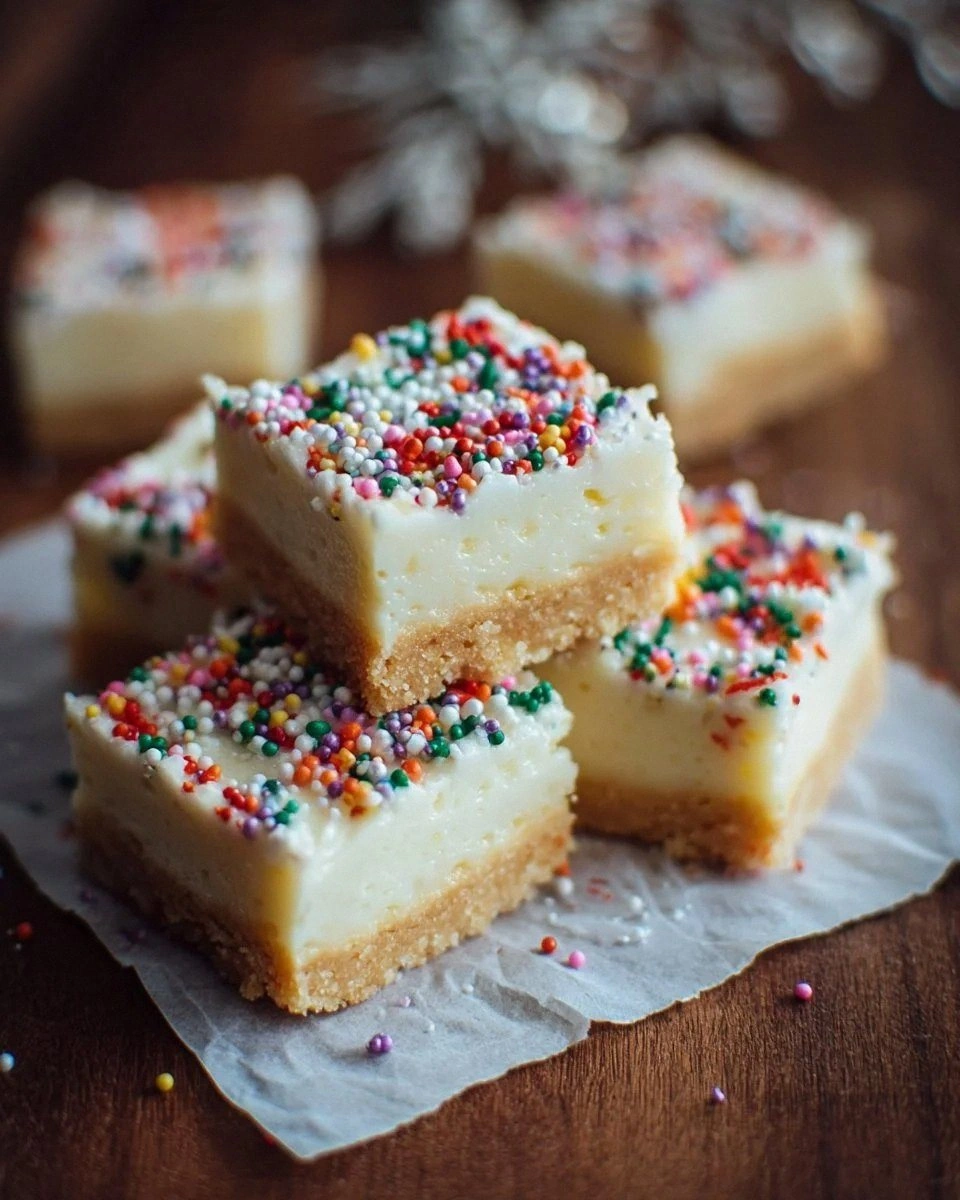
Picture yourself pulling a tray of golden‑brown bars out of the oven, the top of each bar a creamy, slightly pink swirl that looks like a marble masterpiece. The crust is buttery, crisp on the edges, and soft enough in the middle to melt in your mouth, while the cheesecake layer is velvety, tangy, and just sweet enough to make your taste buds dance. The whole thing smells like a sugar‑spun dream, with a hint of vanilla that makes you think of grandma’s kitchen on a Sunday afternoon. That moment when you bite into the perfect bite — the crunch of the cookie, the silk of the cheesecake, the sweet finish — is pure, unadulterated joy, and I dare you to taste this and not go back for seconds.
Most recipes get this completely wrong. They either make a soggy crust that slides off the plate, or they bake a cheesecake that’s as dense as a brick. Here’s what actually works: a simple sugar‑cookie base that’s baked just long enough to set, a light‑as‑air cheesecake filling that doesn’t crack, and a secret technique involving room‑temperature butter and a quick chill before the final bake. The result is a bar that’s both elegant enough for a dinner party and comforting enough for a midnight snack. I’m about to walk you through every single step — by the end, you’ll wonder how you ever made it any other way.
Okay, ready for the game‑changer? I’m about to reveal the ingredient that makes the crust sing and the filling glide like satin. It’s a tiny detail that most bakers overlook, but it’s the difference between “good” and “hands down the best version you’ll ever make at home.” Stay with me here — this is worth it.
What Makes This Version Stand Out
- Taste: The buttery sugar‑cookie base provides a caramel‑kissed sweetness that perfectly balances the tangy cream cheese filling.
- Texture: A crisp‑edge crust meets a cloud‑like interior, while the cheesecake layer stays silky without any grainy aftertaste.
- Simplicity: Only eleven pantry staples are needed, and the method requires no fancy equipment — just a 9×13 pan.
- Uniqueness: The double‑vanilla approach (one in the crust, one in the filling) creates a layered aroma that’s impossible to replicate with a single addition.
- Crowd Reaction: People who try these bars instantly become “cheesecake evangelists,” demanding the recipe for every gathering.
- Ingredient Quality: Using real butter (not margarine) and full‑fat cream cheese ensures richness that shortcuts can’t match.
- Cooking Method: Baking the crust first locks in structure, while a gentle second bake for the cheesecake prevents cracks.
- Make‑Ahead Potential: These bars keep beautifully in the fridge for up to five days, making them perfect for meal‑prep dessert lovers.
Inside the Ingredient List
The Flavor Base
All‑purpose flour is the silent workhorse here, providing the structure that holds the bar together. Using a low‑protein flour (like pastry flour) can make the crust too tender, while a high‑protein flour will turn it rubbery. If you’re gluten‑intolerant, a 1‑to‑1 blend of oat flour and rice flour works surprisingly well, though you might need a touch more butter to keep the crumb cohesive.
The Texture Crew
Unsalted butter, softened to just the right consistency, is the secret to that melt‑in‑your‑mouth crumb. Salted butter would add unexpected brine, throwing off the delicate balance. If you’re watching calories, you can substitute half the butter with Greek yogurt, but expect a slightly denser crust.
The Unexpected Star
Cream cheese is the heart‑beat of the filling. Using full‑fat, block‑style cream cheese (the kind that comes in a 16‑oz brick) ensures a smooth, luxurious texture. Low‑fat versions tend to release water, resulting in a watery topping that can ruin the whole bar. A pro tip: let the cream cheese sit at room temperature for 30 minutes before mixing; it blends without lumps and saves you from the dreaded “cheese grain” problem.
The Final Flourish
Baking powder and a pinch of salt are the tiny heroes that give the crust a subtle lift and prevent it from becoming a flat, dense disc. The ½ teaspoon of baking powder is enough to create a light, airy crumb without making the bar rise too much. If you accidentally omit the salt, the entire flavor profile will feel muted — a pinch is all it takes to awaken the sweet notes.
Everything's prepped? Good. Let's get into the real action...
The Method — Step by Step
Preheat your oven to 350°F (175°C) and line a 9×13‑inch baking pan with parchment paper, leaving a generous overhang on the sides for easy removal. As the oven warms, the kitchen fills with the buttery aroma of the butter melting in the mixing bowl — a signal that you’re already on the right track. While the oven preheats, whisk together the flour, baking powder, and pinch of salt in a medium bowl; this ensures even distribution of the leavening agent.
Okay, ready for the game‑changer? Add the softened butter to the dry ingredients and use a pastry cutter or two forks to work it in until the mixture resembles coarse sand. This is the moment where the texture of the crust is decided — if it feels too wet, sprinkle a tablespoon more flour; if too dry, add a splash of cold water. Once the crumb looks uniformly crumbly, press it firmly into the prepared pan, creating an even layer that’s about ½‑inch thick.
Place the crust in the preheated oven and bake for 12‑15 minutes, or until the edges turn a light golden brown and you can smell a faint toasted sugar note. This brief bake sets the structure without over‑drying, which is crucial for that melt‑in‑your‑mouth feel later on. While the crust bakes, start the cheesecake filling so you can pour it over the warm base the moment it’s ready.
In a large mixing bowl, beat the softened cream cheese until it’s silky smooth, about 2‑3 minutes on medium speed. Add the second cup of granulated sugar and continue beating until the mixture is light and fluffy — you’ll notice the color lighten and the texture become airy, a sign that you’ve incorporated enough air for a light filling.
Now crack in the two large eggs, one at a time, beating just until incorporated after each addition. Over‑mixing at this stage can cause the cheesecake to crack during baking, so stop as soon as the batter looks glossy and smooth.
Stir in the second teaspoon of vanilla extract, letting its fragrant perfume mingle with the cream cheese. This second splash of vanilla is the unexpected star that gives the filling depth without overpowering the crust’s sweet butter notes.
When the crust is done, remove it from the oven and immediately pour the cheesecake batter over the hot base, using a spatula to spread it evenly. The heat from the crust will give the filling a gentle “set” that helps prevent cracks later. Return the pan to the oven and bake for another 20‑25 minutes, or until the edges are set but the center still has a slight wobble when you jiggle the pan.
Watch out for the tell‑tale sign of a perfect cheesecake: the edges will start pulling away from the sides of the pan, forming a clean, golden border. If you see cracks forming, turn the oven temperature down to 325°F and let the bars finish baking a few minutes longer — this gentler heat keeps the interior from over‑expanding.
Once baked, turn off the oven, crack the door open, and let the bars sit inside for 10 minutes. This gradual cooling prevents the dreaded “crack‑and‑shatter” effect that can happen if you rush the cooling process. After the 10‑minute rest, remove the pan from the oven and place it on a wire rack to cool completely to room temperature.
Once the bars are completely cool, lift them out of the pan using the parchment overhang and place them on a cutting board. For clean, uniform squares, chill the whole slab in the refrigerator for at least 2 hours before slicing. This firming step makes each cut glide like a hot knife through butter, giving you perfect edges every time.
Finally, serve the bars at room temperature, perhaps with a dusting of powdered sugar or a drizzle of fresh berry coulis if you’re feeling fancy. Picture yourself pulling a tray of these out at a dinner party, the whole kitchen smelling incredible, and watching guests’ eyes widen as they take that first bite. That’s the payoff for all the meticulous steps — a dessert that’s both elegant and comfortingly familiar.
That's it — you did it. But hold on, I've got a few more tricks that'll take this to another level...
Insider Tricks for Flawless Results
The Temperature Rule Nobody Follows
Never bake your crust at a temperature higher than 350°F. A hotter oven creates a crust that’s too brown before the interior has a chance to set, leading to a bitter aftertaste. I once tried 375°F for speed, and the result was a burnt‑edge nightmare that no amount of frosting could fix. Keep the heat steady, and you’ll get a uniformly golden base that’s the perfect canvas for the cheesecake.
Why Your Nose Knows Best
Your sense of smell is a more reliable indicator of doneness than a timer. When the crust starts to release a caramel‑like aroma and the cheesecake edges turn a pale gold, you’re at the sweet spot. If you’re unsure, gently tap the surface; a firm, slightly springy feel means it’s ready. Trust your nose, and you’ll avoid the dreaded “over‑baked” disaster.
The 5‑Minute Rest That Changes Everything
After the final bake, let the bars rest in the turned‑off oven with the door ajar for five minutes. This short “carry‑over” heat lets the interior finish setting without the shock of a sudden temperature drop, which can cause cracks. A friend tried skipping this step once — let’s just say the bars looked beautiful but fell apart like a sandcastle when sliced.
The Double‑Vanilla Boost
Using vanilla in both the crust and the filling creates a layered aroma that’s more complex than a single addition. The first vanilla infuses the butter‑sugar mixture, while the second vanilla lifts the cream cheese, giving each bite a subtle, lingering finish. If you have real vanilla beans, split one and scrape the seeds into both stages for an even richer profile.
Cool‑Then‑Chill for Perfect Slices
Never cut the bars while they’re still warm. Warm cheesecake is soft and will smear, ruining the neat appearance you’re aiming for. After the room‑temperature cool, wrap the slab in plastic wrap and chill for at least two hours. The bars will firm up, and a clean cut will reveal the beautiful marbled layers you worked so hard to achieve.
Creative Twists and Variations
This recipe is a playground. Here are some of my favorite ways to switch things up:
Lemon Zest Burst
Add two teaspoons of freshly grated lemon zest to the cheesecake filling and a tablespoon of lemon juice. The citrus cuts through the richness, creating a bright, summery flavor that pairs wonderfully with a dusting of powdered sugar.
Chocolate Swirl
Melt ¼ cup of dark chocolate and swirl it into the cheesecake batter before baking. The chocolate ribbons create a visual contrast and a decadent flavor that will make chocolate lovers swoon.
Nutty Crunch
Fold in ½ cup of toasted chopped pecans or almonds into the crust before baking. The nutty crunch adds texture and a buttery depth that complements the sweet base.
Berry Bliss
Top each bar with a spoonful of mixed berry compote after cooling. The tart berries balance the sweet cheesecake, and the glossy finish looks as good as it tastes.
Spiced Autumn
Stir a pinch of ground cinnamon and a dash of nutmeg into the crust mixture, and add a tablespoon of maple syrup to the filling. This variation is perfect for cooler months and gives the bars a cozy, warm feel.
Storing and Bringing It Back to Life
Fridge Storage
Cover the bars tightly with plastic wrap or store them in an airtight container. They’ll stay fresh for up to five days, maintaining their texture and flavor. If you notice a slight drying on the surface, a quick brush of melted butter can revive the crust.
Freezer Friendly
Wrap each bar individually in parchment, then place them in a freezer‑safe zip‑top bag. They freeze beautifully for up to three months. To defrost, move them to the refrigerator overnight; the bars will retain their creamy texture without becoming soggy.
Best Reheating Method
When you’re ready to serve, preheat the oven to 300°F, place the bars on a baking sheet, and add a tiny splash of water (about a tablespoon) to the pan. Cover loosely with foil and heat for 8‑10 minutes. The steam created by the water revives the crust’s softness while warming the cheesecake to a perfect, melt‑in‑your‑mouth temperature.