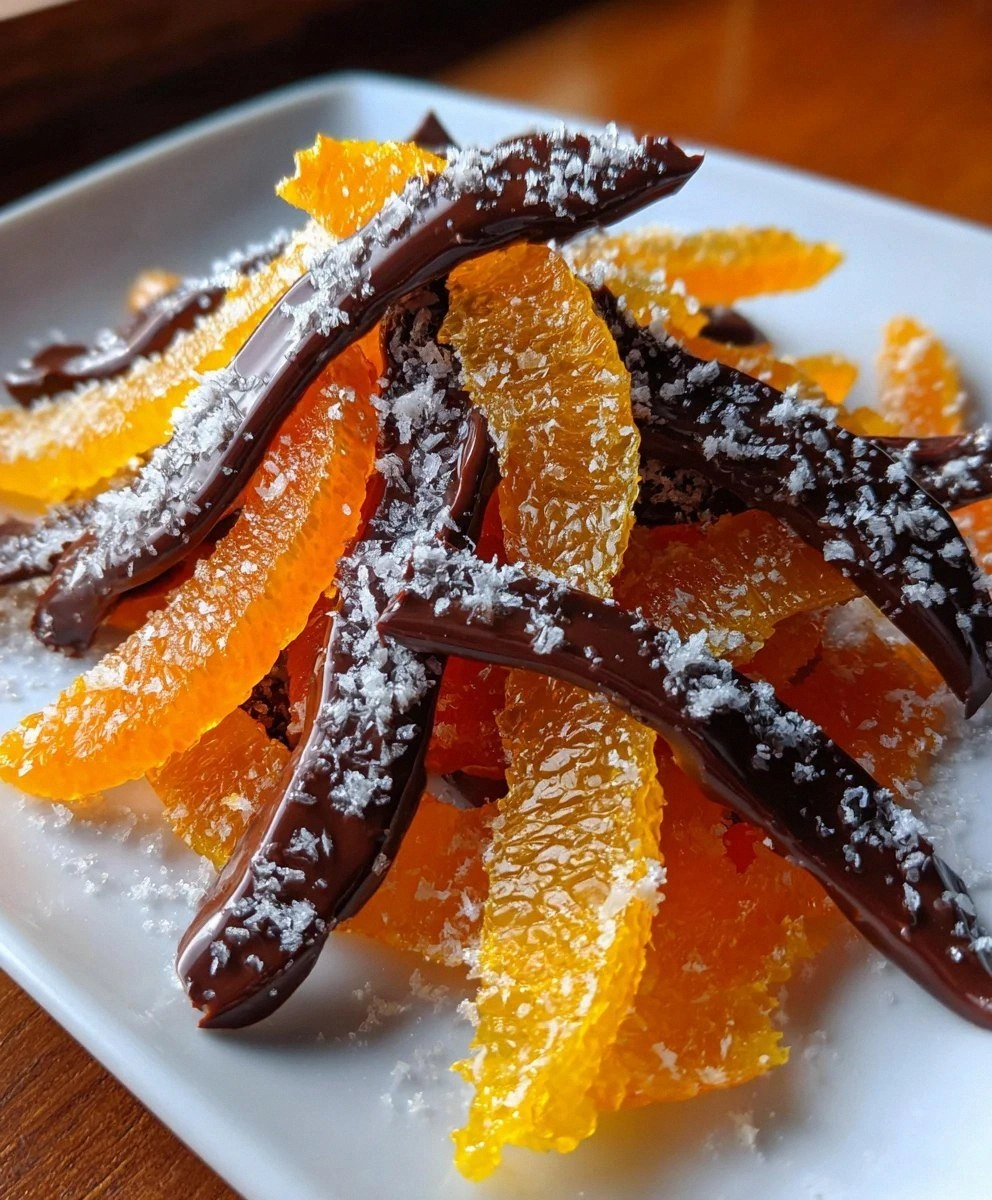
I burned the first batch so badly that my smoke alarm started singing the aria of culinary shame. There I stood, waving a dish towel like a white flag of surrender, while candied orange peel fused to my best saucepan in a sticky orange-black monument to overconfidence. But here's the thing — that disaster led me to the most ridiculously addictive homemade candy I've ever tasted. Picture this: bright ribbons of orange peel, transformed into jewel-like strips of sweetness, then dunked in dark chocolate so glossy you could check your reflection. The first bite cracks through the chocolate shell like stepping on thin ice, then your teeth sink into this chewy, citrusy candy that's somehow both sophisticated and completely childlike in its joy.
Most recipes treat candied orange peel like a chemistry experiment, all precise thermometers and grim warnings about crystallization. I say forget that noise. We're making candy, not performing surgery. My method is hands-down the best version you'll ever make at home because it embraces the beautiful chaos of real kitchens. No candy thermometers, no standing over bubbling syrup for an hour, no ending up with orange peels that taste like sugary shoe leather. Instead, you'll get peels that sparkle like stained glass, with that perfect balance of bitter orange oil and sweet syrup, wrapped in chocolate that snaps just right.
I dare you to taste this and not go back for seconds. Actually, I triple-dog dare you. I'll be honest — I ate half the batch before anyone else got to try it, standing at my kitchen counter in my pajamas at midnight, chocolate smudged on my face like a guilty toddler. The combination of bright citrus and deep chocolate is so intoxicating that you'll find yourself making excuses to whip up another batch. "The neighbors might want some," you'll tell yourself, knowing full well you're going to eat most of it while watching Netflix.
The magic happens when you transform something most people throw away — orange peels — into something that looks like it came from a Parisian chocolatier. Future pacing here: picture yourself pulling these out of the fridge, the chocolate just set, the orange peel glowing like sunset through the translucent candy coating. Your kitchen smells like an orange grove collided with a chocolate factory. Your friends think you're a culinary genius. And the best part? This costs pennies to make but tastes like a million bucks. Let me walk you through every single step — by the end, you'll wonder how you ever made it any other way.
What Makes This Version Stand Out
Most recipes get this completely wrong. Here's what actually works:
- Bitter Balance: Unlike those tooth-achingly sweet versions, this recipe keeps a whisper of orange bitterness that makes the chocolate pop like a symphony. It's that sophisticated edge that keeps you reaching for just one more piece, like a good conversation you don't want to end.
- Texture Alchemy: The peels become translucent jewels with a chew that's firm but yielding, never rubbery. When you bite through the chocolate shell, you get this perfect give-way moment that's pure textural poetry.
- Speed Demon Method: Traditional recipes demand an hour of babysitting syrup. Mine? Twenty minutes of actual work, with most of the time spent letting the orange peels hang out in their sugar spa while you scroll through social media.
- Chocolate Democracy: No fancy tempering required. We're using a foolproof method that gives you that professional snap without any equipment beyond a microwave and a bowl. Your chocolate will shine like it's wearing little chocolate tuxedos.
- Zero Waste Hero: You're literally turning trash into treasure. Every time you eat an orange, you're three steps away from candy. Your grandmother would weep with pride at your thriftiness.
- Crowd Control: These disappear faster than free samples at Costco. Bring them to a party and watch grown adults turn into competitive vultures. I've seen polite dinner parties devolve into feeding frenzies over these little gems.
- Make-Ahead Magic: They keep for weeks, getting better as the flavors meld. Make a big batch and you've got instant hostess gifts, midnight snacks, and "I forgot it was Valentine's Day" insurance.
Alright, let's break down exactly what goes into this masterpiece...
Inside the Ingredient List
The Flavor Foundation
Organic oranges are non-negotiable here, folks. I know, I know — "but organic costs more!" Trust me, you're about to eat the skin of this fruit. Every pesticide, wax, and weird chemical lives in that peel. Organic oranges taste like actual oranges, not like orange-scented cleaning products. You'll need four large ones, and size matters because bigger peels mean easier handling and more candy per orange. When you're selecting them, give them a gentle squeeze. They should feel heavy for their size, with skin that springs back slightly. If it feels like a leather baseball, move on.
The sugar does double duty here. First, it creates that luscious syrup that transforms tough orange peels into tender candy. But it's also a preservative, which means your candied peels will last practically forever in their sugary cocoon. I use plain granulated sugar because it dissolves cleanly and lets the orange flavor shine. Some recipes call for superfine sugar, but that's just one more thing to buy. Regular sugar works perfectly if you're patient enough to let it dissolve properly.
The Chocolate Champions
Here's where quality really matters. That bargain-bin chocolate that's been sitting on the shelf since the Clinton administration? Leave it there. You want dark chocolate with at least 70% cocoa because it has enough backbone to stand up to the sweet orange candy. Anything less and you'll get this weird, cloying situation where the chocolate disappears under the sugar. Look for chocolate that snaps cleanly when you break it, with a glossy surface and no weird white streaks. Those streaks mean it's bloomed, which won't affect safety but will make your finished candy look like it's got dandruff.
Seven ounces sounds oddly specific, but it's the perfect amount for coating all your peels without leaving you with a puddle of leftover chocolate. If you end up with extra, that's not a problem — that's tomorrow's hot chocolate. The chocolate needs to be chopped into small, even pieces so it melts uniformly. Big chunks will leave you with half-melted chocolate that seizes up faster than you can say "microwave disaster."
The Unexpected Game-Changers
Water seems boring until you realize it's doing all the heavy lifting. It dissolves the sugar, creates the syrup, and carries the orange oil throughout the candy. Use filtered water if your tap water tastes like a swimming pool. You only need one cup, but that cup is crucial for getting the right syrup consistency. Too little and you're making orange-flavored concrete. Too much and you'll be simmering until your grandchildren graduate college.
That optional extra sugar for tossing? It's not just for pretty sparkles. It creates a thin, dry shell that keeps the peels from sticking together in storage. Think of it as candy armor. Plus, there's something deeply satisfying about watching your friends try to eat these gracefully while sugar cascades down their shirts like tiny sweet snowstorms.
Everything's prepped? Good. Let's get into the real action...
The Method — Step by Step
- Prep Your Peels Like a Pro: Cut your oranges into quarters and gently peel away the fruit, leaving the white pith attached to the peel. Don't panic about that white stuff — it's not the bitter enemy everyone claims. In fact, it helps the peels hold their shape during cooking. Slice the peels into strips about the width of your pinky finger. They'll look huge, but they shrink dramatically during cooking. Rinse them under cold water, then blanch them in boiling water for 15 minutes. This removes excess bitterness and starts softening the peels. Drain and repeat this blanching process once more. Your kitchen will smell like an orange grove exploded, which is exactly what we want.
- Create the Sugar Spa: In a wide, heavy-bottomed pan, combine your two cups of sugar with one cup of water. Stir over medium heat just until the sugar dissolves, then stop stirring completely. I know every fiber of your being wants to keep stirring, but resist. Stirring after the sugar dissolves can cause crystallization, which turns your smooth syrup into gritty sugar concrete. Once it comes to a gentle boil, add your blanched orange peels. They'll float like little orange lifeboats — this is normal.
- The Lazy Simmer Technique: Here's where my method diverges from the candy police. Reduce the heat to low and let it bubble gently for about 20 minutes. Don't hover. Don't adjust. Just let it do its thing. The syrup will gradually thicken and transform from watery to the consistency of thin honey. The peels will darken to a gorgeous amber color and become translucent around the edges. If you've ever struggled with this, you're not alone — and I've got the fix. The secret is patience and low heat. High heat makes tough candy, low heat makes tender jewels.
- The Dry-Out Dance: Using tongs, lift the peels out of the syrup and arrange them on a wire rack set over a baking sheet. They'll be sticky and glossy, like orange stained glass. Let them dry for at least four hours, preferably overnight. If you live somewhere humid, point a fan at them. They don't need to be rock-hard, just dry enough to handle without leaving sugar fingerprints on everything you touch. Save that orange syrup — it's liquid gold for cocktails, tea, or drizzling over ice cream.
- Chocolate Time Magic: Chop your chocolate into small, even pieces and microwave it in 30-second bursts, stirring between each burst. When it's about 80% melted, stop microwaving and just keep stirring. The residual heat will melt the rest, giving you perfectly tempered chocolate without any fancy equipment. It should be glossy and smooth, coating your spoon like liquid velvet. If it seizes up and gets grainy, add a teaspoon of vegetable oil and stir like your life depends on it.
- The Dip and Set: Hold each candied peel by one end and dip it about three-quarters into the chocolate. Let the excess drip off, then place it on parchment paper. The chocolate should set within 15 minutes at room temperature, or 5 minutes in the fridge if you're impatient (guilty). Don't worry about making them perfect — the rustic, handmade look is part of their charm. Plus, when they're irregular, people think you slaved over them even more.
- Sparkle Finish: If you're using the extra sugar for coating, wait until the chocolate is just set but still slightly soft. Toss a few peels at a time in a bowl with the sugar, then return them to the parchment. The sugar will stick to any exposed spots and create that professional confectioner's sparkle. It's like edible glitter, but actually tastes good.
- The Grand Finale: Arrange your finished candies on a pretty plate and prepare for the compliments to roll in. They keep for weeks in an airtight container, getting better as the flavors meld. But let's be real — they won't last a week. You'll find yourself making excuses to "check on them" every time you walk past the kitchen. That's the moment of truth when you realize you've created something truly dangerous: candy that's way too easy to access.
That's it — you did it. But hold on, I've got a few more tricks that'll take this to another level...
Insider Tricks for Flawless Results
The Temperature Rule Nobody Follows
Here's the thing about sugar syrup — it doesn't need to reach some mythical temperature to make perfect candied peel. Most recipes insist on 220°F or some other specific number, but I've made perfect candy when my syrup was barely simmering. The visual cue is everything: when the peels start looking translucent around the edges and the syrup coats a spoon like thin honey, you're done. Overcooking is the enemy here. Too much time in hot syrup and your peels turn into orange-flavored shoe leather that could double as dental floss.
Why Your Nose Knows Best
Your nose is the most underused tool in candy making. When the orange peels are almost done, your kitchen will fill with this intoxicating aroma that's like orange blossom honey mixed with sunshine. If it starts smelling caramelized or toasty, you've gone too far. Pull them immediately. This is worth it — trust your senses, not some arbitrary timer. I've saved more batches by trusting my nose than by following recipe times to the second.
The 5-Minute Rest That Changes Everything
After you dip your peels in chocolate, let them sit for exactly five minutes before moving them. This is when the chocolate starts to crystallize properly. If you move them too soon, you'll get those annoying chocolate footprints on your parchment. Too late and they stick like they're glued down. Five minutes is the sweet spot where they release easily but have that perfect professional bottom. A friend tried skipping this step once — let's just say it didn't end well. Her chocolate looked like abstract art, not candy.
The Flavor Layering Secret
Want to blow people's minds? Add a tiny pinch of sea salt to the chocolate before dipping. Not enough to make it salty — just enough to make people go "what is that amazing thing I'm tasting?" It's like turning up the contrast on a photo. The salt makes the orange brighter, the chocolate deeper, the whole experience more intense. Start with less than you think you need. You can always add more, but you can't un-salt chocolate.
The Storage Sweet Spot
Here's what nobody tells you: these actually improve with age. The first day, they're good. By day three, the flavors have melded into something transcendent. The orange oil infuses the chocolate, the chocolate mellows the orange, and you get this perfect harmony that makes you understand why people write poetry about food. Store them in a cool, dark place (not the fridge) and they'll be incredible for up to a month. Not that they'll last that long, but it's nice to know you could make them ahead for holiday gifts.
Creative Twists and Variations
This recipe is a playground. Here are some of my favorite ways to switch things up:
The Spicy Seduction
Add a cinnamon stick and two star anise pods to your sugar syrup while it simmers. Remove them before adding the orange peels. The result tastes like Christmas morning in candy form. The warm spices dance with the orange in this sophisticated tango that makes people ask for your secret. Dip in dark chocolate as usual, but dust the tops with a tiny bit of cayenne mixed with sugar. It's like a whisper of heat that hits after you think you're done tasting.
The White Chocolate Wonder
Use white chocolate instead of dark, but add a teaspoon of matcha powder to the chocolate when melting. The green tea's earthiness prevents the white chocolate from being cloyingly sweet, and the color combination is stunning — orange jewels wrapped in pale green. It's like springtime in candy form. These look especially gorgeous in little cellophane bags with gold ribbon. People assume you bought them at some fancy boutique.
The Boozy Batch
Replace two tablespoons of the water in your syrup with Grand Marnier or Cointreau. The alcohol cooks off, leaving behind this incredible depth of flavor that makes people close their eyes when they taste it. It's like the difference between a painting and a photograph — both are nice, but one has soul. These are dangerous because they don't taste alcoholic, so people pop them like, well, candy.
The Tropical Twist
Use a mix of orange and lemon peels, adding some lime peels for the last five minutes of simmering. Dip in chocolate, then immediately roll the chocolate-coated ends in toasted coconut. It's like a tropical vacation in candy form. The combination of citrus keeps it bright and interesting, never one-note. These disappear at summer parties faster than ice cream in July.
The Nutty Professor
After dipping in chocolate, roll the bottom third in very finely chopped pistachios or hazelnuts. The nuts add this incredible texture contrast and make them look like they came from a Swiss chocolate shop. Plus, you can tell yourself they're healthy because nuts have protein. That's how logic works, right? I've fooled myself into eating a dozen this way.
The Coffee Lover's Dream
Add a teaspoon of instant espresso powder to your chocolate before melting. The coffee flavor is subtle — it doesn't scream "coffee!" but it makes the chocolate taste more chocolatey, if that makes sense. It's like the chocolate equivalent of turning up the bass on a song. Coffee and orange is an underrated combination that deserves more love. These are what you serve after dinner when you want people to think you're sophisticated.
Storing and Bringing It Back to Life
Fridge Storage
Don't do it. Just don't. The fridge is the enemy of chocolate's glossy finish and the orange's chewy texture. Cold temperatures make chocolate bloom into those weird white streaks, and your perfect candy starts looking like it's got a skin condition. Plus, the moisture in refrigerators turns your crisp candy coating into sticky sadness. Room temperature in an airtight container is your golden ticket. I keep mine in a pretty tin on the highest shelf, partly because it's cooler there, partly because it requires effort to reach them, which is the only thing slowing down my consumption.
Freezer Friendly
Okay, here's where we make an exception. These freeze beautifully for long-term storage, but there's a trick. Wrap them individually in wax paper, then pack them in a freezer bag with all the air squeezed out. When you're ready to eat, let them come to room temperature while still wrapped. This prevents condensation from ruining the chocolate's shine. They'll keep for three months this way, though I've never tested that limit because, well, they keep disappearing. Frozen ones have this amazing texture — the chocolate snaps even more dramatically, and the orange candy becomes this incredible chewy contrast.
Best Reheating Method
These don't need reheating, but if they've been stored somewhere cool and you want to bring back that just-made magic, here's the move. Place them on a plate and let them sit at room temperature for 30 minutes. If your chocolate has bloomed (those white streaks), you can gently warm them in a 200°F oven for literally two minutes, just until the chocolate starts to look glossy again. Any longer and you'll have orange-flavored chocolate puddles. Add a tiny splash of orange extract to the container when storing — it refreshes the citrus scent and makes them taste like you just made them.