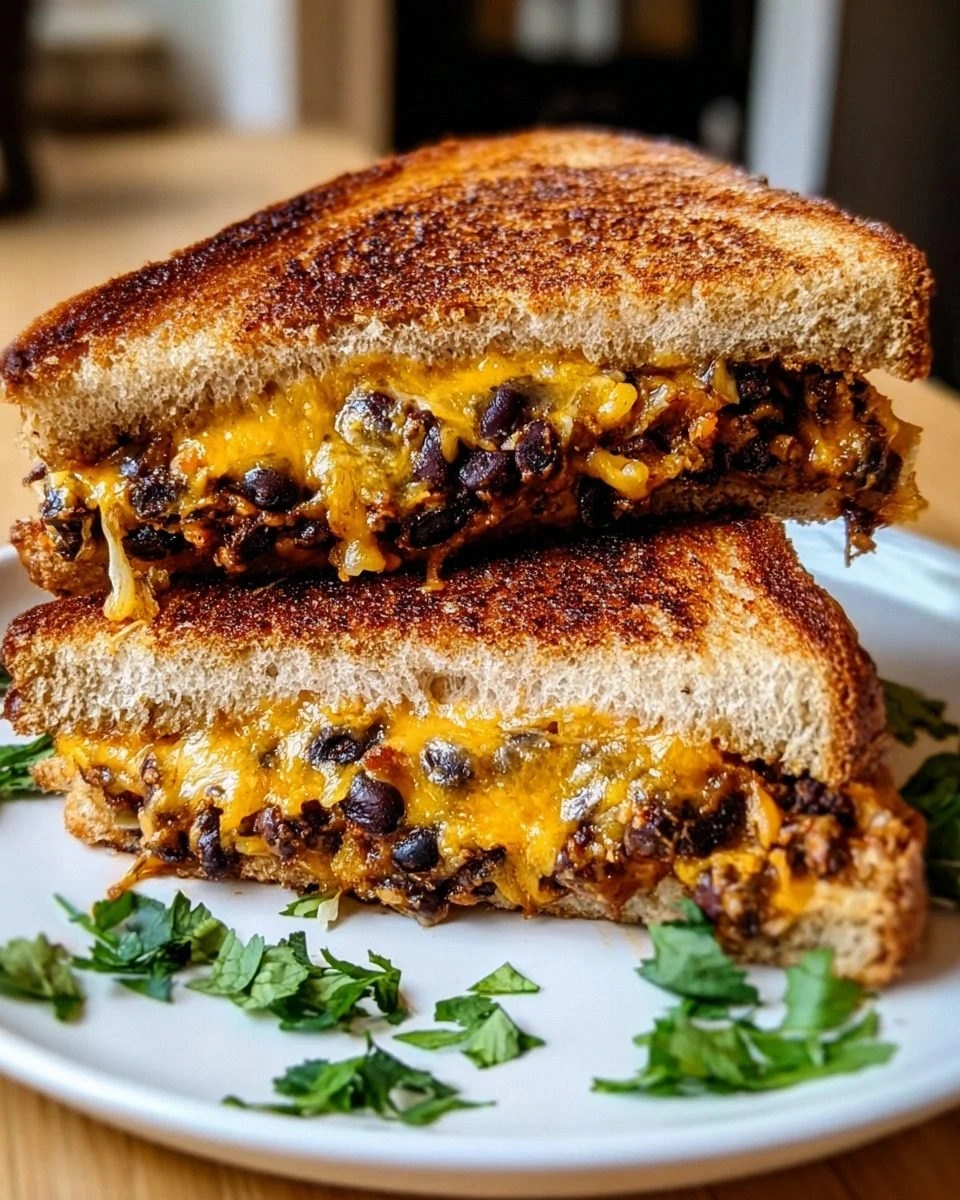
I was standing in my kitchen, half‑asleep, when the toaster popped and a rogue slice of bread landed on the floor with a thud that sounded suspiciously like a tiny drumroll. I stared at the soggy piece, the faint smell of burnt toast mingling with the lingering scent of last night’s salsa, and thought, “What if I could turn this disaster into the most addictive grilled cheese ever?” That moment sparked a daring experiment that has now become my go‑to comfort food. I tossed a can of black beans into the mix, grabbed a handful of shredded cheddar, and set a skillet to medium‑high, daring the universe to keep up. The result? A sandwich that crunches like a fresh‑baked tortilla, oozes cheese like a molten lava flow, and surprises you with a bean‑filled heart that sings with cumin and lime.
Picture the scene: the kitchen humming with the soft hiss of butter hitting the pan, the golden‑brown crust forming a crisp armor around a melty interior. The aroma is a symphony—smoky paprika, sweet onion, and a whisper of garlic that makes your nostrils do a happy dance. When you finally bite, the crunch gives way to a creamy, slightly spicy bean mash that clings to the cheese like a loyal sidekick. Your taste buds register a cascade of textures: the buttery crunch, the silky cheese, the earthy beans, and a bright pop of cilantro that feels like a confetti cannon in your mouth. It’s the kind of sandwich that makes you pause, stare at it reverently, and then devour it in a glorious second‑hand sprint to the sink.
Most grilled cheese recipes treat the sandwich as a simple, two‑ingredient affair—bread and cheese—and that’s where they go wrong. They ignore the potential of a flavor‑packed filling that can turn a humble comfort dish into a show‑stopper. This version stands out because it layers layers of taste, texture, and aroma, turning each bite into a mini‑adventure. The black beans add protein and a subtle earthiness, while the cumin and smoked paprika give a smoky depth that you’d normally only find in a taco. And the lime juice? That final splash is the secret weapon that cuts through the richness, leaving a clean finish that makes you want another bite—yes, I dare you to taste this and not go back for seconds.
I’ll be honest—after the first round, I ate half the batch before anyone else could even sniff the kitchen. But that’s the beauty of this sandwich: it’s addictive, it’s satisfying, and it’s surprisingly easy to make once you know the trick. The trick is a quick sauté of onions and garlic that creates a base so flavorful you’ll swear you’ve been cooking for years. And there’s a little surprise ingredient that most people skip, which I’ll reveal later in the method. So buckle up, keep your spatula ready, and let’s walk through every single step—by the end, you’ll wonder how you ever made it any other way.
What Makes This Version Stand Out
- Flavor Explosion: The combination of black beans, cumin, smoked paprika, and a splash of lime creates a depth that ordinary grilled cheese simply can’t match. Each bite delivers a balanced punch of smoky, tangy, and savory notes that dance across your palate.
- Texture Harmony: You get a crunchy, buttery crust, a gooey cheese pull, and a creamy bean mash that holds everything together. The contrast keeps you interested from the first bite to the last.
- Simplicity Meets Sophistication: Despite the complex flavor profile, the recipe uses pantry staples and takes under an hour from start to finish. No fancy equipment required—just a skillet and a spatula.
- Versatile Crowd‑Pleaser: Whether you’re feeding kids, impressing friends, or craving a solo snack, this sandwich satisfies all ages. The optional chili powder lets you dial up the heat for the adventurous eaters.
- Ingredient Quality: Using a good-quality canned black bean and fresh cilantro makes a noticeable difference. The beans stay firm, the cilantro stays bright, and the cheese melts perfectly.
- One‑Pan Efficiency: The entire sandwich is assembled and cooked in a single pan, meaning less cleanup and more time enjoying the food. The pan also caramelizes the onions, adding an extra layer of flavor.
- Make‑Ahead Potential: The bean filling can be prepared ahead of time and stored in the fridge for up to three days, so you can assemble the sandwiches whenever hunger strikes.
- Health Boost: Black beans bring protein and fiber, while the sandwich still feels indulgent. You get a balanced meal that fuels you without feeling heavy.
Inside the Ingredient List
The Flavor Base
The heart of this sandwich is the bean mixture, and it starts with a can of black beans. A single 15‑ounce can, drained and rinsed, yields about 1½ cups of beans that provide a creamy, earthy foundation. If you skip the beans, you lose the protein punch and the satisfying bite that makes this sandwich more than just cheese on bread. You can swap for canned kidney beans or even cooked lentils, but the flavor will shift from smoky to earthy, and the texture will be less buttery. When selecting beans, look for ones packed in water rather than oil to keep the sandwich light.
The Aroma Trio
Olive oil, onion, and garlic are the holy trinity that builds the aromatic base. Two tablespoons of olive oil coat the pan, ensuring the onions caramelize without burning. Finely chopped onion (about half a cup) releases its natural sugars, creating a sweet undertone that balances the spices. Minced garlic—two cloves—adds a pungent kick that instantly awakens the senses. If you forget the garlic, the sandwich feels flat; if you overcook the onions, you’ll get bitterness. For a milder version, use a sweet onion; for extra depth, try a mix of yellow and red onions.
The Spice Symphony
Ground cumin, smoked paprika, and optional chili powder are the spices that turn a simple bean mash into a fiesta. One teaspoon of cumin brings an earthy warmth, while one teaspoon of smoked paprika adds a subtle wood‑smoke flavor that mimics a grill. If you crave heat, a half‑teaspoon of chili powder injects a gentle fire without overwhelming the other flavors. Skipping the cumin makes the beans taste bland; omitting smoked paprika removes the signature smoky note that makes this sandwich unforgettable. Feel free to experiment with a pinch of coriander or a dash of oregano for a different twist.
The Fresh Finish
Fresh cilantro and lime juice provide the final burst of brightness that cuts through the richness of the cheese and butter. Two tablespoons of chopped cilantro add a herbaceous pop, while one tablespoon of lime juice introduces a citrusy tang that lifts the entire sandwich. If you’re not a cilantro fan, substitute with fresh parsley or a pinch of dried oregano; the lime remains essential for balance. Skipping the lime will leave the bean mixture tasting heavy, and the sandwich will feel more like a dense, cheesy slab than a lively bite.
The Structural Elements
The sandwich’s backbone is the bread and cheese, of course. Eight slices of sturdy sandwich bread—whether whole wheat, sourdough, or classic white—hold up to the weight of the bean filling without falling apart. Shredded cheddar or Monterey Jack, about two cups, guarantees a gooey melt that stretches with each pull. Finally, two tablespoons of softened butter create a golden crust that crackles like fireworks when it hits the pan. If you prefer a dairy‑free version, use a plant‑based cheese that melts well and a vegan butter alternative; just be aware the texture will differ slightly.
The Binding Agent
Salt and black pepper are the unsung heroes that round out the flavor. A half‑teaspoon of salt and a quarter‑teaspoon of black pepper are enough to enhance the beans without overwhelming them. Remember, the cheese and butter already bring some salt, so taste before adding more. If you’re watching sodium, reduce the salt and rely on the natural seasoning of the beans and spices.
Everything's prepped? Good. Let's get into the real action...
The Method — Step by Step
Heat a large skillet over medium heat and add two tablespoons of olive oil. As the oil shimmers, you’ll hear a faint sizzle—this is the moment the pan tells you it’s ready. Toss in the finely chopped onion and let it cook for about three minutes, stirring occasionally until it becomes translucent and starts to caramelize. This is the foundation of flavor; if the onions burn, the whole sandwich will taste bitter, so keep the heat steady.
Kitchen Hack: Add a pinch of sugar to the onions while they sauté; it accelerates caramelization and deepens the sweetness.When the onions are golden, stir in the minced garlic and cook for another 30 seconds—just until fragrant. You’ll notice the kitchen filling with that unmistakable garlic aroma that makes you want to inhale deeply. If you leave the garlic too long, it will turn bitter, so keep a close eye on it.
Now add the drained black beans to the pan, breaking them up with a wooden spoon. Sprinkle in one teaspoon of ground cumin, one teaspoon of smoked paprika, and, if you like heat, half a teaspoon of chili powder. Stir everything together and let the mixture simmer for four to five minutes, allowing the spices to coat each bean like a warm blanket. Taste at this point; you should feel a subtle earthiness with a hint of smokiness.
Finish the bean mixture with a half‑teaspoon of salt, a quarter‑teaspoon of black pepper, two tablespoons of chopped cilantro, and a generous splash of lime juice—about one tablespoon. The lime will sizzle slightly as it meets the hot beans, releasing a citrusy vapor that brightens the entire pan. Give the mixture a final stir, then remove it from the heat and set it aside while you prep the bread.
While the bean mixture rests, spread softened butter on one side of each slice of bread. I like to butter the outside only, leaving the inside clean for the cheese and beans. This creates that iconic crispy, golden crust that shatters like thin ice when you bite into it.
Watch Out: If you butter both sides, the sandwich will become soggy; only the outer sides should be buttered for maximum crunch.Lay four slices of bread butter‑side‑down on a clean surface. Evenly distribute the shredded cheese over each slice—about a half‑cup per slice, which totals roughly two cups for the whole batch. The cheese should cover the surface but not spill over the edges; this ensures a perfect melt without leaking.
Spoon a generous portion of the bean mixture onto the cheese, spreading it out to the edges but leaving a small border to prevent overflow. The beans should be layered thick enough that each bite delivers a creamy bite, yet thin enough that the cheese still dominates the flavor profile. Press lightly with the back of a spoon to compact the filling.
Top each sandwich with the remaining bread slices, butter‑side‑up. Gently press down so the sandwich holds together, then let it rest for a minute while the butter settles. This short rest helps the cheese adhere to the beans, reducing the chance of a messy collapse.
Return the skillet to medium‑low heat and carefully place the assembled sandwiches into the pan. Cook for three to four minutes on the first side, watching for the edges to turn a deep golden brown and the cheese to start bubbling. You’ll hear a faint crackle as the butter fries—this is the sound of perfection.
Flip the sandwiches with a wide spatula, pressing gently to ensure even browning. Cook the second side for another three to four minutes, or until the cheese is fully melted and the bread is crisp enough to echo when you tap it. If the cheese isn’t fully melted, lower the heat slightly and cover the pan for a minute; the trapped steam will finish the melt without burning the crust.
Kitchen Hack: Use a lid to trap steam for the last 30 seconds of cooking; this guarantees a uniformly gooey interior without soggy bread.
That's it — you did it. But hold on, I've got a few more tricks that'll take this to another level. The next section will reveal insider secrets that turn a great sandwich into a legendary one, ensuring every bite is as unforgettable as the first.
Insider Tricks for Flawless Results
The Temperature Rule Nobody Follows
Most home cooks crank the heat up to get that crust fast, but the secret is to start low and finish high. Begin at medium‑low to let the cheese melt gently; once the cheese is bubbling, crank the heat to medium‑high for the final minute to achieve that crisp, caramelized exterior. I once tried the “high‑heat all the way” method and ended up with burnt butter and under‑melted cheese—a disaster that taught me the value of patience. Keep a close eye on the color; a light amber hue means you’re on the right track.
Why Your Nose Knows Best
Your sense of smell is a more reliable indicator than a timer. When the butter sizzles and the onions start to caramelize, you’ll smell a sweet, nutty fragrance—that’s your cue to add the garlic. Later, when the cheese begins to ooze, you’ll catch a buttery, milky scent that signals the sandwich is ready to flip. Trusting your nose prevents overcooking and ensures each layer hits its peak flavor.
The 5‑Minute Rest That Changes Everything
After flipping the sandwich, let it rest in the pan for about five minutes, covered loosely with foil. This short rest allows the heat to distribute evenly, finishing the melt and letting the bean mixture settle. One of my friends skipped this step and ended up with beans spilling out the sides, turning the sandwich into a sloppy mess. A brief pause makes the interior set, so the sandwich holds together when you slice it.
Butter vs. Oil: The Golden Dilemma
While butter gives that classic flavor, a touch of oil raises the smoke point, preventing the butter from burning. I blend one tablespoon of olive oil with one tablespoon of softened butter for the perfect balance—rich taste without the bitter burnt notes. If you’re dairy‑free, replace butter with a plant‑based spread and add a drizzle of oil for the same effect.
The Secret Ingredient: A Pinch of Smoked Sea Salt
Adding a pinch of smoked sea salt to the bean mixture just before finishing elevates the smoky profile without overwhelming the palate. It’s subtle, but it makes the flavor depth feel more layered, as if you’d grilled the beans over an open flame. I tried the sandwich without this pinch, and while still good, it missed that lingering smoky whisper that makes you close your eyes and sigh.
Creative Twists and Variations
This recipe is a playground. Here are some of my favorite ways to switch things up:
Spicy Chipotle Kick
Swap the smoked paprika for chipotle powder and add a tablespoon of adobo sauce to the bean mixture. The result is a smoky, fiery sandwich that pairs perfectly with a cool avocado spread. Great for those who love a bold, smoky heat.
Mediterranean Flair
Replace the black beans with a mixture of roasted red peppers and artichoke hearts, and use feta cheese instead of cheddar. Add a drizzle of olive tapenade for an umami punch. This version feels lighter and is perfect for a brunch gathering.
Breakfast Boost
Add a scrambled egg layer between the cheese and beans, and use a slice of crisp bacon as a topping after cooking. The added protein makes it a hearty breakfast that will keep you fueled all morning. Serve with a side of fresh fruit for balance.
Vegan Victory
Swap the cheese for a dairy‑free cheddar alternative, use vegan butter on the bread, and keep the black bean mixture as is. Add a dash of nutritional yeast to the beans for a cheesy undertone. This version satisfies vegans without sacrificing the gooey, crunchy experience.
Sweet & Savory Fusion
Incorporate a thin layer of caramelized pineapple slices inside the sandwich and use a hint of honey in the bean mixture. The sweet pineapple contrasts beautifully with the smoky beans and cheese, creating a tropical twist that’s unexpectedly delightful.
Storing and Bringing It Back to Life
Fridge Storage
Place any leftover sandwiches in an airtight container or wrap tightly in foil. They’ll stay fresh for up to three days. When you’re ready to eat, reheat in a skillet over medium heat for about two minutes per side, adding a tiny splash of water to the pan and covering briefly; the steam revives the crust while keeping the interior moist.
Freezer Friendly
Wrap each sandwich individually in parchment paper, then place them in a zip‑top freezer bag. They freeze well for up to two months. To reheat, thaw overnight in the fridge, then toast in a preheated oven at 375°F for 10‑12 minutes, or pan‑fry directly from frozen with a little extra butter.
Best Reheating Method
For the ultimate revival, use a skillet: melt a small knob of butter, add the sandwich, and cover with a lid for the first minute. The lid traps steam, melting the cheese, while the butter crisps the bread. Finish uncovered for another minute to restore that golden crunch. This method avoids sogginess and brings back the original texture.