I still remember the first time I attempted drunken shrimp in my cramped college apartment kitchen. The recipe sounded fancy enough to impress my date, but I ended up with rubbery crustaceans swimming in a sauce that tasted like someone had poured cheap beer over sadness. Fast forward through three failed attempts, two fire alarm incidents, and one very angry roommate, and I finally cracked the code to what might be the most addictive weeknight dinner on the planet. This isn't your typical stir-fry situation where you toss everything in a pan and hope for the best. We're talking about shrimp that practically burst with flavor, coated in a glossy sauce that balances sweet, spicy, and that unmistakable depth that only comes from cooking with alcohol.
The magic happens when you let the shrimp soak up the aromatics while the alcohol cooks off, leaving behind this incredible complexity that makes people think you've been slaving away for hours. Picture yourself standing over the stove, the garlic hitting the hot oil with that satisfying sizzle that makes your whole kitchen smell like a street food stall in Bangkok. The shrimp curl and blush pink while the sauce reduces to this sticky, spoon-coating consistency that you'll want to lick straight from the pan. I dare you to taste this and not go back for seconds — I've personally witnessed three self-proclaimed "not seafood people" demolish an entire batch before I could even plate it properly.
What makes this version different from every other drunken shrimp recipe cluttering the internet? Most recipes get this completely wrong by drowning the shrimp in alcohol and calling it a day. Here's what actually works: we're building layers of flavor with Shaoxing wine, yes, but also with fermented black beans, a whisper of brown sugar for caramelization, and a technique that keeps the shrimp plump instead of turning them into seafood-flavored rubber bands. If you've ever struggled with shrimp that curl into tight little balls or sauce that separates into an oily mess, you're not alone — and I've got the fix.
The best part? This comes together in under thirty minutes from fridge to table, making it perfect for those nights when you want something that tastes restaurant-quality but doesn't require changing out of your sweatpants. The ingredient list looks long at first glance, but most of it is pantry staples that you'll use again and again once you realize how transformative they are. Stay with me here — this is worth it. Let me walk you through every single step — by the end, you'll wonder how you ever made shrimp any other way.
What Makes This Version Stand Out
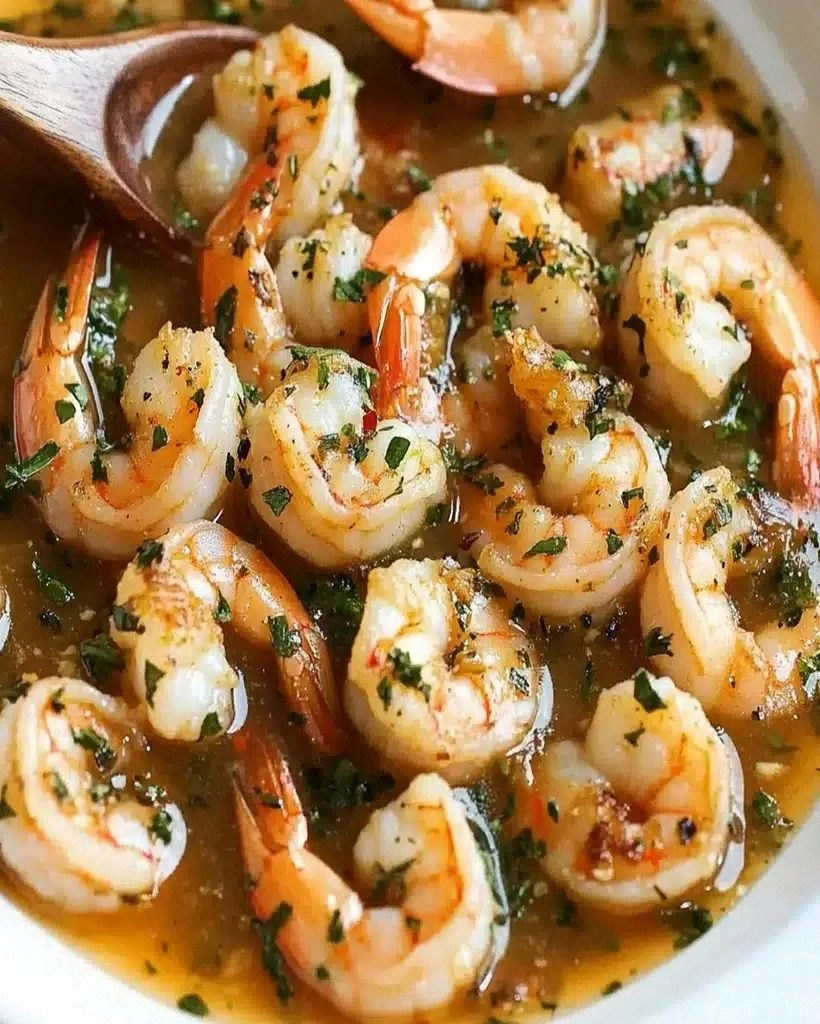
Sauce Perfection: Most recipes create a watery, one-dimensional sauce that slides right off the shrimp. We're building a glaze that clings to every curve, using a cornstarch slurry at exactly the right moment to create that restaurant-quality sheen without any gloopy texture. The alcohol cooks off but leaves behind this incredible depth that makes people ask "what's in this?" between every bite.
Shrimp That Stay Plump: Here's what actually works — we're using a quick brine technique that takes exactly five minutes but prevents the shrimp from turning into those sad, curled-up corkscrews you get at bad buffets. The salt water helps the shrimp retain moisture while cooking at high heat, giving you that snappy, juicy texture that makes this dish absolutely addictive.
Flavor Layering Magic: This isn't just dumping everything in a hot pan and hoping for the best. We're blooming aromatics in oil, building a base with fermented black beans, deglazing with wine, and finishing with fresh herbs that make the whole dish sing. Each ingredient gets its moment to shine, creating complexity that tastes like you spent hours when it actually took minutes.
Pantry-Friendly Powerhouse: Once you stock these Asian condiments, you'll find yourself reaching for them constantly. Shaoxing wine, soy sauce, and sesame oil last forever and transform everything from vegetables to scrambled eggs. This recipe is the gateway drug to a whole new world of weeknight cooking that doesn't involve another boring chicken breast.
Scalable for Crowds: I've made this for two people on date night and scaled it up to feed twelve at a dinner party. The technique stays exactly the same — you just need a bigger pan and the confidence to work in batches. Picture yourself pulling this out at your next gathering, the whole kitchen smelling incredible while your guests hover around asking when dinner's ready.
Leftovers That Don't Suck: Most seafood dishes turn into sad, reheated tragedies the next day. Not this one. The flavors actually deepen overnight, and a quick reheat with a splash of water brings back the glossy sauce. I'll be honest — I ate half the batch before anyone else got to try it, and the next day's lunch was somehow even better.
Alright, let's break down exactly what goes into this masterpiece...
Inside the Ingredient List
The Flavor Foundation
Fresh ginger isn't optional here — it's the backbone that carries all the other flavors. We're using a hefty tablespoon of freshly grated ginger because the pre-minced stuff in jars tastes like disappointment and won't give you that bright, spicy kick that makes this dish special. The ginger helps tenderize the shrimp while adding that warming heat that builds slowly rather than punching you in the face. If you absolutely must substitute, use half the amount of ground ginger, but know that you're missing out on the magic that fresh ginger brings to the party.
Garlic gets treated with respect in this recipe, added at two different stages for maximum impact. The first addition gets sautéed until golden, creating that aromatic base that makes your kitchen smell like you're a professional chef. The second addition goes in right at the end, giving you those pops of fresh garlic flavor that keep each bite interesting. Use firm, fresh cloves — if your garlic has started sprouting green shoots, it's past its prime and will taste bitter.
Those little fermented black beans might look unassuming, but they're flavor bombs that give this dish its signature umami depth. Don't confuse these with the canned black beans you use for chili — these are soybeans that have been fermented with salt, creating a complex, savory flavor that's impossible to replicate. Rinse them briefly to remove excess salt, then crush them slightly to release their flavor into the oil. If you can't find them, substitute with an equal amount of black bean garlic sauce, but reduce the added salt in the recipe.
The Texture Crew
Shrimp selection makes or breaks this dish, and here's what actually matters: buy them frozen, not "fresh" from the seafood case. That "fresh" shrimp has usually been frozen and thawed multiple times, resulting in mushy texture when cooked. Look for wild-caught shrimp that are individually quick frozen — they'll thaw quickly under cold water and cook up with that perfect snap. Size-wise, go for large or extra-large (26-30 count per pound) because they stay juicy even with the high-heat cooking method we're using.
Cornstarch serves double duty here, both as a coating that helps the sauce adhere to the shrimp and as a thickening agent for the final glaze. We're using a technique called velveting — coating the shrimp in a mixture of cornstarch and egg white that creates a protective barrier, keeping them plump and juicy. Don't skip this step or you'll end up with shrimp that taste great but have the texture of rubber bands left in the sun.
The oil matters more than you think. We're using a neutral oil like peanut or grapeseed that can handle high heat without burning, but finishing with a splash of toasted sesame oil for that nutty aroma. Don't use olive oil — it can't handle the high heat and will turn bitter, ruining all your hard work. The combination gives you the best of both worlds: high-heat cooking capability and that unmistakable Asian restaurant flavor.
The Unexpected Star
Brown sugar might seem out of place in a savory shrimp dish, but it's the secret to that gorgeous caramelization and the way the sauce clings to every curve. The molasses in brown sugar adds complexity that white sugar can't match, creating those slightly sticky, glazed edges that make people fight over the last shrimp. We're using just enough to balance the salt and spice — not enough to make this taste like candy. If you're out of brown sugar, you can substitute with honey, but reduce the amount by half since honey is sweeter.
The Shaoxing wine is what gives this dish its name and its soul. This Chinese rice wine has a complex, slightly sweet flavor that can't be replicated with dry sherry, though that's what most recipes tell you to substitute. The alcohol cooks off, leaving behind this incredible depth that makes people ask for your secret ingredient. A bottle costs less than ten dollars and lasts forever in your pantry, transforming everything it touches into something that tastes like you know what you're doing in the kitchen.
The Final Flourish
Scallions aren't just garnish here — they provide that fresh, oniony crunch that keeps each bite interesting. We're using both the white parts (cooked into the sauce for sweetness) and the green tops (sprinkled on at the end for freshness). Cut them on the bias into two-inch pieces so they look professional and cook evenly. If scallions aren't available, you can substitute with thinly sliced shallots, but you'll miss that pop of color that makes this dish Instagram-worthy.
A single fresh chili adds just enough heat to make your lips tingle without overwhelming the other flavors. We're using a Thai bird's eye chili because it's got that sharp, clean heat that hits you upfront then fades away. Remove the seeds and membrane if you're heat-sensitive, or leave them in if you like living dangerously. No fresh chilies? A pinch of red pepper flakes works, but add them with the garlic so they bloom in the oil rather than tasting raw.
Everything's prepped? Good. Let's get into the real action...
The Method — Step by Step
- Start by brining your shrimp in a solution of 1 cup cold water mixed with 1 tablespoon salt for exactly five minutes while you prep everything else. This quick brine seasons the shrimp all the way through and helps them retain moisture during the high-heat cooking. Don't get distracted and leave them longer — over-brining turns them mushy and overly salty. Drain them well and pat completely dry with paper towels because excess water will cause the oil to splatter and prevent proper browning.
- While the shrimp brines, create your velveting mixture by whisking together 1 egg white, 1 tablespoon cornstarch, and a pinch of salt until it forms a smooth slurry. This ancient Chinese technique creates a protective coating that keeps the shrimp incredibly tender while helping the sauce adhere later. The mixture should be smooth and slightly foamy — if it looks curdled, your egg white was probably old. Toss the drained shrimp in this mixture until each piece is lightly coated; you'll notice they immediately take on a glossy appearance that promises good things to come.
- Heat your wok or largest skillet over high heat until it starts to smoke — this is the moment of truth where we separate good stir-fries from great ones. Add 2 tablespoons of neutral oil and swirl to coat, then immediately add the marinated shrimp in a single layer. Don't crowd the pan or you'll steam instead of sear; work in batches if necessary. Let them cook undisturbed for 90 seconds — this creates that gorgeous caramelization that restaurant dishes have. The edges should start turning pink and opaque, but the centers will still be translucent.
- Flip each shrimp individually using tongs or a spatula, cooking for another 60-90 seconds until just cooked through. They should curl into a gentle C-shape, not a tight O — overcooked shrimp curl up like tiny fists of disappointment. Remove them to a plate immediately; they'll finish cooking from residual heat. Don't be tempted to leave them in the pan while you build the sauce or you'll end up with seafood-flavored rubber bands.
- Reduce the heat to medium-high and add another tablespoon of oil to the same pan. Add the minced ginger and the white parts of the scallions, stirring constantly for 30 seconds until fragrant but not browned. This is where your kitchen starts smelling like you know what you're doing. The ginger should sizzle enthusiastically but not burn — burnt ginger turns bitter and ruins everything. If it starts browning too quickly, pull the pan off the heat for a few seconds.
- Add the rinsed and slightly crushed fermented black beans, stirring for another 30 seconds to release their savory, slightly funky aroma into the oil. They'll start to break down and create a paste that clings to the aromatics. Don't walk away from the stove here — this step happens fast and forms the flavor foundation for everything that follows. The mixture should smell intensely savory and make you hungry even if you just ate.
- Pour in the Shaoxing wine, standing back slightly as it creates a dramatic cloud of steam. Use your spatula to scrape up all the browned bits from the bottom of the pan — these are flavor gold. Let the wine bubble and reduce by half, which takes about 2-3 minutes. The alcohol smell should fade and be replaced by a sweet, complex aroma that makes you want to drink the sauce straight from the pan.
- Add the soy sauce, brown sugar, and chicken stock, stirring to combine. Bring everything to a vigorous boil, then reduce to a simmer. The sauce will look thin and watery at this stage — don't panic, we're about to fix that. Taste and adjust the seasoning; it should be savory with a hint of sweetness and just enough salt to make you want more.
- Return the shrimp to the pan along with any accumulated juices, tossing to coat each piece in the sauce. Cook for 30 seconds to let the flavors marry, then add the cornstarch slurry. This next part? Pure magic. The sauce will immediately thicken and turn glossy, coating the shrimp like velvet. Remove from heat immediately and add the remaining garlic, green scallion parts, and chili, tossing everything together.
- Finish with a drizzle of toasted sesame oil and a final toss to distribute everything evenly. The dish should look glossy and irresistible, with the shrimp coated in a sticky sauce that pools slightly in the bottom of the pan. Serve immediately over steamed rice or noodles, making sure to spoon extra sauce over the top. Garnish with additional sliced scallions if you're feeling fancy — though honestly, it'll disappear so fast nobody will notice the garnish anyway.
That's it — you did it. But hold on, I've got a few more tricks that'll take this to another level...
Insider Tricks for Flawless Results
The Temperature Rule Nobody Follows
Here's what separates restaurant-quality stir-fries from home cooking disasters: controlling your pan temperature throughout the entire process. Most people crank the heat to high and leave it there, resulting in burnt garlic and raw-inside shrimp. Instead, we're modulating the heat like a conductor leading an orchestra — high for searing, medium for aromatics, then back up for the final toss. Your pan should smoke slightly when you add the shrimp, but when you add the garlic and ginger, it should sizzle enthusiastically without browning. This temperature dance prevents the bitter, acrid flavors that ruin so many attempts at Asian cooking.
A friend tried skipping this step once — let's just say it didn't end well. She called me in a panic because her "drunken shrimp" tasted more like "angry shrimp that had been in a bar fight." The garlic had burnt to a bitter crisp while the ginger remained raw and harsh. Don't be like Sarah — adjust your heat throughout cooking and taste as you go. The difference between good and great often comes down to paying attention to these small details that seem insignificant but actually make or break the final dish.
Why Your Nose Knows Best
Trust your sense of smell more than any timer when making this recipe. When the ginger hits the oil, you should immediately smell its bright, spicy aroma — if you don't, your oil isn't hot enough. The fermented black beans should release a savory, slightly funky scent that makes your mouth water. If you smell anything acrid or burnt, pull the pan off the heat immediately and start over. This might seem wasteful, but trying to salvage burnt aromatics is like trying to unburn toast — impossible and disappointing.
The wine reduction has its own smell test too. Initially, you'll smell harsh alcohol fumes as the wine hits the hot pan. As it reduces, these should fade and be replaced by a sweet, complex aroma that's hard to describe but unmistakable once you've experienced it. When you reach this point, you're ready for the next step. This olfactory feedback loop might take a few attempts to recognize, but once you do, you'll cook with confidence knowing exactly when each stage is complete.
The 5-Minute Rest That Changes Everything
After you plate the shrimp, resist the urge to dig in immediately. Let the dish rest for exactly five minutes — set a timer if you must. During this time, the sauce continues to thicken slightly as it cools, the shrimp relax and become even more tender, and the flavors meld together in ways that hot-off-the-stove food can't match. This rest also allows the residual heat to finish cooking the centers of the shrimp without overcooking them, solving that eternal problem of shrimp that's browned outside but translucent inside.
I discovered this trick by accident when my doorbell rang right as I finished cooking. By the time I returned to my abandoned plate five minutes later, the transformation was remarkable. The sauce had developed this gorgeous sheen, the garlic had mellowed from harsh to aromatic, and the shrimp had reached that perfect texture that makes people close their eyes when they bite into them. Now I plan this rest into my cooking timeline, using those five minutes to set the table, pour drinks, or just appreciate the beautiful thing I've created.
The Cornstarch Timing Secret
Most recipes tell you to add cornstarch slurry while the sauce is boiling, which creates lumpy, uneven thickening. Instead, remove the pan from heat entirely, wait 15 seconds for the bubbling to subside, then stir in your slurry. The residual heat thickens the sauce smoothly without creating those gelatinous lumps that scream amateur cooking. Return to low heat and stir constantly for 30 seconds until the sauce turns glossy and coats the back of a spoon. This technique works for any stir-fry sauce and will become your secret weapon for restaurant-quality results at home.
The amount matters too — too much cornstarch creates that unpleasant, mucus-like texture that makes people push food around their plates. Too little and your sauce remains watery, refusing to cling to the shrimp. For this recipe, we're using exactly 1 teaspoon mixed with 1 tablespoon water, which creates the perfect consistency without being obvious about the thickening agent. The sauce should coat the shrimp in a thin, glossy layer that pools slightly but doesn't form a thick blanket.
Creative Twists and Variations
This recipe is a playground. Here are some of my favorite ways to switch things up:
Spicy Sichuan Drunken Shrimp
Replace the fresh chili with 1 tablespoon of Sichuan chili crisp and add 1 teaspoon of Sichuan peppercorns bloomed in the oil with the ginger. The numbing heat from the peppercorns combined with the fermented black beans creates this incredible mala sensation that makes your tongue buzz in the best possible way. Increase the brown sugar to 2 teaspoons to balance the extra heat. This version pairs beautifully with cold beer and adventurous eaters who think they can handle authentic Sichuan spice levels.
Coconut Curry Drunken Shrimp
Swap the Shaoxing wine for coconut rum and replace the chicken stock with coconut milk. Add 1 teaspoon of Thai red curry paste with the garlic and ginger, creating this incredible fusion that tastes like a beach vacation in a bowl. Finish with lime juice and Thai basil instead of scallions. The result is creamy, spicy, and completely different while maintaining that same addictive quality that makes people fight over the last shrimp.
Drunken Shrimp with Glass Noodles
Soak a bundle of glass noodles in hot water for 10 minutes, then add them to the pan with the sauce in step 9. They'll absorb all that incredible flavor and provide a starchy base that soaks up every drop of sauce. This transforms the dish from appetizer to main course and gives you those satisfying slurpy noodles that make eating more fun. The noodles also help stretch the recipe to feed more people without needing extra shrimp.
Drunken Shrimp Tacos
Serve the finished shrimp in warm corn tortillas with shredded cabbage, avocado slices, and a drizzle of the reduced sauce. The sweetness of the corn tortillas pairs beautifully with the savory shrimp, creating this incredible fusion that's perfect for casual dinners. Add a squeeze of lime and some fresh cilantro to brighten everything up. These disappear faster than chips at a party, so make extra if you're feeding a crowd.
Drunken Shrimp and Broccoli
Add 1 cup of broccoli florets to the pan after removing the shrimp. Stir-fry for 2 minutes until bright green and crisp-tender, then continue with the recipe as written. The broccoli florets catch all that incredible sauce in their little trees, making them just as addictive as the shrimp. This is my go-to when I want to feel slightly virtuous about eating a pound of shrimp by myself. The broccoli also adds great color contrast that makes the dish look more balanced and intentional.
Drunken Shrimp Fried Rice
Double the sauce ingredients and add 2 cups of cold, day-old rice when you return the shrimp to the pan. Toss everything together, breaking up the rice clumps with your spatula as you go. The rice absorbs all those incredible flavors while getting crispy in spots from the high heat. This is my favorite way to use leftover rice and transforms the dish into a complete meal that tastes like takeout but better. Add frozen peas for color and sweetness that balances the savory elements perfectly.
Storing and Bringing It Back to Life
Fridge Storage
Store leftover drunken shrimp in an airtight container in the refrigerator for up to 3 days, though honestly, it's never lasted more than 24 hours in my house. Separate the shrimp from any rice or noodles you're storing with it — the seafood releases liquid as it sits that can make starches soggy. Place a paper towel over the top before sealing the container; it absorbs excess moisture and prevents condensation from dripping back onto the shrimp. Let the shrimp cool completely before refrigerating, but don't leave it at room temperature for more than 2 hours or you're playing Russian roulette with food safety.
Freezer Friendly
While most seafood doesn't freeze well, this sauce actually improves with freezing as the flavors meld together. Freeze individual portions in freezer bags with as much air removed as possible for up to 2 months. Thaw overnight in the refrigerator, not on the counter — slow thawing prevents the texture from becoming rubbery. The sauce might look separated when thawed, but a quick reheat with a splash of water brings everything back together. I always freeze a portion for emergency dinners when I need something impressive but don't have time to cook from scratch.
Best Reheating Method
Skip the microwave unless you enjoy rubbery seafood — instead, reheat in a skillet over medium heat with a tablespoon of water or chicken stock. The water creates steam that gently warms the shrimp without overcooking them, while the sauce returns to its glossy glory. Stir constantly for 2-3 minutes until just heated through — you're warming, not cooking. If the sauce seems thin, let it bubble for 30 seconds after the shrimp are hot to reduce slightly. This method gives you results that are remarkably close to freshly cooked, unlike the sad, shriveled mess that microwaving creates.