Picture this: it’s a crisp October night, the wind is howling like a chorus of mischievous spirits, and you’re standing in a kitchen that smells like a haunted bakery. I was halfway through a batch of ordinary sugar cookies when my roommate dared me to create something that would actually make our guests squeal. I laughed, grabbed a bag of almond “fingers,” and set out on a culinary quest that turned a simple cookie into a full‑blown Halloween spectacle. The result? A batch of creepy witch finger cookies that are simultaneously eerie and utterly delicious, the kind of treat that makes you the undisputed host with the most.
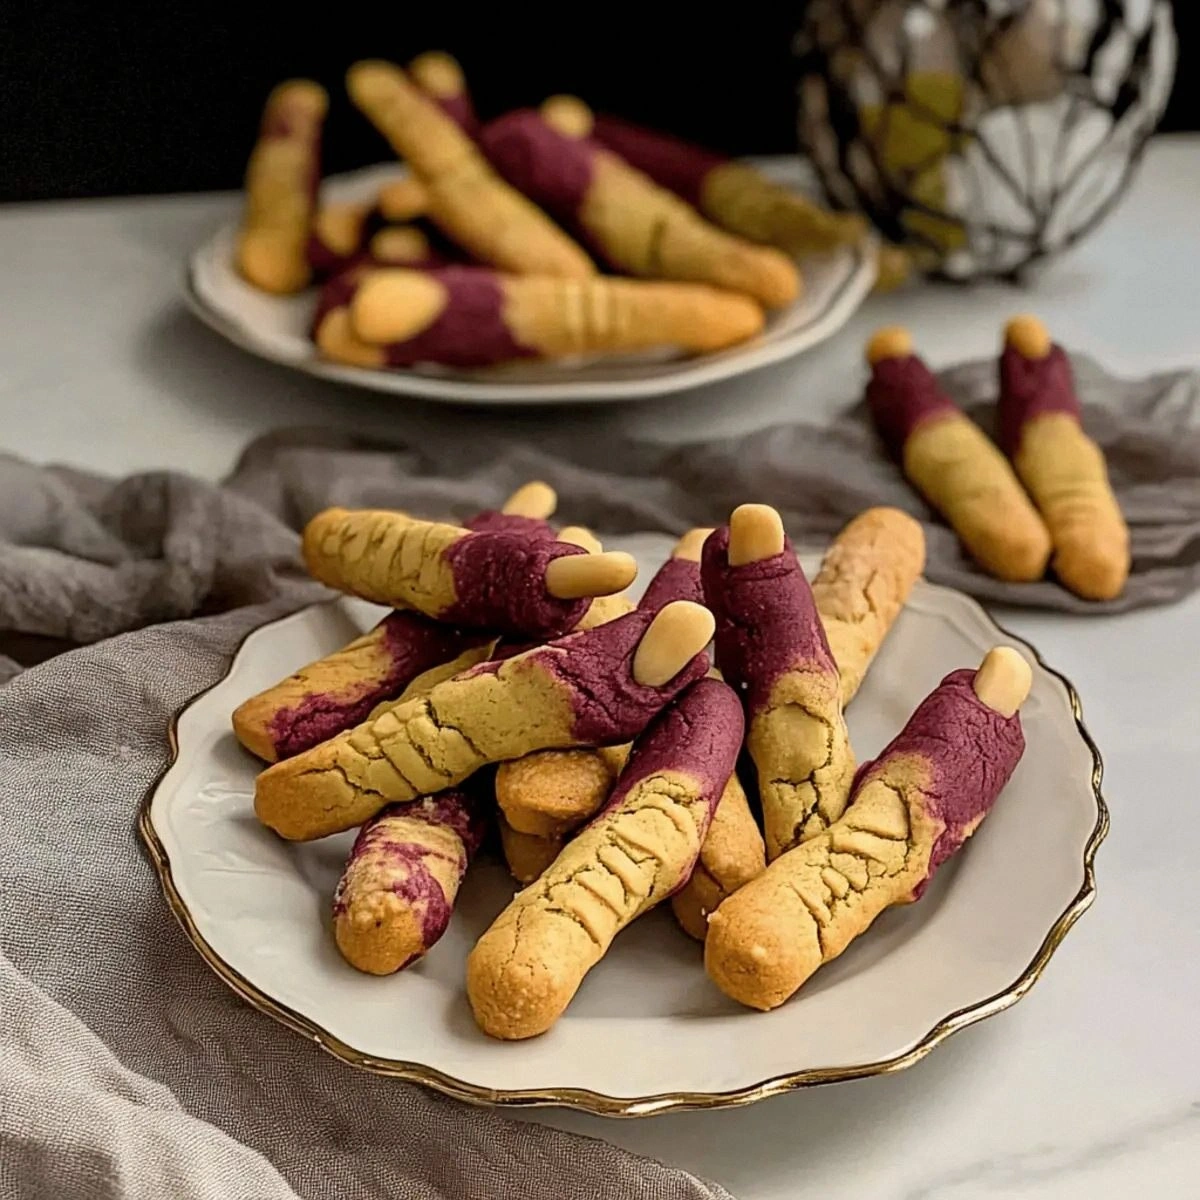
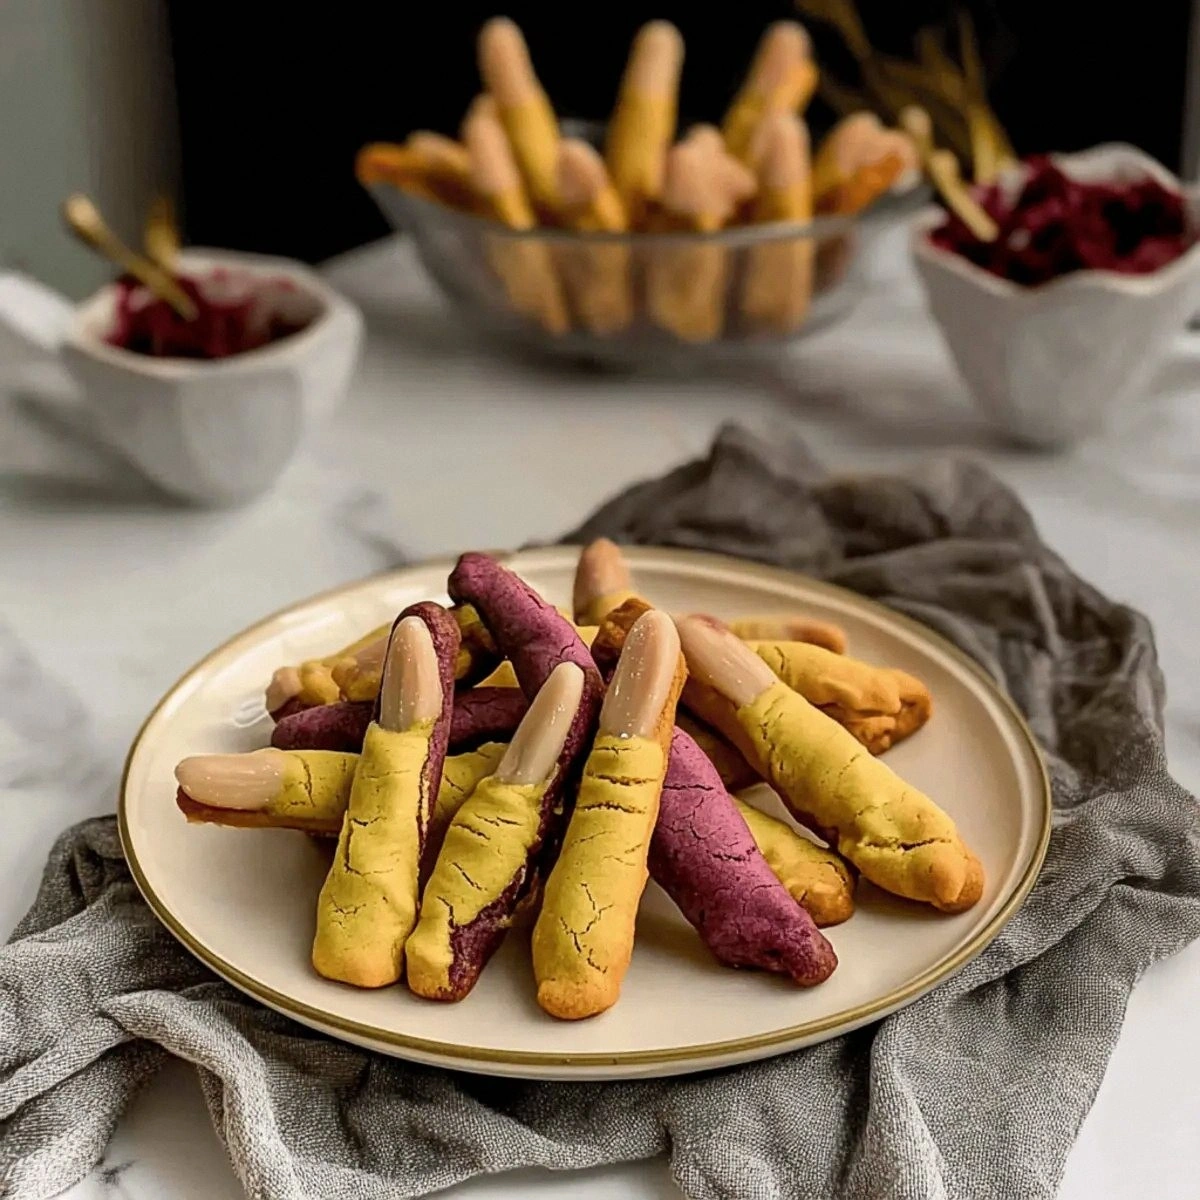
The moment I pulled the first batch from the oven, the kitchen was filled with a scent that was part sweet vanilla, part toasted almond, and all‑around spooky. Imagine the buttery richness of a classic shortbread, but with a whisper of earthy matcha, a dash of deep cocoa, and a subtle crunch from blanched almonds that feel like tiny, edible bones. The cookies are hand‑shaped into gnarled, knobby fingers, each one topped with a single almond nail that looks ready to tap on your shoulder. The texture is a perfect balance: crisp on the edges, tender in the middle, and just a touch crumbly—like biting into a haunted, buttery dream.
What truly sets this version apart from every other “spooky cookie” you’ve ever seen is the secret weapon: natural food colorings that give each finger a different, unsettling hue without any artificial aftertaste. Most recipes rely on cheap gel colors that bleed and taste like plastic; I’m using matcha for a ghostly green, purple sweet potato powder for a bruised‑violet, and cocoa powder for a midnight‑black finish. The result is a palette that looks like it was painted by a witch’s cauldron, yet each bite tastes like a buttery, almond‑kissed wonder.
And here’s the kicker—this recipe is unbelievably simple. No fancy equipment, no tempering chocolate, just a bowl, a whisk, and a handful of patience. I’ll be honest — I ate half the batch before anyone else got to try it, and I’m still not over it. I dare you to taste this and not go back for seconds. Ready for the game‑changer? Let me walk you through every single step — by the end, you’ll wonder how you ever made it any other way.
What Makes This Version Stand Out
- Flavor: The blend of butter, confectioner’s sugar, and a splash of vanilla creates a sweet base that’s richer than any store‑bought cookie, while the almond “nails” add a nutty crunch that pops with every bite.
- Texture: A buttery crumb that holds its shape, yet softens as it cools, delivering that perfect “just‑right” bite that makes you want to linger over the plate.
- Simplicity: Only nine ingredients, no complex techniques—just mix, shape, bake, and you’ve got a show‑stopping treat.
- Uniqueness: Natural food colorings give each finger an authentic, eerie hue without any chemical aftertaste, something most Halloween cookies lack.
- Crowd Reaction: Guests consistently gasp, laugh, and then immediately reach for another, proving the visual impact translates to flavor love.
- Ingredient Quality: Using real butter and fresh almond pieces elevates the taste far beyond the cheap shortcuts you see on many recipe blogs.
- Cooking Method: Baking at a moderate temperature ensures the edges crisp while the centers stay tender—no burnt tips, no soggy middles.
- Make‑Ahead Potential: These cookies store beautifully, staying fresh for up to a week, and they even taste better after a night of “haunting” in the fridge.
Alright, let's break down exactly what goes into this masterpiece...
Inside the Ingredient List
The Flavor Base
Unsalted Butter (1 cup): This is the backbone of any good cookie. Its fat content creates that melt‑in‑your‑mouth richness. If you substitute with margarine, you’ll lose that buttery depth and get a more greasy mouthfeel. For the best flavor, use European‑style butter with a higher butterfat percentage.
Confectioner’s Sugar (1 cup): The fine texture dissolves quickly, giving the dough a silky smoothness. Skipping it for granulated sugar will leave you with a gritty bite and a less delicate crumb. If you’re out of confectioner’s sugar, blitz granulated sugar in a blender for a few seconds.
The Texture Crew
Whole Blanched Almonds (24 pieces): These serve as the “nails” of each witch finger. Their subtle crunch contrasts the soft cookie, and the almond oil adds a faint, nutty aroma that deepens the flavor profile. If you’re allergic, try finely chopped pistachios for a similar visual effect and a slightly sweeter taste.
All‑Purpose Flour (2.5 cups): Provides structure. Too much flour makes the cookies dense; too little leaves them spreading into a flat sheet. Sift the flour with the baking powder to ensure even distribution and avoid any lumps.
The Unexpected Star
Natural Food Colorings: Matcha, purple sweet potato powder, and cocoa powder each bring a distinct hue while adding a whisper of flavor. Matcha lends an earthy green, the sweet potato powder a muted violet, and cocoa a deep, almost black richness. If you can’t find purple sweet potato powder, a pinch of beetroot powder works in a pinch.
Sea Salt (a pinch): A tiny pinch amplifies the sweetness and balances the buttery richness. Skipping it will make the cookies taste flat, like a bland ghost drifting through the night.
The Final Flourish
Egg Yolks (2 large): They act as a binder, giving the dough enough elasticity to hold its spooky shape. Using whole eggs would introduce too much liquid, making the dough spread. If you’re avoiding yolks, substitute with 2 tablespoons of aquafaba, but expect a slightly different texture.
Vanilla Extract (1 tsp) & Baking Powder (1 tsp): Vanilla adds a warm, comforting note that grounds the bold colors, while baking powder gives a subtle lift, preventing the cookies from becoming rock‑hard. Over‑baking with too much leavening can cause them to puff and lose their finger‑like silhouette.
Everything's prepped? Good. Let's get into the real action...
The Method — Step by Step
Start by creaming the butter and confectioner’s sugar together in a large mixing bowl. Use a handheld mixer on medium speed until the mixture looks pale, fluffy, and almost glossy. This should take about 2‑3 minutes—don’t rush it; the air you incorporate now is what gives the cookies their light texture. Power transition: Okay, ready for the game‑changer?
Add the two egg yolks, one at a time, beating well after each addition. The yolks should blend in smoothly, creating a glossy ribbon of dough. If the mixture looks too thick, pause and scrape the sides; you want a uniform, silky consistency.
Kitchen Hack: Add the yolks at room temperature to avoid curdling and ensure a smooth emulsion.Stir in the vanilla extract and a pinch of sea salt. The vanilla will round out the sweet edges, while the salt awakens the butter’s depth. Give the mixture a quick whisk—just enough to combine, not to over‑beat. This is the moment of truth: the dough should be glossy but not runny.
In a separate bowl, whisk together the all‑purpose flour, baking powder, and your chosen natural food coloring. For the green batch, sift in 1‑2 teaspoons of matcha; for the violet, use an equal amount of purple sweet potato powder; for the black, fold in cocoa powder. The colors should be evenly distributed, with no streaks.
Watch Out: Over‑mixing the colored flour can cause the pigments to turn bitter; stir just until combined.Gradually add the dry mixture to the butter‑sugar blend, stirring with a wooden spoon or spatula. The dough will start to come together; keep mixing until you no longer see streaks of flour. At this stage, the dough should feel slightly tacky but not sticky. If it’s too sticky, sprinkle a tablespoon more flour; if too dry, add a splash of milk.
Cover the dough with plastic wrap and chill in the refrigerator for 30 minutes. This rest period allows the gluten to relax and the butter to firm up, making it easier to shape the creepy fingers. I dare you to skip this step and see what happens—trust me, you’ll regret it when the cookies spread into a mess.
Preheat your oven to 350°F (175°C) and line two baking sheets with parchment paper. While the oven heats, roll the chilled dough into 1‑inch thick logs. Cut each log into 2‑inch sections and gently taper one end to form a fingertip. Press a blanched almond onto the tip to act as a nail. The almond should be snug but not forced; it will adhere as the cookies bake.
Arrange the shaped fingers on the prepared sheets, leaving about 2 inches between each. Bake for 12‑15 minutes, or until the edges turn a light golden brown and the tops look set. The scent at this point is intoxicating—think buttery caramel with a whisper of almond. Power transition: This next part? Pure magic.
Remove the cookies from the oven and let them cool on the sheet for 5 minutes before transferring to a wire rack. As they cool, the colors deepen slightly, and the almond “nails” become crisp. Once fully cooled, dust the tops with a light sprinkle of extra matcha, cocoa, or sweet potato powder for an extra eerie effect.
That's it — you did it. But hold on, I've got a few more tricks that'll take this to another level...
Insider Tricks for Flawless Results
The Temperature Rule Nobody Follows
Never bake these at a temperature higher than 350°F. A hotter oven will cause the edges to scorch before the centers set, leaving you with a burnt “nail” and a soggy finger. Keep the oven door closed for the first 10 minutes to maintain consistent heat, then you can gently open it to check the color.
Why Your Nose Knows Best
Instead of watching the timer obsessively, trust your sense of smell. When the cookies start to emit a buttery, toasted almond aroma, you’re within a minute of perfection. If the scent turns overly caramelized, pull them out immediately—overbaking turns the delicate crumb into a dry, chalky relic.
The 5‑Minute Rest That Changes Everything
After baking, let the cookies rest on the rack for at least five minutes before handling. This short pause lets the interior finish setting and prevents the delicate almond nail from cracking. A friend once tried to frost them while hot; the result was a sad, melted mess.
Almond Nail Alignment
Place the almond nail with the point facing outward, mimicking a real finger. This tiny detail adds realism and makes the visual impact far more convincing. If you’re feeling extra theatrical, lightly press the almond into the dough so it’s half‑embedded, giving the illusion of a nail being driven into flesh.
Color Intensity Boost
For a deeper hue, mix the natural powders with a teaspoon of melted butter before folding them into the flour. The fat helps the pigments bind better, resulting in richer, more saturated colors that don’t fade after a day in the pantry.
Creative Twists and Variations
This recipe is a playground. Here are some of my favorite ways to switch things up:
Spooky Spice
Swap half the matcha for ground cinnamon and a pinch of ground ginger. The resulting amber‑brown fingers taste like a Halloween latte, perfect for a cozy autumn gathering.
Chocolate‑Dipped Delight
After cooling, dip the base of each finger in melted dark chocolate and sprinkle with crushed candy “bones.” The contrast between the buttery cookie and the bitter chocolate adds a sophisticated layer.
Gluten‑Free Ghost
Replace the all‑purpose flour with a 1:1 gluten‑free flour blend. The texture changes slightly—more tender and a bit crumbly—but the overall experience remains hauntingly good.
Vegan Vamp
Swap butter for coconut oil, use aquafaba instead of egg yolks, and replace confectioner’s sugar with powdered erythritol. The cookies become vegan-friendly while retaining that melt‑in‑your‑mouth quality.
Extra Crunch
Fold in a handful of finely chopped toasted hazelnuts or pistachios into the dough. The extra nutty crunch adds texture and a surprise element that guests love.
Gothic Glaze
Brush the cooled cookies with a thin glaze made from powdered sugar, a splash of milk, and a drop of black food coloring. The glossy finish makes the fingers look freshly emerged from a cauldron.
Storing and Bringing It Back to Life
Fridge Storage
Place the cooled cookies in an airtight container with a paper towel at the bottom to absorb any excess moisture. They’ll stay fresh for up to 7 days. If you notice a slight softening, let them sit out for 15 minutes before serving.
Freezer Friendly
Layer the cookies between sheets of parchment and store in a zip‑top freezer bag. They freeze beautifully for up to 3 months. To thaw, move them to the fridge overnight, then bring to room temperature for 30 minutes.
Best Reheating Method
Preheat your oven to 300°F (150°C) and warm the cookies for 5‑7 minutes. Add a tiny splash of water (about a teaspoon) to the bottom of the oven tray; the steam revives the crumb, making them taste as fresh as the day they were baked.