It started with a kitchen alarm that sounded like a broken metronome and a pizza that tasted like cardboard. The cheese had melted into a gooey sludge, the crust had turned to ash, and my confidence had hit a low note. I stared at the ruined slice, then at the untouched box of elbow macaroni, and thought, What if I could turn this disaster into the ultimate comfort dish? I was halfway through a midnight pizza binge when the kitchen alarm blared, and the burnt crust, the soggy cheese, the whole thing was a culinary catastrophe that left me nursing a bruised ego and a craving for something truly comforting. The moment was electric, a spark of inspiration that would later become my signature recipe.
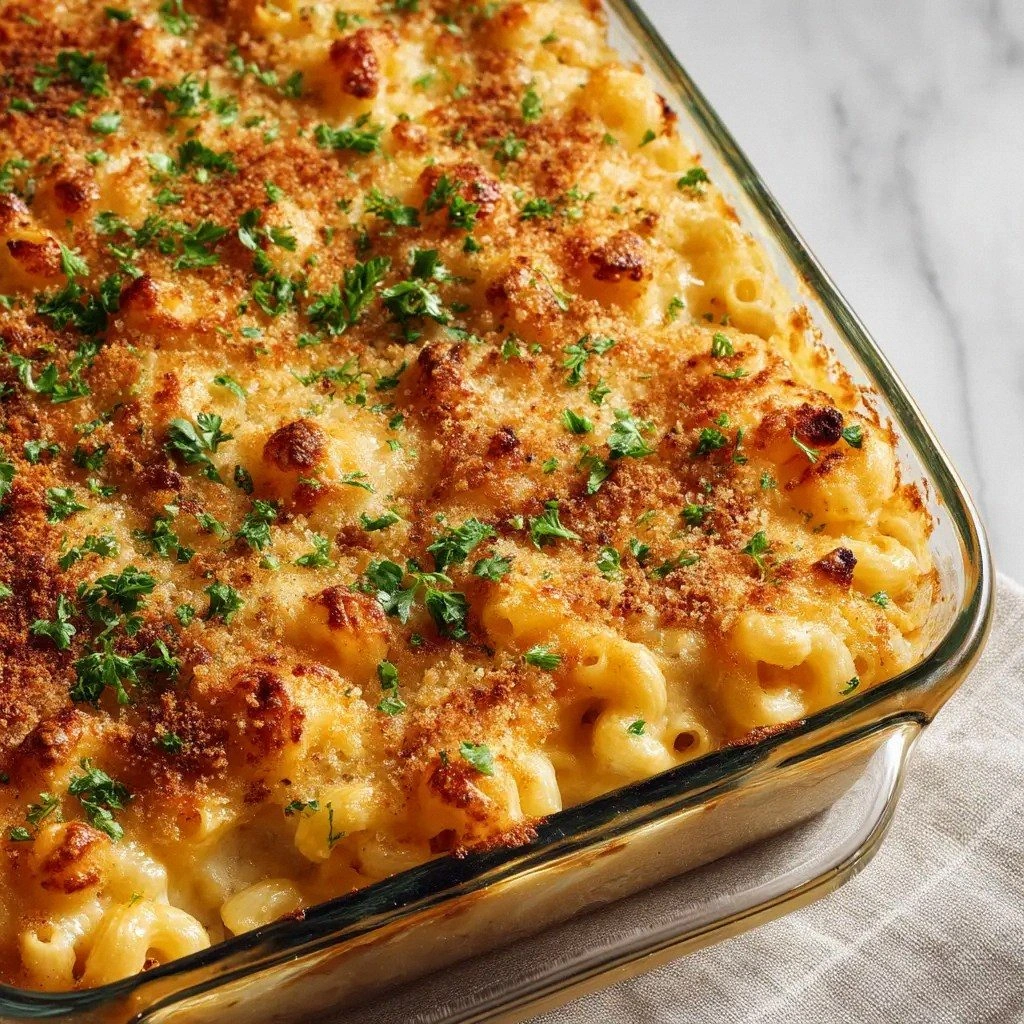
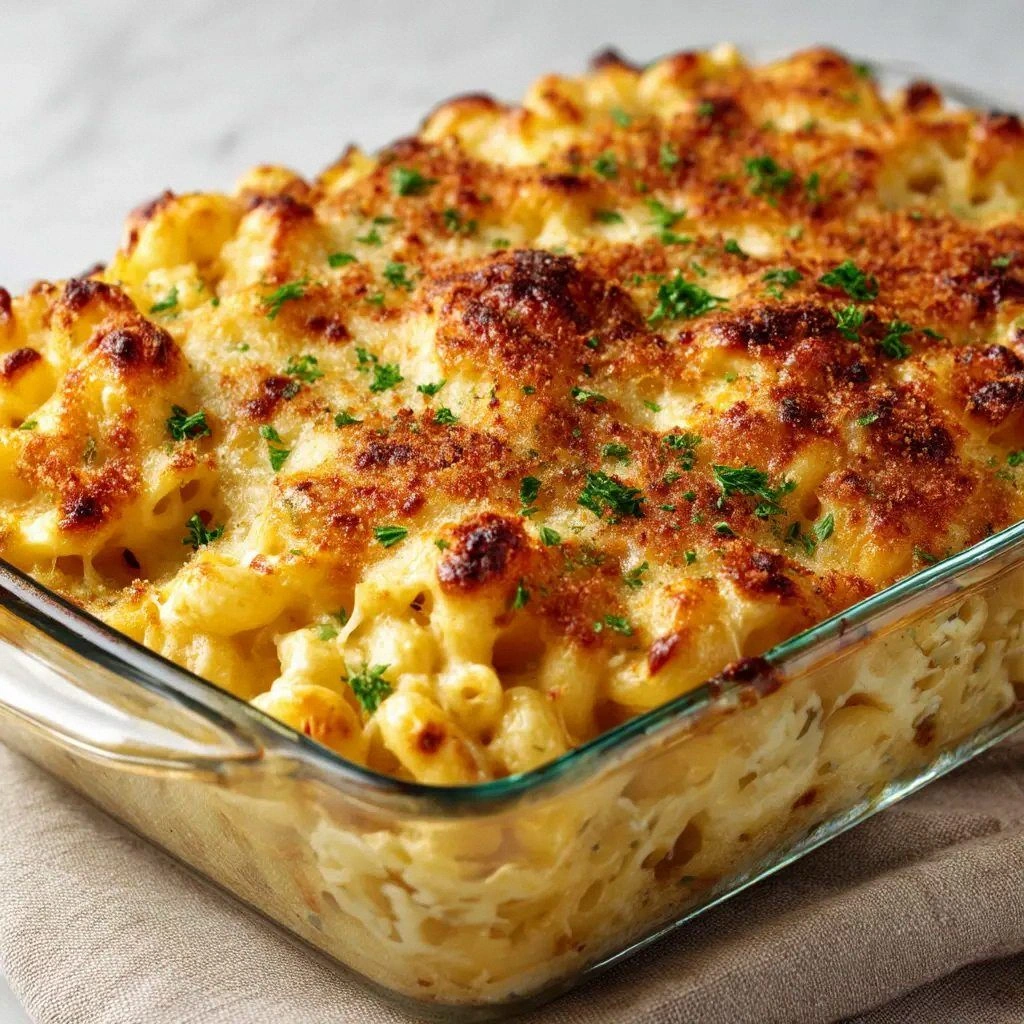
Picture the kitchen: the air thick with the scent of toasted butter, the sound of a pot simmering like a quiet storm, the sight of golden pasta glistening in a creamy sauce, the feel of a wooden spoon sliding through a velvety mixture, the taste of sharp cheddar that cuts through the richness, and the warmth that spreads from the oven into every corner of the room. I could almost taste the first bite, the cheese coating the pasta like velvet, the buttery crust popping like a small, golden firework. The texture is a perfect balance between creamy and crunchy, a dance of silk and crunch that lingers on the palate. It was a sensory experience that turned a kitchen nightmare into a symphony of flavors.
What sets this version apart is that it’s not just about creamy cheese; it’s about layering flavors, textures, and techniques that elevate a simple dish into a culinary masterpiece. I dared myself to incorporate a secret ingredient that most mac and cheese recipes overlook—a splash of evaporated milk for depth, a touch of seasoned salt for complexity, and a precise blend of cheddar and Monterey Jack that creates a melt that’s both gooey and robust. The result is a dish that feels indulgent yet balanced, indulgent yet comforting, and, most importantly, unforgettable.
I’ll be honest — I ate half the batch before anyone else got to try it. That moment was a revelation: I tasted the perfect marriage of savory, creamy, and slightly caramelized edges that shatter like thin ice when you bite into them. I realized that the secret lies in the sauce’s consistency, the cheese blend, and the final bake that gives it that irresistible golden top. Picture yourself pulling this out of the oven, the whole kitchen smelling incredible, the steam curling like a lazy cloud, and the anticipation of that first forkful. Let me walk you through every single step — by the end, you’ll wonder how you ever made it any other way.
What Makes This Version Stand Out
- Taste: The combination of sharp cheddar and Monterey Jack delivers a layered flavor profile that feels both bold and mellow, creating a savory depth that most recipes lack.
- Texture: The sauce coats the pasta like velvet, while the crispy, golden edges shatter like thin ice, offering a satisfying contrast in every bite.
- Ingredient Quality: Using high‑grade, fresh cheeses and a splash of evaporated milk elevates the dish from ordinary to extraordinary.
- Simplicity: With just twelve ingredients, the recipe is quick to assemble yet complex enough to impress.
- Crowd Reaction: Friends and family rave about the creamy consistency and the buttery, caramelized finish that makes it a party staple.
- Make‑Ahead Potential: The assembled dish can be refrigerated or frozen, then baked to perfection, making it ideal for busy schedules.
Alright, let's break down exactly what goes into this masterpiece...
Inside the Ingredient List
The Flavor Base
Butter is the cornerstone of any creamy sauce. Its richness not only adds depth but also helps create that glossy sheen that makes the dish look restaurant‑grade. When you melt the butter, watch for the golden brown flecks that appear—those are the flavor notes that will carry through the sauce. If you skip butter, the sauce will feel flat and lifeless, and the cheese won’t melt as smoothly.
All‑purpose flour is the thickening agent that turns liquid into a silky sauce. It neutralizes the raw taste of the butter and gives the sauce body. If you omit flour, the sauce will be too thin, and the pasta will be coated in a watery mess. A quick tip: whisk the flour into the melted butter at a low heat to avoid lumps—this creates a smooth roux that is the foundation of a perfect mac and cheese.
The Texture Crew
Evaporated milk adds a subtle caramelized sweetness that balances the sharpness of the cheeses. It’s a pantry staple that brings a silky mouthfeel without the heaviness of cream. If you use regular milk instead, the sauce will be thinner and less rich. A handy trick: heat the evaporated milk slightly before adding it to the roux to prevent clumping.
Whole milk is the final liquid that brings everything together. It ensures the sauce has enough moisture to coat the pasta evenly. Skipping whole milk can result in a thick, clumpy sauce that clings to the pot. If you’re lactose sensitive, replace it with a non‑dairy milk that has a similar fat content, like oat milk, to preserve the creamy texture.
The Unexpected Star
Seasoned salt is more than just a seasoning; it’s a flavor enhancer that brings out the umami in the cheeses. It’s a subtle whisper of herbs and spices that elevates the dish from bland to bold. If you use plain salt, the dish will taste flat and unremarkable. For a twist, try a pinch of smoked paprika for a smoky undertone.
Garlic powder is the secret to that warm, aromatic base that lingers in the background. It’s a quick way to add depth without the need for fresh garlic, which can overpower the delicate cheeses. Skipping garlic powder will leave the sauce feeling plain. A small amount of freshly minced garlic can be added for a more robust flavor if you prefer.
The Final Flourish
Sharp cheddar provides the classic sharpness that cuts through the richness, while Monterey Jack offers a creamy melt that keeps the sauce silky. Together, they create a cheese blend that is both tangy and smooth. If you use only one type of cheese, the dish will lack complexity and depth. For a dairy‑free version, experiment with vegan cheddar and jack blends, but be aware the texture may change.
Eggs act as a binder, giving the baked mac a firm yet tender crumb. They also help the cheese set into a cohesive, golden crust. If you omit eggs, the dish will be runny and won’t hold its shape. A good tip: whisk the eggs separately before adding them to the sauce to ensure a uniform mixture.
Everything's prepped? Good. Let's get into the real action...
The Method — Step by Step
- Step 1: Boil the Pasta Bring a large pot of salted water to a rolling boil. Add the elbow macaroni and cook until just al dente, about 7 minutes. Stir occasionally to prevent sticking. Drain and set aside, reserving a cup of pasta water for later. The pasta should still have a slight bite; this will help it absorb the sauce without becoming mushy.
- Step 2: Create the Roux In a large saucepan, melt the butter over medium heat until it foams. Sprinkle in the flour, stirring constantly to form a smooth paste. Cook for 1-2 minutes until the mixture turns a light golden brown. This step is crucial; it eliminates the raw flour taste and builds the sauce’s body. Don’t let the roux burn—keep the heat moderate.
- Step 3: Add the Milk Slowly whisk in the evaporated milk, ensuring a smooth consistency. Allow the mixture to thicken, stirring frequently. Then pour in the whole milk, continuing to whisk until the sauce is silky and free of lumps. The sauce should be thick enough to coat the back of a spoon. If it’s too thick, add a splash of reserved pasta water.
- Step 4: Season the Sauce Stir in the seasoned salt, garlic powder, and black pepper. Taste the sauce; it should have a balanced, savory flavor with a hint of herbaceous warmth. If the sauce feels too salty, add a touch of sugar to balance the flavors. This is the moment where the sauce transforms from bland to bold.
- Step 5: Melt the Cheeses Reduce the heat to low and add the shredded sharp cheddar and Monterey Jack. Stir continuously until the cheeses melt completely and the sauce is smooth. The cheese should be glossy and creamy, not lumpy. The key is low heat; high heat can cause the cheese to separate.
- Step 6: Combine Pasta and Sauce Add the drained macaroni to the sauce, tossing to coat each piece evenly. If the sauce feels too thick, add a little reserved pasta water to loosen it. Let the pasta simmer in the sauce for 2 minutes, allowing the flavors to meld. The pasta should look glossy and the sauce should cling to each noodle.
- Step 7: Bind with Eggs Beat the eggs in a small bowl. Slowly whisk them into the pasta mixture, stirring constantly to prevent curdling. The eggs bind the sauce and give the baked mac a firm yet tender structure. Once the eggs are fully incorporated, the mixture should look glossy and slightly thickened.
- Step 8: Bake to Perfection Preheat your oven to 375°F (190°C). Transfer the mac and cheese to a greased baking dish. Sprinkle a light dusting of extra cheddar on top for a golden crust. Bake for 20-25 minutes, or until the top is golden brown and the edges are slightly crisp. The aroma will fill your kitchen, signaling that the dish is ready.
That's it — you did it. But hold on, I've got a few more tricks that'll take this to another level...
Insider Tricks for Flawless Results
The Temperature Rule Nobody Follows
Many cooks assume that a higher oven temperature will give a crispier top, but it often leads to a dry center. I discovered that baking at 375°F (190°C) allows the cheese to melt evenly while the crust develops a golden hue. If you bake at 400°F, the top will brown too quickly, and the interior may still be undercooked. Keep the heat moderate and let the flavors bloom.
Why Your Nose Knows Best
Before you lift the lid, pause and inhale the steam. A buttery, cheesy aroma that has a hint of caramelized butter is a sign that the sauce has reached its peak. If the smell feels flat or overly sour, the sauce may need a touch more salt or a few seconds longer on the stove. Trust your nose; it’s a reliable guide to flavor.
The 5-Minute Rest That Changes Everything
After removing the dish from the oven, let it rest for five minutes before serving. This allows the sauce to set, preventing it from sliding off the fork. During this brief pause, the cheese fibers realign, creating a smoother mouthfeel. A friend once tried skipping this step and ended up with a gooey mess that didn’t hold together.
Use a Silicone Baking Mat for Even Browning
Silicone mats create a uniform heat distribution, ensuring that every inch of the mac and cheese gets the same amount of radiant heat. This eliminates hot spots that can cause uneven browning. It also makes cleanup a breeze, as the dish won’t stick to the pan.
Incorporate a Splash of Hot Water for Extra Moisture
When reheating leftovers, add a tablespoon of hot water before microwaving or steaming. This tiny splash of moisture steams the dish back into a silky consistency, preventing it from drying out. The result is a reheated mac and cheese that tastes almost freshly baked.
Creative Twists and Variations
This recipe is a playground. Here are some of my favorite ways to switch things up:
Spicy Jalapeño Kick
Add diced jalapeños and a pinch of cayenne pepper to the sauce for a fiery bite. The heat pairs beautifully with the creamy cheese, creating a contrast that excites the palate. Great for those who love a little spice in their comfort food.
Sun‑Dried Tomato & Basil Fusion
Stir in chopped sun‑dried tomatoes and fresh basil before baking. The tomatoes provide a sweet, tangy note while the basil adds a fragrant herbal aroma. This variation turns the dish into a Mediterranean-inspired delight.
Chicken & Broccoli Power Bowl
Fold in shredded rotisserie chicken and steamed broccoli florets for a protein boost. The vegetables add crunch and nutrition, making the dish more filling and balanced. Perfect for a post‑workout meal.
Vegan Delight
Replace dairy cheeses with vegan cheddar and jack blends, use plant‑based milk, and omit the eggs. The result is a creamy, dairy‑free version that still delivers on flavor. Ideal for guests who are lactose intolerant.
Cheddar & Bacon Bliss
Top the baked mac with crumbled bacon and a drizzle of maple syrup before baking. The salty bacon and sweet syrup create a caramelized crust that’s irresistible. This twist is a crowd‑pleaser at potlucks.
Herb‑Infused Green Chili
Incorporate chopped green chilies and a handful of chopped cilantro for a fresh, zesty finish. The cilantro’s bright flavor cuts through the richness, leaving a clean, herbaceous aftertaste. This variation works well with Mexican‑style toppings.
Storing and Bringing It Back to Life
Fridge Storage
Cool the dish completely before covering it tightly with plastic wrap or an airtight container. Store in the refrigerator for up to 3 days. When ready to serve, reheat in the oven at 350°F (175°C) for 15 minutes until warmed through.
Freezer Friendly
Divide the mac and cheese into freezer‑safe portions and seal each in a zip‑lock bag. Freeze for up to 2 months. Thaw overnight in the fridge, then bake at 375°F (190°C) for 25 minutes, or until the top is golden brown.
Best Reheating Method
For the freshest taste, reheat in a preheated oven at 350°F (175°C) for 10-12 minutes. If you’re short on time, microwave on high for 2 minutes, then stir and bake for an additional 5 minutes. A tiny splash of water before reheating steams the dish back to perfection.