I still remember the Wednesday night I nearly gave up on dinner entirely. My fridge held half a roast chicken, some sad vegetables, and a vision of culinary mediocrity. I was ready to surrender to a bowl of cereal when a friend texted, "Bet you can't make something better than take-out with what's in your kitchen right now." Challenge accepted. What emerged from that scrappy lineup was a bubbling, golden-topped chicken cobbler so outrageously comforting that my roommate threatened to lick the baking dish clean. The aroma alone—buttery crust mingling with savory thyme—had my neighbor knocking to ask if I was running a secret bakery. I dare you to taste this and not go back for seconds.
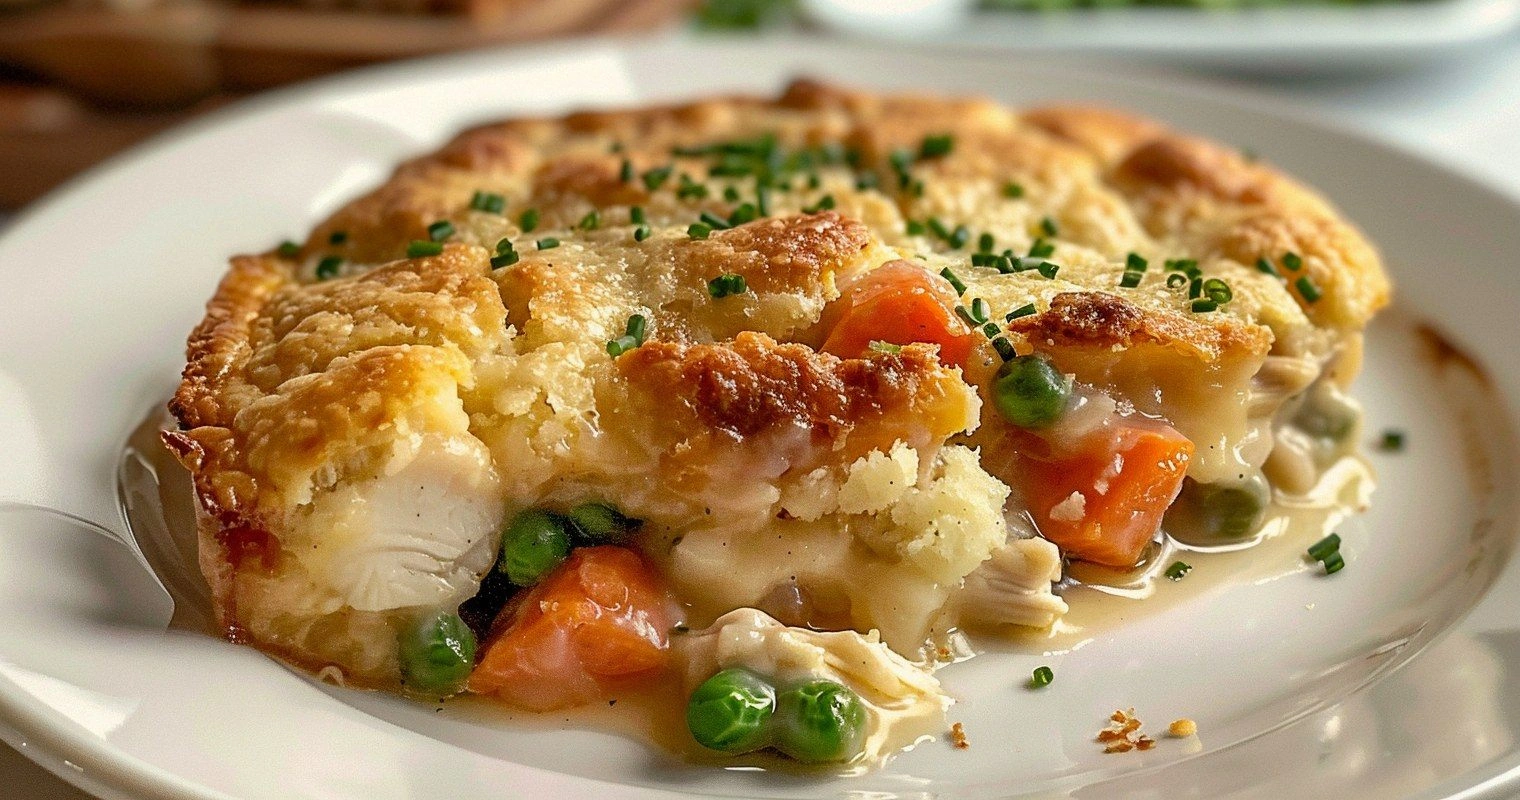
Most recipes get this completely wrong. They treat the cobbler topping like an afterthought, a bland biscuit blanket that turns gummy under the filling. Here's what actually works: a light, almost scone-like lid flecked with sharp cheddar and black pepper, baked until the edges caramelize into crispy lace while the center stays cloud-soft. The filling? Not the gloppy canned-soup situation you grew up with, but a silky gravy that coats tender chicken and vegetables like velvet. Picture yourself pulling this out of the oven, the whole kitchen smelling incredible, steam curling up as you crack through that bronzed crust. Stay with me here—this is worth it.
I'll be honest—I ate half the batch before anyone else got to try it. The magic is in the layering: first the jammy vegetables, then the juicy chicken, finally the cheesy batter that rises and bronzes into something between a dumpling and a biscuit. Each forkful delivers the buttery crunch of the lid, the creamy stew underneath, and those surprise pockets where the gravy has seeped up just enough to marble the dough. If you've ever struggled with dry chicken bakes or soggy crusts, you're not alone—and I've got the fix.
The game-changer is a splash of Worcestershire and a whisper of nutmeg in the sauce. Sounds odd, right? Trust me, the Worcestershire deepens everything like bass notes in a jazz solo, while nutmeg makes the chicken taste more... chicken-y. Okay, ready for the game-changer? We're using buttermilk in the batter for tang, but we're going to freeze the butter first and grate it in like snow. Those tiny shards steam open into micro-layers of flakiness. Let me walk you through every single step—by the end, you'll wonder how you ever made it any other way.
What Makes This Version Stand Out
- Flavor Boom: A double hit of umami—caramelized onion fond and a dash of soy sauce hidden in the gravy—makes the chicken taste like it's been slow-roasting for hours even though dinner's done in 45 minutes flat.
- Texture Tango: The topping straddles the line between biscuit and dumpling: crisp golden peaks with soft, sauce-soaked valleys that squish satisfyingly under your spoon.
- One-Skillet Wonder: Everything happens in the same oven-safe pan, so you build layers of flavor without creating a Mount Dish-more in your sink.
- Weeknight Friendly: Rotisserie chicken is the MVP, but if you only have raw thighs, I'll show you a 12-minute cheat that seasons them perfectly as they simmer.
- Freezer Hero: Assemble, cover tight, freeze un-baked for up to two months. Bake from frozen—just add 20 extra minutes and a foil tent so the top doesn't over-brown.
- Crowd Hypnosis: I've seen picky kids, keto cousins, and vegetarian roommates (don't ask) all hover over this dish, powerless against its tractor-beam aroma.
Alright, let's break down exactly what goes into this masterpiece...
Inside the Ingredient List
The Flavor Base
Butter and flour get the party started, forming the roux that thickens our gravy. You want the butter to foam and just start browning—nutty, not burnt—because that color carries through the whole dish. Yellow onion brings sweetness once it melts down, but sneak in the white part of a leek if you have it; leek adds a gentle funk that makes guests ask, "What's that amazing background note?" Garlic goes in late so it doesn't scorch; scorched garlic turns bitter and will haunt your cobbler like a tiny ghost. A cup of good chicken stock is non-negotiable. Swirl in the Worcestershire and soy here; they'll vanish into the sauce, leaving only deep savoriness behind.
The Texture Crew
Carrots and celery are classics, but cut them small so they finish tender in the oven. Frozen peas are my weeknight cheat—they add pops of sweetness and color without extra prep. If you have leftover roasted vegetables from last night's dinner, chop them up and toss them in; they bring roasted edges that fresh veg can't fake. For the chicken, I pull meat off a store-bought bird, but I keep the skin. Chop it into shards and stir it through the filling; it melts into smoky little nuggets that surprise you with crunch. And please, skip the breast-only approach. Dark thigh meat stays juicy even if you accidentally over-bake by five minutes.
The Unexpected Star
Sharp white cheddar in the batter sounds extra until you taste the cheesy lace around the rim of the baking dish. A pinch of cayenne doesn't make things spicy; it just wakes up all the other flavors like an alarm clock for your taste buds. Buttermilk is the tenderizer, but if you only have milk, stir in a teaspoon of lemon juice and let it sit for five minutes. That acid reacts with baking powder to give the cobbler sky-high lift. Finally, fresh thyme leaves—strip them off woody stems with your fingers; dried thyme tastes like dusty potpourri in comparison.
The Final Flourish
Before baking, I dot the top with tiny cubes of cold butter. They melt into the peaks, creating freckles of brown butter crunch. A quick brush of cream on the exposed dough helps it bronze like a beach bum in July. And never skip the five-minute rest after baking; the sauce thickens just enough to stay put when you scoop, rather than flooding the plate like a gravy tsunami.
Everything's prepped? Good. Let's get into the real action...
The Method — Step by Step
- Preheat your oven to 425 °F (220 °C) and set a rack in the upper-middle slot. While it heats, melt 2 tablespoons of butter in a 10-inch cast-iron or other oven-safe skillet over medium. Swirl until it foams and just starts to smell like hazelnuts—about 90 seconds. This little brown-butter moment seasons the whole pan and prevents the filling from sticking later. Don't rush it; low and slow color equals flavor insurance.
- Toss in the diced onion, carrot, and celery with a pinch of salt. Sauté until the vegetables soften and the edges of the onion flirt with golden, roughly six minutes. You want them translucent, not caramelized, because they'll continue cooking in the oven. Stir occasionally, but leave them alone long enough to pick up fond—the browned bits on the skillet bottom are liquid gold. If the pan looks dry, add a teaspoon of butter; dry veg scorch, and scorched veg taste like regret.
- Sprinkle 3 tablespoons of flour over the vegetables and stir for two minutes to cook out the raw taste. The flour will coat everything like dusty snow and start to toast; watch as it turns from pale blond to a light tan. This roux is your gravy's backbone, so give it the full two minutes. Slowly whisk in the chicken stock, soy, Worcestershire, and thyme leaves. The sauce will thicken until it can coat the back of a spoon—run your finger through; the line should hold. Season with ½ teaspoon salt and plenty of black pepper.
- Fold in the shredded chicken and frozen peas. If you're using raw thigh pieces, add them now and let the mixture simmer for five minutes so the meat poaches gently in the gravy. Taste and adjust; this is your last chance to boost flavor before the topping goes on. The filling should be thick but still spoonable; add a splash more stock if it looks like cement. Remove from heat and let it settle while you whip up the cobbler crown.
- In a mixing bowl, whisk together flour, baking powder, cayenne, and a pinch of salt. Using the large holes of a box grater, grate in the frozen butter directly over the bowl, stopping every few swipes to toss the shards with flour. This keeps them from clumping back together. Add the shredded cheddar and chopped thyme, then pour in the cold buttermilk. Stir with a fork just until a shaggy dough forms; over-mixing develops gluten and you'll end up with bread, not tender pillows.
- Now the fun part: Using two spoons, dollop the batter over the surface of the filling in eight rough mounds. Leave gaps between them so steam can escape and the gravy can bubble up around the edges, creating that gorgeous cobblestone look. Don't smooth the tops—peaks and cracks equal crispy bits. Dot each mound with a cube of cold butter, then brush lightly with cream. Slide the skillet into the oven and bake for 22–25 minutes.
- The cobbler is ready when the tops are deep golden and the filling is erupting like a savory lava lamp. A toothpick inserted into the center of a biscuit should come out clean, but a few moist crumbs are fine—better than dry bricks. The edges where biscuit meets gravy will be caramelized and chewy; that's the chef's treat, so claim it early. Let the skillet rest on a rack for five minutes; the sauce thickens as it cools, transforming from soupy to spoon-coating perfection.
- Serve straight from the pan at the table for maximum rustic charm. Scoop deep so every plate gets a mix of saucy chicken and biscuit, then finish with a crack of fresh pepper and extra thyme leaves. The contrast of hot filling and slightly cooled crust is pure magic. Leftovers reheat like a dream—pop individual portions in a 375 °F oven for 12 minutes and the topping re-crispifies as if freshly baked.
That's it—you did it. But hold on, I've got a few more tricks that'll take this to another level...
Insider Tricks for Flawless Results
The Temperature Rule Nobody Follows
Your ingredients should be cold, your skillet hot. Starting the filling on the stovetop jump-starts thickening so the biscuits don't sink into soup. Conversely, the butter in the dough must stay solid until it hits the oven; warm butter melts into the flour, greasing it and creating a dense topping. If your kitchen is tropical, chill the bowl and even the flour for 15 minutes. A friend tried skipping this step once—let's just say it didn't end well. Her "cobbler" emerged like a savory pancake wearing a biscuit disguise.
Why Your Nose Knows Best
When the cobbler is almost done, you'll smell browned butter and toasty cheese before the timer rings. That's your cue to peek. Ovens lie; thermostats drift 25 degrees either way, but your nose is calibrated perfectly to your kitchen. If you catch a whiff of something nutty and the top is still pale, switch to broil for the final 90 seconds. Keep the door ajar and hover like a hawk; the jump from bronze to burnt happens faster than a toddler's mood swing.
The 5-Minute Rest That Changes Everything
Impossible as it seems, let the skillet sit untouched for five minutes after baking. During this pause, the gravy's starch granules swell and trap liquid, so your servings hold their shape instead of slumping into a puddle. The biscuits also finish cooking from residual heat, drying their bottoms just enough to stay fluffy rather than gummy. Cover loosely with foil if your kitchen is drafty; too much steam trapped inside softens the crust. Patience, young grasshopper—good things come to those who wait.
Creative Twists and Variations
This recipe is a playground. Here are some of my favorite ways to switch things up:
Buffalo Ranch Chicken Cobbler
Swap the thyme for a teaspoon of ranch seasoning and stir ¼ cup buffalo hot sauce into the gravy. Use blue cheese crumbles instead of cheddar in the biscuit dough. The result tastes like wings met comfort food and had a beautiful baby. Serve with celery sticks for the full sports-bar vibe.
Autumn Harvest Cobbler
Replace half the carrots with diced butternut squash and add a handful of dried cranberries. A pinch of sage and nutmeg in both filling and biscuits screams sweater weather. It's Thanksgiving in a skillet, minus the relatives arguing over politics.
Green Chile Corn Cobbler
Fold in a drained can of chopped green chiles and a cup of frozen corn. Use pepper jack in the topping and a squeeze of lime at the end. The sweet corn against tangy chiles is a Tex-Mex dream. Top with avocado slices for the full fiesta effect.
Mushroom & Thyme Vegetarian Cobbler
Skip the chicken and double the vegetables, adding 8 oz sautéed mushrooms for meaty chew. Use vegetable stock and a teaspoon of miso for umami depth. Even carnivores inhale this version; the mushrooms give that satisfying chew you'd swear came from meat.
Breakfast-for-Dinner Cobbler
Stir in diced ham and a handful of grated potato hash. Add an extra egg to the biscuit dough for richness and bake as directed. Crack four eggs onto the surface during the final 8 minutes; they'll set into runny-centered "eyeballs" that break into golden sauce when pierced. Breakfast lovers, this one's for you.
Mediterranean Sunshine Cobbler
Swap the peas for chopped artichoke hearts and sun-dried tomatoes. Use feta in the biscuits and finish with fresh oregano and a drizzle of olive oil. The briny tomatoes pop against creamy sauce, transporting you straight to a seaside taverna—no passport required.
Storing and Bringing It Back to Life
Fridge Storage
Let leftovers cool completely, then transfer to airtight containers. They'll keep for up to four days, though the biscuits will gradually absorb moisture and soften. For best texture, store the topping separately if possible; I invert a small plate over the skillet and refrigerate the whole thing. Reheat individual portions in a 375 °F oven for 12 minutes or until the gravy bubbles and the biscuits re-crisp. A tiny splash of water in the container before reheating steams everything back to juicy perfection.
Freezer Friendly
Assemble the cobbler up to the point of baking, wrap the skillet tightly in a double layer of foil, and freeze for up to two months. Bake from frozen—just add 20–25 extra minutes and tent loosely with foil if the top browns too fast. For smaller households, freeze in individual oven-safe bowls; they reheat straight from the freezer in about 35 minutes. Label with the date; frozen cobblers look mysteriously like frozen lasagna at 6 p.m. on a Tuesday.
Best Reheating Method
Microwaves turn biscuit topping into rubber, so use the oven whenever possible. If you must microwave, scoop off the biscuits and reheat the filling first, then toast the biscuits separately in a dry skillet for two minutes on each side. They won't be quite as lofty, but they'll regain some crunch. For a quick lunch, warm filling in a small pot, spoon over toast, and crown with a fried egg. Instant chicken & biscuits à la minute.