I still remember the first time I attempted to make pull-apart bread for a game night. I was so confident, so sure that I could just wing it, that I ended up with a dense, doughy mess that could have doubled as a doorstop. My friends were polite about it, bless them, but I could see the disappointment in their eyes as they tried to pry apart what looked more like a failed science experiment than an appetizer. That night, I made a promise to myself and to them that I would crack the code to the perfect cheesy pull-apart pizza bread, even if it meant making fifty versions and gaining twenty pounds in the process.
What followed was months of obsessive testing, tweaking, and tasting. I discovered that most recipes get the fundamental technique completely wrong, treating this like regular garlic bread when it's actually something far more magical. The secret isn't just stuffing cheese between dough pieces and hoping for the best. It's about creating layers of flavor that build on each other, using the right temperature progression to ensure every bite is perfectly cooked, and understanding how different cheeses behave when they're molten and begging to be pulled apart. Picture yourself pulling this out of the oven, the whole kitchen smelling like a pizzeria had a beautiful baby with a French bakery, your guests already gathering around like moths to a flame.
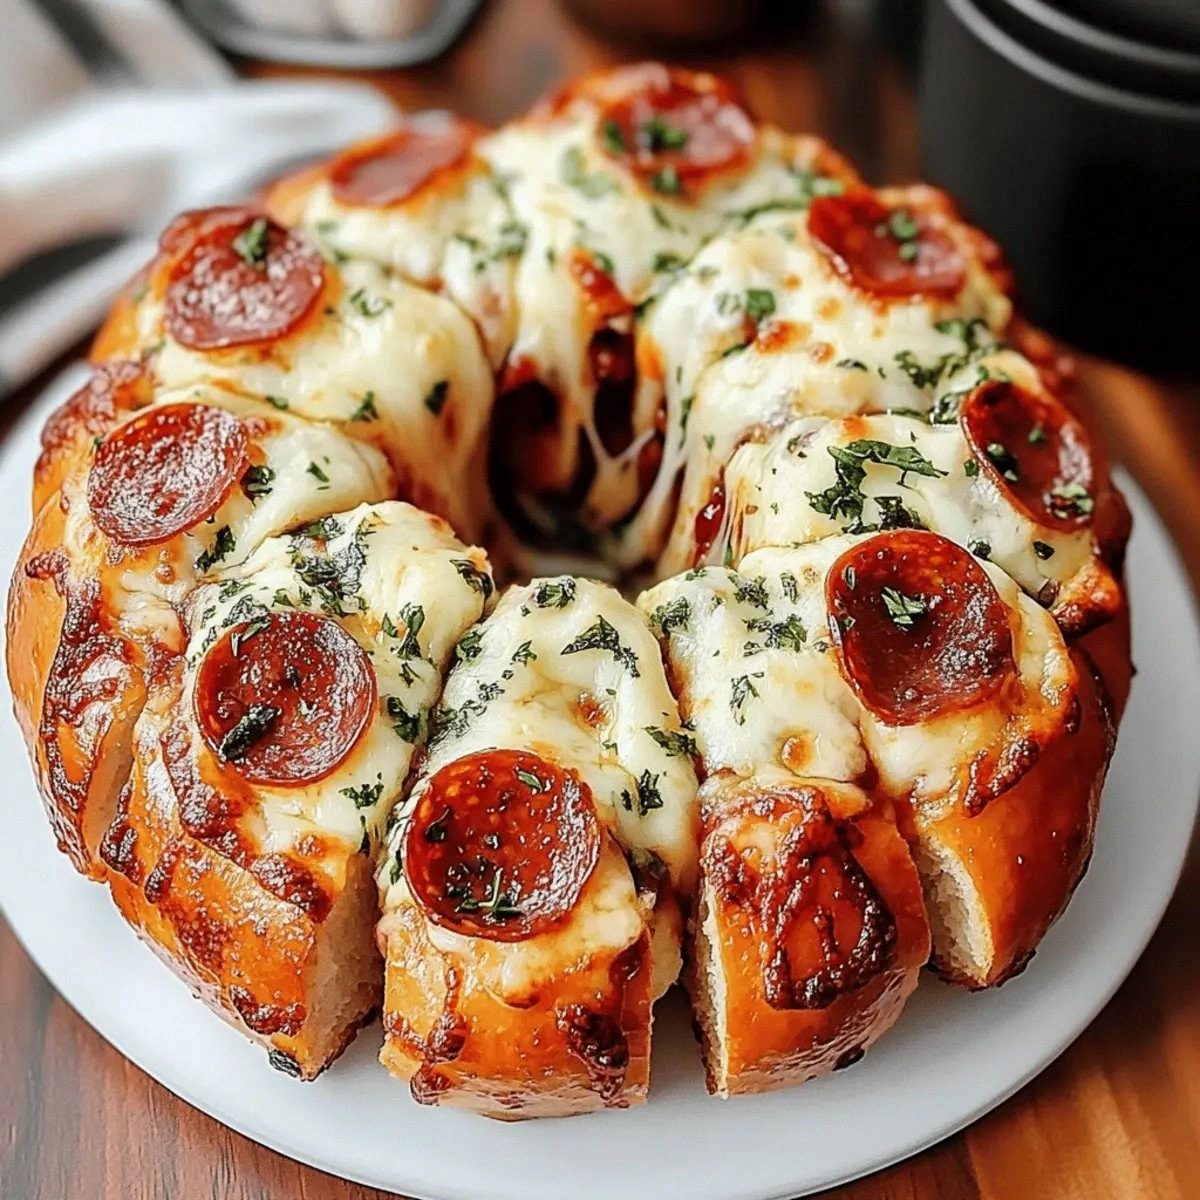
This recipe I'm sharing today is the result of all that delicious experimentation. It's hands down the best version you'll ever make at home, with crispy edges that shatter like thin ice, revealing molten cheese that stretches into Instagram-worthy strands. The dough becomes infused with garlic and herbs, creating pockets of pizza perfection that somehow manage to be both light and indulgently rich. I dare you to taste this and not go back for seconds, thirds, and maybe even fourths. I'll be honest — the first time I nailed this recipe, I ate half the batch before anyone else got to try it, standing over the counter in my kitchen at 11 PM, burning my fingers because I couldn't wait for it to cool.
Let me walk you through every single step — by the end, you'll wonder how you ever made it any other way.
What Makes This Version Stand Out
Cheese Strategy: Most recipes throw in whatever cheese is in the fridge and call it a day. This version uses a precise blend of mozzarella for that legendary stretch and Parmesan for deep umami flavor that makes each bite taste like the best part of a pizza crust. The ratio is 2:1, and yes, it matters more than you'd think.
Herb Infusion: Instead of just sprinkling dried herbs on top, we're creating a flavored oil that gets brushed between every layer. This means every bite tastes like it's been kissed by an Italian grandmother, with oregano and basil permeating the entire creation, not just sitting on the surface like an afterthought.
Texture Contrast: The outside gets crispy and golden while the inside stays soft and doughy, creating that perfect contrast that makes people close their eyes when they take a bite. It's like getting the best parts of pizza — the crispy crust edges and the soft, cheesy center — in every single pull.
Temperature Precision: Starting at a higher temperature and then reducing it halfway through is the game-changer that ensures the outside doesn't burn while the inside cooks through. Most recipes keep it simple with one temperature, but we're not making simple here, we're making spectacular.
Assembly Technique: Instead of just cutting and stuffing, we're creating a layered structure that allows for maximum cheese distribution without overwhelming the dough. Think of it like architecture, but for your mouth. Each piece is positioned to create the perfect cheese-to-bread ratio.
Make-Ahead Magic: You can prep this entire thing up to the final baking step, cover it, and keep it in the fridge for up to 24 hours. When guests arrive, just pop it in the oven and prepare for the standing ovation. It's like having a secret weapon in your culinary arsenal.
Crowd Psychology: There's something primal and communal about pulling apart food together. It breaks down barriers faster than alcohol and gets even the shyest guests interacting. I've seen complete strangers become best friends over this bread, united in their quest for the cheesiest piece.
Alright, let's break down exactly what goes into this masterpiece...
Inside the Ingredient List
The Flavor Foundation
Pizza dough is obviously the star here, but not all dough is created equal. If you're buying pre-made, look for the kind that's actually made with real ingredients you can pronounce, not a science experiment of preservatives. The dough should feel soft and slightly sticky, not dry and floury like it's been sitting in that refrigerated case since the Clinton administration. I prefer the kind from the grocery store's bakery section over the canned stuff, which tastes like disappointment and aluminum. If you've got the time and ambition to make your own, more power to you — just make sure it's a relatively wet dough for the best texture.
Olive oil isn't just a cooking medium here — it's the vehicle for all our flavor. Use a good quality extra virgin oil, something that actually tastes like olives and not like the bottle it's been sitting in for three years. The oil carries the garlic, herbs, and red pepper flakes into every nook and cranny of the bread. Skip the cheap stuff that tastes like motor oil, unless you want your guests to wonder if you work at Jiffy Lube.
Garlic is non-negotiable, and fresh is the only way to go. Those jars of pre-minced garlic sitting in water have about as much flavor as the plastic container they come in. Fresh garlic, minced so fine it almost becomes a paste, will infuse the oil with pungent, aromatic magic that makes the whole kitchen smell like you've been transported to a trattoria in Rome.
The Texture Crew
Mozzarella is where the magic happens, but you need the right kind. Skip the fresh buffalo mozzarella for this one — it's too watery and won't give you that legendary stretch. Go for the low-moisture, whole milk variety that comes in a block, not the pre-shredded stuff that's coated in cellulose to prevent clumping. The cellulose also prevents melting into that gorgeous, Instagram-worthy cheese pull that makes people audibly gasp when you lift a piece.
Parmesan plays the supporting role that somehow steals the show. It adds that deep, nutty, umami flavor that makes people ask "what's in this?" with their mouths full. Use the real Parmigiano-Reggiano if you can find and afford it, or at least something that's been aged properly and doesn't come in a green can. The powdered stuff has its place, but this isn't it.
The Unexpected Star
Red pepper flakes might seem optional, but they're the difference between good and unforgettable. Just a pinch wakes up all the other flavors without making things spicy. It's like adding a bass line to a song — you might not consciously notice it, but you'd miss it if it were gone. The slight heat also helps cut through the richness of all that cheese, keeping you coming back for more instead of feeling overwhelmed after two pieces.
The Final Flourish
Fresh parsley at the end isn't just for color, though it does make the whole thing look like a million bucks. It adds a bright, fresh note that cuts through all that richness and makes the whole thing feel somehow lighter. Chop it just before serving so it stays vibrant and doesn't wilt into sad green flecks. If you're feeling fancy, you could use fresh oregano or basil instead, but parsley is the reliable friend that never lets you down.
Everything's prepped? Good. Let's get into the real action...
The Method — Step by Step
- Start by making your flavored oil, because this is what separates the amateurs from the legends. Combine your olive oil with the minced garlic, dried oregano, dried basil, and red pepper flakes in a small saucepan. Heat this over medium-low heat for about 3-4 minutes — just until the garlic starts to sizzle and become fragrant. Don't let it brown or you'll end up with bitter oil that tastes like disappointment. The moment you smell that garlic perfume hit the air, remove it from the heat and let it cool slightly. This oil is going to be the backbone of flavor that permeates every single bite.
- Now comes the fun part where you get to play with your food without judgment. Take your room-temperature pizza dough and turn it out onto a lightly floured surface. Roll or stretch it into a rectangle about 12x8 inches — don't stress if it's not perfect, we're going for rustic charm here, not architectural precision. Using a sharp knife or pizza cutter, slice the dough into roughly 1-inch squares. They don't have to be identical, but try to keep them close in size so they cook evenly. Think of it like making edible building blocks for adults.
- Here's where the magic starts happening. Take each square of dough and give it a quick dip in your flavored oil, just enough to coat it lightly. You don't want it swimming in oil, just kissed by it. Then toss it with some of the Parmesan cheese, making sure each piece gets a light dusting. This creates a flavor-packed barrier that prevents the dough from becoming soggy while adding layers of umami goodness. If you've ever struggled with this, you're not alone — and I've got the fix right here.
- Okay, ready for the game-changer? Instead of just throwing everything in a pan willy-nilly, we're going to create a strategic layering system. Start by brushing your baking dish with some of the flavored oil — this prevents sticking and adds flavor to the bottom pieces. Then, create your first layer of oiled, cheese-dusted dough pieces, leaving small gaps between them. These gaps are crucial because they allow the dough to expand and create those crispy edges that make people fight over the corner pieces.
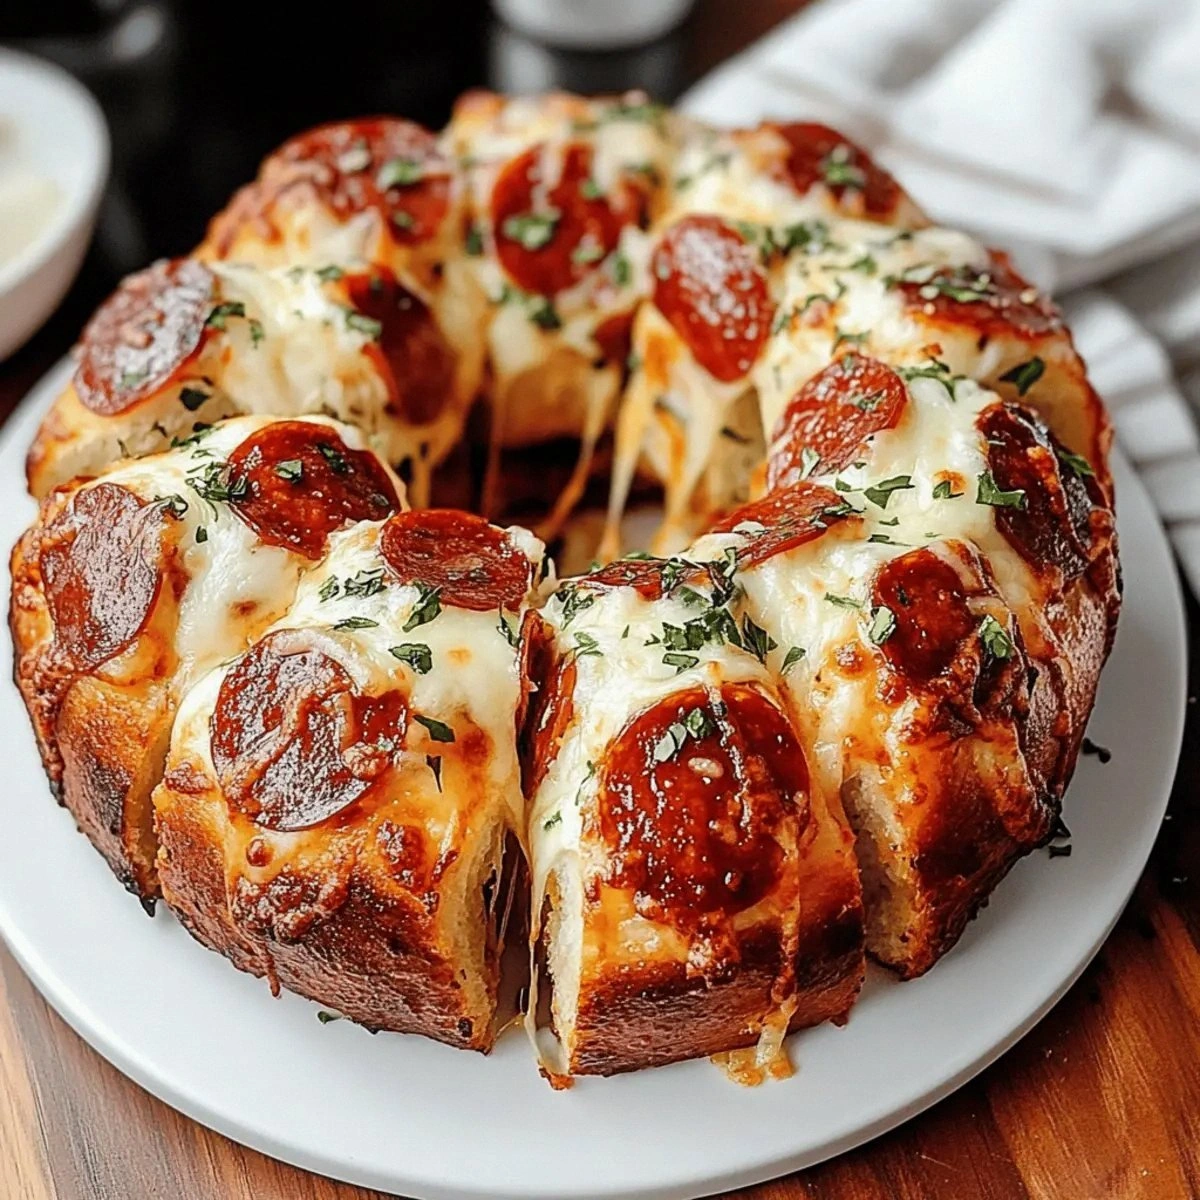
- Now we build the cheese mountain that dreams are made of. Sprinkle about a third of your mozzarella over the first layer of dough pieces. Don't be shy here — this isn't the time for restraint. The cheese will melt down into all those nooks and crannies, creating a network of molten deliciousness that holds everything together. Think of it like edible mortar that's way more fun than the regular kind.
- Repeat this process two more times, ending with a generous layer of cheese on top. The key here is to distribute the cheese evenly but not perfectly — those random extra-cheesy pockets are what people will be talking about for weeks. Press down gently on the top layer to compress everything slightly. This helps the layers meld together while still maintaining their individual character. It's like a cheese and bread lasagna, but better because you get to pull it apart like a savage (in the best possible way).
- Cover the whole thing with plastic wrap and let it rise in a warm spot for about 30-45 minutes. This step is crucial and where most people rush ahead and ruin everything. The dough needs this time to puff up slightly, creating those airy pockets that make the final texture so addictive. You'll know it's ready when the pieces look slightly puffed and have started to touch each other. Don't let it go too long or you'll end up with bread that's more like a dense doorstop.
- Preheat your oven to 425°F (220°C) — yes, we're starting high to get that golden crust. When it's ready, uncover your creation and drizzle any remaining flavored oil over the top. This creates a beautiful golden finish and adds one last punch of flavor. Slide it into the oven and set a timer for 15 minutes. These first 15 minutes are when the magic happens — the cheese melts into every crevice while the tops start to brown and crisp.
- After 15 minutes, reduce the temperature to 375°F (190°C) and continue baking for another 15-20 minutes. This temperature drop is the secret to ensuring the inside cooks through without burning the outside. You'll know it's done when the top is golden brown and bubbly, and the edges are pulling away slightly from the sides of the pan. The cheese should be molten and slightly caramelized in spots, creating those crispy cheese frico bits that are basically edible gold.
- Remove it from the oven and try to resist the urge to dive in immediately — I know it's torture, but this 5-minute rest is what makes the difference between a molten cheese burn and pulling apart perfect pieces. Garnish with fresh parsley for that pop of color and fresh flavor. Then place it in the center of your table and watch as your guests transform into cheese-crazed maniacs. The first pull is always the most dramatic — make sure someone's ready with their phone camera.
That's it — you did it. But hold on, I've got a few more tricks that'll take this to another level...
Insider Tricks for Flawless Results
The Temperature Rule Nobody Follows
Here's the thing about cheese — it has a sweet spot where it melts perfectly without becoming greasy or separating. That sweet spot is between 130-150°F (54-65°C), but most home ovens don't distribute heat evenly enough to hit this consistently. The solution? Use an oven thermometer to check your oven's actual temperature, not just what the dial says. My oven runs 25 degrees hot, which meant my first few attempts had cheese that separated into an oily mess. A friend tried skipping this step once — let's just say it didn't end well, and she ended up ordering pizza instead.
Also, let your cheese come to room temperature before assembling. Cold cheese straight from the fridge takes longer to melt, which means the outside of your bread might burn before the inside cheese is fully melted. This is especially important for the Parmesan, which can stay stubbornly solid if it's too cold.
Why Your Nose Knows Best
Forget timers — your nose is the most reliable indicator of when this is done. When you start smelling that incredible aroma of toasting cheese and garlic wafting through your house, you're about 5 minutes away from perfection. That smell is the Maillard reaction happening, creating hundreds of flavor compounds that make this irresistible. The moment your neighbors start knocking on your door asking what you're making, you know you're close.
But here's the real secret — when you can smell the cheese starting to brown and caramelize, that's when you need to start watching closely. The difference between perfectly golden and burnt happens fast, faster than you think. Set a timer for 2-minute intervals during the last 10 minutes of baking, and trust your nose when it tells you something magical is happening.
The 5-Minute Rest That Changes Everything
I know, I know — when something looks this good, waiting feels impossible. But this rest period is when the cheese sets slightly, moving from that molten lava stage to the perfect pulling consistency. It's also when the bread finishes cooking from residual heat, ensuring the center isn't doughy. Think of it like letting a steak rest, except way more torturous because it's right there, calling your name with its cheesy siren song.
During this rest, the cheese will firm up just enough to stretch into those Instagram-worthy strands without breaking, and the bread will absorb some of the oil, becoming even more flavorful. Cover it loosely with foil if you're worried about it cooling too much, but don't seal it completely or you'll lose that crispy top. These five minutes are perfect for finishing up any other dishes, pouring drinks, or just basking in the anticipation of what's about to happen.
The Cheese Pull Psychology
Want to know why people go absolutely crazy for cheese pulls? It's not just about the taste — it's about the primal satisfaction of watching something stretch and break. It's the same reason kids love slime and adults love watching slow-motion videos of things breaking. When you get that perfect cheese pull, you're creating a moment of pure, unadulterated joy that transcends age and culture. I've seen grown adults giggle like children when they get a good pull, and it's beautiful every single time.
The secret to maximizing this effect is to serve it when the cheese is between 140-150°F. Too hot and it flows like liquid, too cool and it breaks instead of stretching. If you want to be extra about it, keep a food thermometer handy and announce the optimal pulling temperature like you're a cheese sommelier. Your guests will think you're either a genius or completely insane, but either way, they'll remember the experience.
Creative Twists and Variations
This recipe is a playground. Here are some of my favorite ways to switch things up:
The Buffalo Chicken Bomb
Toss shredded cooked chicken with buffalo sauce and layer it between the dough pieces with the cheese. Use blue cheese crumbles instead of Parmesan for an authentic wing experience. The spicy, tangy buffalo sauce melts into the bread, creating pockets of flavor that will have everyone reaching for their drinks. Pro tip: serve with ranch or blue cheese dressing on the side for dipping. This version disappears faster than the original at sports parties, and I've seen grown men weep when the last piece is gone.
The Mediterranean Dream
Swap out the Italian herbs for Greek seasoning, add kalamata olives and sun-dried tomatoes between the layers, and use feta in place of some of the Parmesan. The salty, briny olives and sweet-tart tomatoes create an incredible flavor profile that transports you straight to a Greek island. Use oregano and thyme in your oil instead of basil, and finish with fresh oregano instead of parsley. If you've ever struggled with what to bring to a Mediterranean potluck, this is your answer.
The Everything Bagel Edition
Replace the Italian herbs with everything bagel seasoning in your oil, and add small cubes of cream cheese between the layers with the mozzarella. The cream cheese creates these incredible pockets of creamy goodness that mimic the best part of an everything bagel. Top with more everything seasoning before baking for extra crunch. This is breakfast, lunch, and dinner all rolled into one, and it's particularly dangerous because you can convince yourself it's appropriate for any meal.
The Supreme Pizza Remix
Between each layer, add mini pepperoni, diced bell peppers, and sliced black olives. Use pizza seasoning instead of just oregano and basil, and mix some Italian sausage crumbles throughout. You're essentially creating a deconstructed supreme pizza that people can pull apart, which is way more fun than regular pizza. The vegetables add moisture, so you might need to bake it 5 minutes longer, but the flavor payoff is worth it. This is what you make when you want to impress people who claim they don't like "fancy" food.
The Truffle Shuffle
Add a teaspoon of truffle oil to your herb oil, use fontina cheese instead of mozzarella for extra nuttiness, and finish with a drizzle of white truffle oil when serving. The truffle flavor is subtle but unmistakable, elevating this from party food to something that belongs on a fancy restaurant menu. Use white truffle oil for finishing, not cooking — the heat destroys its delicate flavor. This version pairs beautifully with champagne, in case you're feeling particularly fancy.
The Dessert Plot Twist
Who says this has to be savory? Skip the herbs and garlic, instead infuse your oil with cinnamon and vanilla. Use a mix of cream cheese and mascarpone with the mozzarella, add chocolate chips between layers, and finish with a dusting of powdered sugar. It's like a cinnamon roll and pull-apart bread had a beautiful, decadent baby. Serve with caramel or chocolate sauce for dipping, and watch people's minds explode when they realize they can have pull-apart bread for dessert.
Storing and Bringing It Back to Life
Fridge Storage
If you somehow end up with leftovers (and that's a big if), let the bread cool completely before storing. Wrap it tightly in plastic wrap, then in foil, and refrigerate for up to 3 days. The key is to minimize air exposure, which turns the bread stale and the cheese into something resembling plastic. I've found that storing it in the original baking dish, covered tightly with plastic wrap and then foil, works better than transferring to containers. The less you handle it, the better it keeps.
Freezer Friendly
This actually freezes beautifully, which is dangerous knowledge to have. Cut it into individual portions before freezing so you can pull out exactly what you want. Wrap each piece in plastic wrap, then in foil, and freeze for up to 2 months. When that midnight craving hits, you can reheat a single piece without having to commit to the whole pan. It's like having a secret stash of happiness waiting in your freezer for emergencies.
Best Reheating Method
The microwave is your enemy here — it turns the bread gummy and the cheese rubbery. Instead, reheat in a 350°F oven for 10-15 minutes if refrigerated, 20-25 minutes if frozen. Add a tiny splash of water to the pan before reheating — it creates steam that brings the bread back to life without drying it out. Cover with foil for the first half of reheating, then remove it for the last few minutes to crisp up the top again. It's almost as good as fresh, which is saying something.