I still remember the day I ruined my first strawberry shortcake. It was a humid July afternoon, the kind that makes butter sweat and bakers cry. I had promised my neighbor I'd bring dessert to her backyard barbecue, and I was determined to impress with a towering, cloud-like shortcake. Instead, I produced a dense, biscuit-y disaster that could have doubled as a paperweight. As I stood there, ready to toss the whole mess into the trash and swing by the grocery store for a sad store-bought substitute, inspiration struck. What if I could capture everything I loved about strawberry shortcake—the airy cake, the juicy berries, the billowy cream—but roll it up like a jelly roll, with a cheesecake twist? That moment of desperation birthed what is now my most-requested dessert: the Strawberry Shortcake Cheesecake Roll.
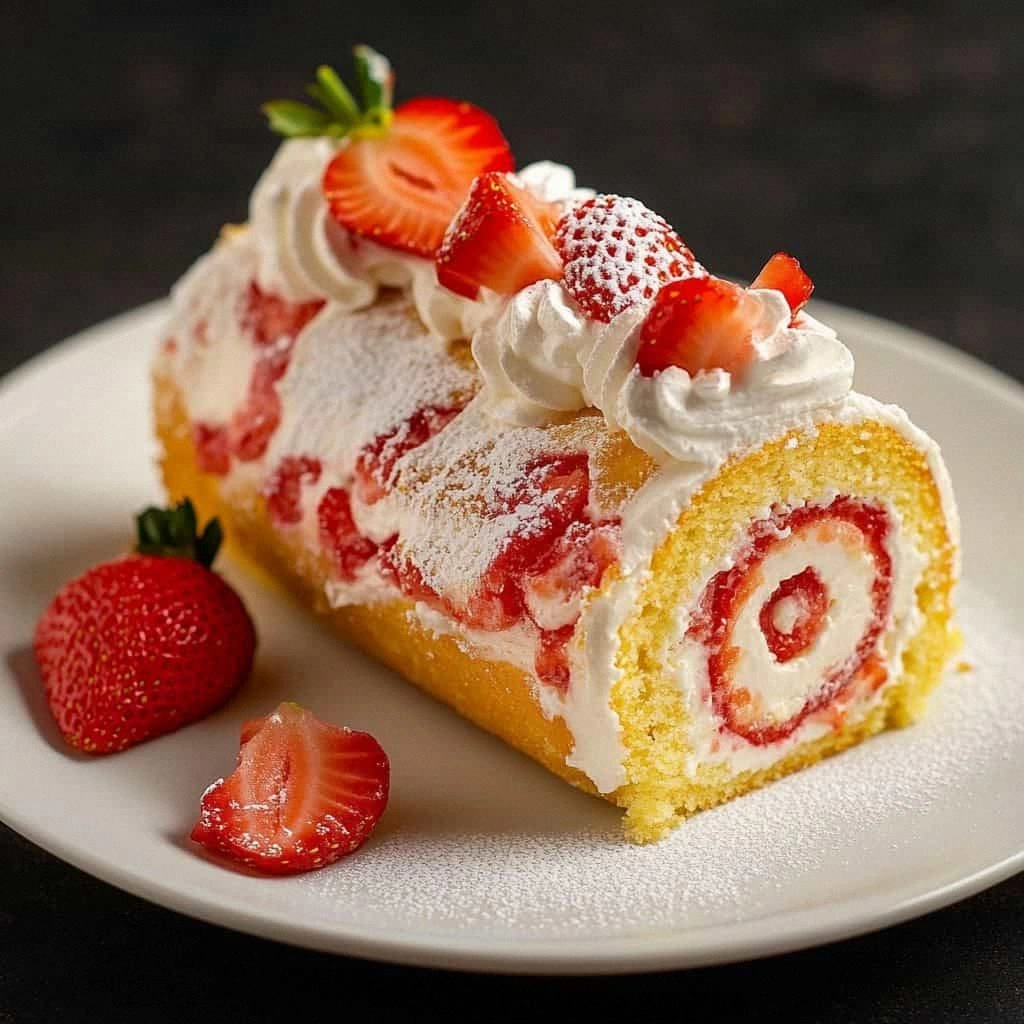
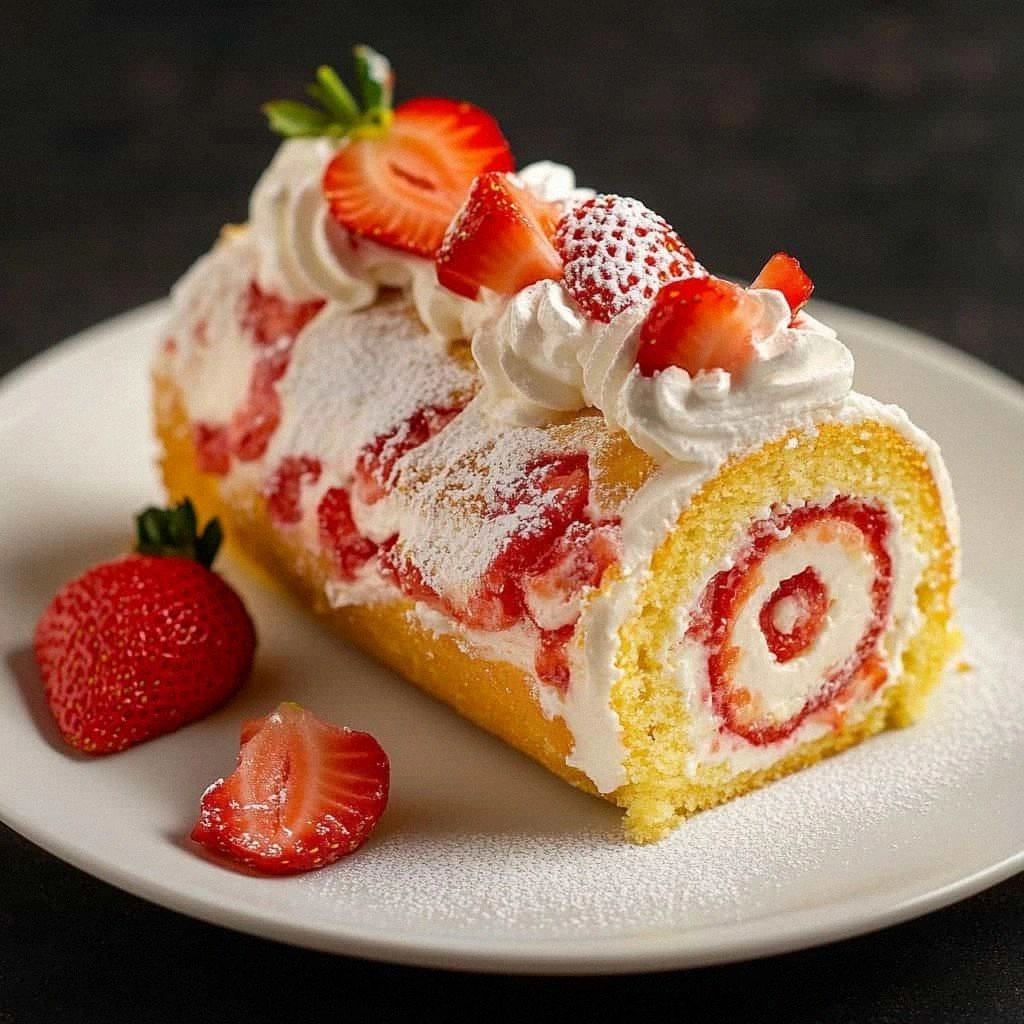
Picture this: a feather-light sponge cake that practically floats off the pan, wrapped around a silky cheesecake filling so smooth it makes silk jealous. Inside that cheesecake cloud, ribbons of macerated strawberries burst with summer sweetness, their juices mingling with just a whisper of lemon to keep things bright. The first bite is pure nostalgia wrapped in innovation—the familiar comfort of strawberry shortcake, but with a sophistication that makes grown-ups close their eyes and sigh. The cake dissolves on your tongue, the cheesecake filling is cool and creamy, and those strawberries? They're not just sitting on top like some afterthought. They're woven throughout every single forkful, ensuring that perfect berry-to-cream ratio in every bite.
I've made this dessert for weddings, funerals, Tuesday night dinners, and everything in between. It's become my secret weapon, the thing I bring when I need to guarantee empty plates and recipe requests. The beauty lies in its deception—it looks like you spent hours slaving away in the kitchen, but the reality is far kinder. Yes, there are a few steps, but none of them require advanced pastry skills or specialty equipment you don't already own. Just a sheet pan, some parchment paper, and the patience to let your cream cheese actually soften (we've all been there, trying to beat rock-hard cream cheese into submission at 9 PM).
Let me walk you through every single step—by the end, you'll wonder how you ever made it any other way.
What Makes This Version Stand Out
Cloud-like Texture: The sponge cake uses a genius technique where we whip whole eggs with sugar until they form a thick ribbon that holds its shape for five seconds. This creates air pockets that survive baking, giving you a cake so light it practically floats. Traditional shortcake can be heavy and biscuit-like, but this version melts on your tongue like cotton candy.
Cheesecake Filling Innovation: Instead of the usual whipped cream, we're folding heavy cream into whipped cream cheese sweetened with both granulated and powdered sugar. The granulated sugar dissolves completely, while the powdered sugar adds stability. The result is a filling that's stable enough to roll but still has that tangy cheesecake flavor that makes people ask, "Wait, is this cheesecake or whipped cream?"
Strawberry Distribution Magic: Most recipes just throw berries on top and call it a day. We're macerating our strawberries with sugar and lemon juice, which draws out their juices and concentrates their flavor. Then we're spreading this strawberry mixture evenly across the cheesecake filling, ensuring every bite has that perfect berry burst. No more hunting around for the one piece with fruit!
Make-Ahead Hero: This dessert actually improves with a few hours in the fridge, making it perfect for entertaining. The cake absorbs just enough moisture from the filling to become even more tender, while the flavors meld into something greater than their parts. You can make it the morning of your dinner party and slice it up like a professional pastry chef.
Crowd-Pleasing Presentation: The spiral effect when you slice it is pure Instagram gold, but more importantly, it guarantees that everyone gets a perfect ratio of cake, cream, and berries. No more fighting over the piece with the most strawberries or the corner with extra frosting. Every slice is the best slice.
Year-Round Versatility: While strawberries scream summer, this recipe works beautifully with any seasonal fruit. In winter, I swap in citrus segments or sautéed apples. Spring calls for raspberries or blackberries. The technique stays the same, but the flavor profile changes with whatever fruit is at its peak.
Inside the Ingredient List
The Flavor Base
Cream cheese is the star here, and I cannot stress enough how important it is to let it come to room temperature naturally. I know, I know—you're impatient and there's a microwave. But trust me on this one. Properly softened cream cheese whips up lighter and incorporates better with the cream, giving you that dreamy texture we're after. If your cream cheese is still cold, you'll end up with little lumps that no amount of mixing will eliminate. The flavor should be tangy but not overwhelming, so I always taste and adjust with a pinch more sugar if needed.
Vanilla extract might seem like a background player, but it's the bridge between all the flavors. Use the good stuff here—the artificial variety will taste flat and chemical against the fresh berries. I make my own by steeping vanilla beans in vodka, but a high-quality store-bought extract works beautifully. The vanilla enhances the strawberries' natural sweetness while adding depth to the cheesecake filling that makes people ask for your secret ingredient.
The Texture Crew
Heavy whipping cream needs to be ice-cold to whip properly. I keep my bowl and whisk in the freezer for 15 minutes before starting, which might seem excessive until you try to whip cream on a hot day and end up with butter. The cream should whip to soft peaks that hold their shape but still have some movement. Over-whip and you'll get a grainy filling that cracks when you roll the cake. Under-whip and it'll be too loose, oozing out the sides like a melted ice cream sandwich.
The eggs in the sponge cake aren't just for structure—they're the leavening. We're whipping them with sugar until they triple in volume and turn a pale yellow color that reminds me of sunshine. This step incorporates air that expands in the oven, giving us lift without any chemical leaveners that would make the cake taste like baking powder. The eggs should be at room temperature too, which helps them whip up to maximum volume.
The Unexpected Star
Lemon juice in the strawberries might seem counterintuitive—why add acid to already tart berries? But here's the magic: a small amount of acid actually makes strawberries taste sweeter by balancing their natural sugars. It also helps the berries hold their color and prevents them from turning mushy. Just a tablespoon does the trick; any more and you'll have strawberry lemonade filling, which is delicious but not what we're after here.
Powdered sugar in the filling serves two purposes. First, it dissolves instantly, eliminating any graininess. Second, it contains cornstarch, which helps stabilize the whipped cream and prevents it from weeping. This is crucial for a rolled dessert that needs to hold its shape when sliced. Granulated sugar alone would eventually dissolve, leaving you with a soggy, weepy mess.
The Final Flourish
Fresh strawberries are non-negotiable. Frozen berries will release too much liquid and turn your filling into a watery disaster. Look for berries that are fragrant, firm, and deeply red all the way to the stem. If they have white shoulders or green tips, they're underripe and won't have the intense flavor we want. I like to buy them a day ahead and let them sit on the counter to fully ripen, then refrigerate until I'm ready to use them.
The Method — Step by Step
- Start by making the strawberry filling because it needs time to macerate. Hull and slice your strawberries about 1/4-inch thick—not paper-thin or they'll disappear, but not so thick they'll poke holes in your cake when you roll it. Toss them with the granulated sugar and lemon juice in a bowl that looks too big. Trust me, they'll shrink as they release their juices. Let this sit while you make everything else, stirring occasionally. The sugar will draw out the juices, creating a glossy syrup that tastes like summer sunshine concentrated into liquid form. After about 20 minutes, you'll see a pool of ruby-red syrup at the bottom of the bowl—that's liquid gold, and we're using every drop.
- Now for the sponge cake, which is where most people panic but shouldn't. Preheat your oven to 350°F and line a 15x10-inch jelly roll pan with parchment paper. Here's the key: spray the pan, then line it with parchment, then spray the parchment again. This triple insurance guarantees your cake will release like a dream. In a large bowl, beat the eggs and sugar together until they're thick and pale yellow. When you lift the beaters, the mixture should fall back in a ribbon that sits on top for five seconds before disappearing. This takes about 5 minutes with a stand mixer on medium-high speed, or 8 minutes with a hand mixer. Don't rush it—this is your structure and leavening.
- Gently fold in the flour, baking powder, and salt. Here's where people mess up: they stir like they're mixing cement, deflating all that precious air we just incorporated. Use a large rubber spatula and fold from the bottom of the bowl up and over the top, turning the bowl as you go. It should take about 10 folds—no more, or you'll have a flat, tough cake. The batter should look light and airy, with no pockets of flour remaining. Pour it into your prepared pan and gently spread it to the corners. It'll look like you don't have enough batter, but resist the urge to make more. Sponge cakes are thin by nature.
- Bake for 12-15 minutes, until the cake springs back when lightly touched and is just starting to pull away from the sides of the pan. While it's baking, lay out a clean kitchen towel and dust it generously with powdered sugar. This is your rolling surface, and the sugar prevents sticking while adding a subtle sweetness to the exterior. When the cake comes out, immediately invert it onto the towel. Peel off the parchment paper—it should come off in one satisfying sheet—and roll the cake up in the towel, starting from one short end. Let it cool completely rolled up. This trains the cake to roll without cracking later.
- While the cake cools, make the cheesecake filling. In a large bowl, beat the cream cheese until it's completely smooth and fluffy—this takes about 3 minutes. Add the granulated sugar and vanilla extract, and beat until combined. The mixture should look like thick frosting and taste like cheesecake concentrate. In a separate bowl (remember, that cold bowl from the freezer?), whip the heavy cream with the powdered sugar until soft peaks form. This means when you lift the beaters, the peaks should curl over like a Dairy Queen ice cream cone, not stand up straight like a soldier.
- Here's where the magic happens: gently fold the whipped cream into the cream cheese mixture in three additions. First addition gets mixed in thoroughly to lighten the cream cheese. The second and third additions should be folded in gently, preserving as much air as possible. The final mixture should be light and fluffy, with no streaks of white cream remaining. It should taste like the best cheesecake mousse you've ever had, with a texture that's stable enough to spread but still melts on your tongue.
- Time to assemble! Carefully unroll your cooled cake. It should hold its curled shape but not be so stiff that it cracks. Spread the cheesecake filling evenly over the cake, leaving a 1-inch border on all sides. This border prevents the filling from squishing out when you roll it up. Now, drain your strawberries (save that syrup for cocktails or pancakes), and spread them evenly over the filling. They should be in a single layer, not piled up like a fruit mountain. Too many berries and your roll won't hold together.
- Starting from the same short end you rolled from before, gently roll the cake up using the towel to help lift and guide it. Don't press down or squeeze—just let it roll naturally. The towel prevents sticking and gives you something to grip. Once rolled, wrap the whole thing in plastic wrap and refrigerate for at least 2 hours, preferably overnight. This chilling time is crucial—it firms up the filling and allows the flavors to meld into something transcendent.
- When you're ready to serve, unwrap the roll and place it seam-side down on a cutting board. Dust generously with powdered sugar, which not only looks beautiful but adds a subtle sweetness to each bite. Use a sharp knife dipped in hot water to slice—this gives you clean cuts without squishing the roll. Wipe the knife between cuts for picture-perfect slices that show off that gorgeous spiral pattern.
That's it—you did it. But hold on, I've got a few more tricks that'll take this to another level...
Insider Tricks for Flawless Results
The Temperature Rule Nobody Follows
Everything needs to be at the right temperature, and I mean everything. Cold cream whips better, but cream cheese needs to be room temperature to incorporate properly. Eggs whip up fluffier when they're not straight from the fridge, but the cake needs to cool completely before filling or it'll melt into a puddle. I plan ahead: cream cheese comes out of the fridge 2 hours before I start, cream goes in 15 minutes before I need it, and eggs sit on the counter while I prep everything else. This attention to temperature is what separates amateur bakes from professional results.
Why Your Nose Knows Best
Don't rely on timers alone—your senses are your best kitchen tools. The cake is done when it smells like sweet vanilla and just barely starts to pull away from the sides of the pan. The strawberries are perfectly macerated when they smell like strawberry jam and have released their juices. The filling is properly combined when it smells like cheesecake, not cream cheese. Trust your nose over your eyes every time. I've pulled cakes at 11 minutes because they smelled done, and they've been perfect every time.
The 5-Minute Rest That Changes Everything
After you roll up the cake the first time, let it rest for exactly 5 minutes before unrolling it to fill. This brief rest relaxes the gluten just enough to prevent cracking but doesn't let it set completely. I learned this the hard way after my first attempt cracked like a desert floor. Those five minutes are the difference between a smooth, professional-looking roll and one that looks like it survived an earthquake. Set a timer—don't guess.
The Strawberry Selection Secret
Not all strawberries are created equal, and the ones that look perfect are often the least flavorful. Look for berries that smell intensely of strawberry when you stick your nose right up to the container. They should be deeply red but not dark red (those are overripe and will turn to mush). The green tops should look fresh, not dried out, but the berries themselves shouldn't have white shoulders. If you can only find mediocre berries, add a teaspoon of really good strawberry jam to the filling for an extra flavor boost.
The Make-Ahead Miracle
This dessert actually gets better with time, up to a point. You can make it up to 24 hours ahead and it'll taste amazing—the flavors meld and intensify. But after 48 hours, the strawberries start to break down and the cake can get soggy. For maximum make-ahead convenience, I prepare everything separately: bake and roll the cake, make the filling, macerate the berries, then assemble the morning I need it. It takes 20 minutes to put together but tastes like you spent all day on it.
Creative Twists and Variations
This recipe is a playground. Here are some of my favorite ways to switch things up:
Raspberry Lemon Dream
Swap the strawberries for fresh raspberries and add a teaspoon of lemon zest to the cheesecake filling. The tartness of the raspberries against the creamy filling is absolutely addictive. I like to crush about a third of the berries before macerating them, which creates a beautiful raspberry swirl throughout the filling. The lemon zest brightens everything and makes this version taste like summer in the French countryside.
Chocolate Covered Strawberry
Add 2 tablespoons of cocoa powder to the cake batter and replace 2 tablespoons of flour with cocoa. The chocolate cake pairs beautifully with the strawberries, creating that classic chocolate-covered strawberry flavor profile. I also like to add a tablespoon of chocolate liqueur to the cheesecake filling for an extra layer of chocolate complexity. Dust the finished roll with cocoa powder instead of powdered sugar for a dramatic presentation.
Autumn Apple Cider
Replace the strawberries with thinly sliced apples that have been sautéed in butter, brown sugar, and a splash of apple cider. Add cinnamon and nutmeg to the cheesecake filling, and you've got all the flavors of fall rolled into one elegant dessert. This version is particularly good served slightly warm, with a drizzle of caramel sauce over each slice.
Tropical Paradise
Use diced mango and pineapple instead of strawberries, add coconut extract to both the cake and filling, and sprinkle toasted coconut over the top before serving. The tropical fruit needs less maceration time—just 10 minutes with the sugar and lemon juice will do. This version transports you straight to a beach in Hawaii, even in the dead of winter.
Savory Brunch Version
Skip the sugar in the cake and add fresh herbs like basil or tarragon. Fill it with herbed cream cheese and smoked salmon instead of the sweet filling. Roll it up and slice for an impressive brunch dish that looks like you spent hours but comes together in minutes. The key is to use plenty of fresh herbs and a squeeze of lemon to keep everything bright.
Holiday Peppermint
Add crushed candy canes to the cheesecake filling and use crushed peppermint bark instead of powdered sugar for dusting. The cool mint against the creamy filling is incredibly refreshing, and the red and white colors make it perfect for holiday gatherings. I like to add just a touch of peppermint extract to the filling—start with 1/4 teaspoon and add more to taste.
Storing and Bringing It Back to Life
Fridge Storage
Wrap the roll tightly in plastic wrap, then store it in an airtight container. It'll keep for up to 3 days, but it's best within the first 24 hours. The key is to keep it away from strong-smelling foods—cheesecake filling is like a sponge for refrigerator odors. I like to add a piece of parchment paper between the plastic wrap and the roll to prevent condensation from making the cake soggy. If you notice any weeping from the filling, just gently blot it with a paper towel before serving.
Freezer Friendly
You can freeze this dessert for up to a month, but with caveats. The texture will change slightly—the filling becomes more dense and ice cream-like, which isn't necessarily bad. Wrap it in plastic wrap, then foil, then place in a freezer bag. Thaw overnight in the refrigerator, not at room temperature, or the filling can separate. The strawberries will be softer after freezing, so I recommend this method for variations with heartier fruits like apples or pears.
Best Reheating Method
You don't reheat this dessert, but you can refresh it. If it's been in the fridge and seems a bit firm, let it sit at room temperature for 15-20 minutes before serving. This takes the chill off and lets the flavors bloom. If the cake seems dry (this can happen after a day or two), lightly brush the cut sides with simple syrup or even just a few drops of water before dusting with fresh powdered sugar. The moisture will rehydrate the cake just enough to bring back that fresh-baked texture.