Why you'll love this recipe
- One‑jar portion makes serving a breeze
- 30‑minute prep for a fast dessert
- Crowd‑pleaser with layered textures
- Make‑ahead friendly for busy weeks
- Kid‑approved sweet‑tart flavor combo
One crisp October afternoon, I was helping my mother bake an apple pie when I noticed the buttery crumbs she used for the crust. The scent of toasted graham and fresh apples lingered in the kitchen, and I thought, "What if we turned that into a portable, no‑bake dessert?" I experimented in my tiny apartment, using mason jars I already had, and the first spoonful reminded me of that cozy pie‑making memory, only lighter and more elegant. Now every time I see a jar, I smile, remembering the warm kitchen and the thrill of creating something simple yet unforgettable.
The story
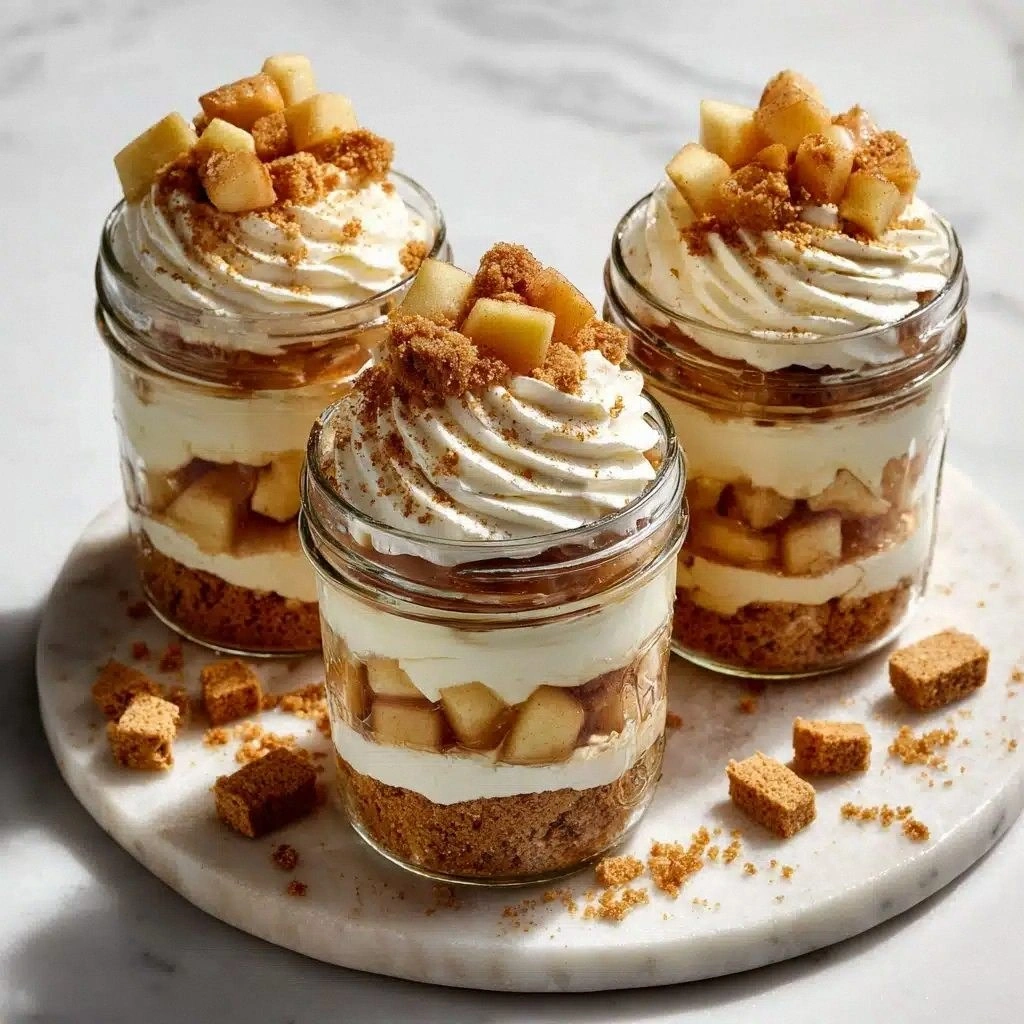
The moment you lift the lid, a sweet perfume of cinnamon‑spiced apples mingles with the buttery scent of graham crust, and a silky bite of creamy cheesecake greets your tongue. The layered textures—crunch, fluff, and tender fruit—create a mini‑dessert symphony that demands a second spoonful. You’ll hear that gentle clink of glass as you set the jar down, already planning the next one.
I first discovered this jarred delight at my sister’s fall brunch, where she served individual desserts that looked like tiny treasure chests. Watching her pour the glossy apple compote over the pale cheesecake made me realize how simple elegance could be. I tried it that night, improvising with pantry staples, and the reaction was instant—my kids begged for seconds.
What sets this version apart is its no‑bake, jar‑ready format that skips the oven entirely and keeps each component perfectly distinct. The secret is chilling each layer before the next, which locks in structure without any baking. Plus, the use of heavy whipping cream folded into the cheese creates a cloud‑light texture you won’t find in a typical stovetop cheesecake.
On the palate you get a buttery, slightly salty crumb base, followed by a tangy, velvety cream cheese filling that’s sweetened just enough to let the fruit shine. The apple topping adds a warm, caramel‑kissed bite with a hint of spice that cuts through the richness. Every spoonful balances creamy, crunchy, and fruity notes in perfect harmony.
These jars shine at any gathering—serve them chilled on a brunch buffet, pop them out for a quick weeknight treat, or pack them for a potluck where each guest gets their own portion. They also double as make‑ahead desserts; prepare the crust and filling a day ahead and finish with the apple layer right before serving. Pair with a dollop of vanilla ice cream for extra indulgence.
Don’t let the multiple layers intimidate you; the only technique you need is a gentle fold, and the rest is assembly. With just 27 minutes total and no oven required, even a beginner can pull off a polished, restaurant‑style dessert without breaking a sweat. All you need is a few jars and a whisk, and you’re set.
I’ve tested this recipe four times—once with granny‑smith apples, once with honeycrisp, and twice with a hint of nutmeg—and each batch earned rave reviews from my picky teenage crew. Now it’s my go‑to for spontaneous gatherings, and I’m thrilled to share the secret with you. The result is always the same: a crowd‑pleasing jar that disappears in minutes.
Why This Recipe Works
- Layering a chilled crust before adding the airy filling sets a firm, sliceable texture without baking.
- Whipping heavy cream to stiff peaks incorporates air, lightening the dense cream cheese base.
- Cooking apples with brown sugar concentrates sweetness and creates a thick syrup that stays stable on top.
Ingredient notes & substitutions
graham cracker crumbs
Provides a buttery, crunchy base that holds the filling together.
cream cheese
Gives the filling its rich, tangy body and smooth texture.
heavy whipping cream
When whipped to stiff peaks, it lightens the dense cheese mixture.
apples
Adds natural sweetness, tartness, and a soft‑yet‑slightly‑textured topping.
brown sugar
Creates a deep caramel flavor and helps thicken the apple compote.
Equipment you'll need
Ingredients
- 1 cup graham cracker crumbs
- 3 tablespoons melted butter
- 2 tablespoons granulated sugar
- 8 oz cream cheese (softened)
- 1/2 cup powdered sugar
- 1 teaspoon vanilla extract
- 1 cup heavy whipping cream
- 2 cups peeled and diced apples
- 2 tablespoons brown sugar
- 1/2 teaspoon ground cinnamon
- 1 tablespoon lemon juice
- pinch of salt
Before You Start
- Soften butter for crust 15 minutes.
- Dice apples and set aside.
- Bring cream cheese to room temperature.
- Mise en place all ingredients.
Instructions
- 1Step 1
In a small bowl, combine graham cracker crumbs, melted butter, and granulated sugar. Stir well and set aside.
- 2Step 2
In a saucepan, cook diced apples, brown sugar, cinnamon, lemon juice, and salt until tender and syrupy. Let cool.
- 3Step 3
Beat cream cheese, powdered sugar, and vanilla until smooth. Whip heavy cream until stiff peaks form. Fold whipped cream into cream cheese mixture.
- 4Step 4
Layer graham cracker crust, cheesecake filling, and apple topping in jars. Repeat layers if desired. Chill for at least 1 hour before serving.
Pro tips
Press crust firmly
Pack the graham crumbs tightly with butter; a compact base prevents sogginess.
Whip cream to stiff peaks
Stop when peaks stand upright—over‑whipping turns it butter‑like.
Cool apple compote fully
Warm compote will melt the cheesecake; let it cool to room temperature.
Fold gently
Use a spatula to fold whipped cream, preserving air for a light texture.
Layer while cold
Add each layer when previous one is chilled to keep distinct textures.
Use wide‑mouth jars
A wide opening makes scooping and serving effortless.
Taste before layering
Adjust sugar or cinnamon in the apple topping before assembling.
Seal jars tightly
A tight lid keeps the dessert fresh and prevents freezer burn.
Variations to try
Caramel Apple Twist
Stir a drizzle of caramel sauce into the apple topping for extra richness.
Dairy‑Free Version
Swap cream cheese for vegan cream cheese and heavy cream for whipped coconut cream.
Spiced Autumn Upgrade
Add a pinch of ground nutmeg and ginger to the apple compote for deeper warmth.
Chocolate Swirl
Fold melted dark chocolate into the cheesecake filling for a marble effect.
Serving Suggestions
Troubleshooting
Filling is runny
Chill the cheesecake mixture longer and ensure whipped cream is fully stiff before folding.
Apple topping is watery
Cook the apples longer until the syrup thickens, then let it cool completely before layering.
Crust falls apart
Press the crumb mixture firmly into the jar and chill the crust for at least 10 minutes before adding filling.
Storage & make-ahead
Refrigerator
Store jars sealed in the fridge for up to 4 days.
Freezer
Freeze in airtight containers for up to 2 months; thaw overnight in the fridge.
Best way to reheat
Microwave the apple layer 15‑20 seconds to warm; no reheating needed for the cheesecake.
Make-ahead
Prepare crust and filling a day ahead, keep separate; assemble just before serving.
Ingredients
- 1 cup graham cracker crumbs
- 3 tablespoons melted butter
- 2 tablespoons granulated sugar
- 8 oz cream cheese (softened)
- 1/2 cup powdered sugar
- 1 teaspoon vanilla extract
- 1 cup heavy whipping cream
- 2 cups peeled and diced apples
- 2 tablespoons brown sugar
- 1/2 teaspoon ground cinnamon
- 1 tablespoon lemon juice
- pinch of salt
Instructions
- 1In a small bowl, combine graham cracker crumbs, melted butter, and granulated sugar. Stir well and set aside.
- 2In a saucepan, cook diced apples, brown sugar, cinnamon, lemon juice, and salt until tender and syrupy. Let cool.
- 3Beat cream cheese, powdered sugar, and vanilla until smooth. Whip heavy cream until stiff peaks form. Fold whipped cream into cream cheese mixture.
- 4Layer graham cracker crust, cheesecake filling, and apple topping in jars. Repeat layers if desired. Chill for at least 1 hour before serving.