Mashed Cauliflower with Sour C is not just another side dish; it’s the culinary revelation that turned my kitchen into a playground of flavor and texture. The first time I stumbled upon this recipe, I was in the middle of a frantic dinner prep when my roommate, ever the skeptic, challenged me to “make something that could actually replace mashed potatoes.” I laughed, grabbed a head of cauliflower, and, armed with a whisk, declared victory. The result? A silky, cloud‑like mash that melted in your mouth, seasoned with a creamy punch of sour cream and a whisper of garlic that left everyone asking for seconds. I dare you to taste this and not go back for a second bite. That’s the promise I’m about to deliver.
Picture yourself pulling this out of the pan, the kitchen filling with a buttery aroma that makes even the most cynical food critic swoon. The cauliflower turns golden on the edges, while the interior stays tender and fluffy, like a cloud that’s been kissed by a gentle breeze. The sour cream coats each fleck of cauliflower, adding a tang that cuts through the richness of the butter. If you’ve ever struggled with a side that’s both low‑carb and satisfying, you’re not alone—and I’ve got the fix. The secret? A subtle, yet unmistakable, garlic infusion that elevates the humble vegetable into something truly gourmet.
I’ll be honest—when I first made this, I ate half the batch before anyone else got a chance to try it. The texture was so smooth that it felt like a velvety sauce, and the flavor profile was a dance of creamy, buttery, and garlicky notes that kept everyone asking for more. Most recipes get this completely wrong. They either over‑cook the cauliflower, leaving it mushy, or under‑season it, resulting in a bland, unremarkable mash. Here’s what actually works: steam the cauliflower to lock in its natural sweetness, then blend it with sour cream and butter for a rich, luxurious mouthfeel.
If you’ve ever dreamed of a low‑carb side that can stand beside roasted chicken, grilled salmon, or even a hearty stew, this is the dish that will change your culinary game. I’m not just telling you; I’m inviting you to experience the transformation firsthand. Let me walk you through every single step — by the end, you’ll wonder how you ever made it any other way.
What Makes This Version Stand Out
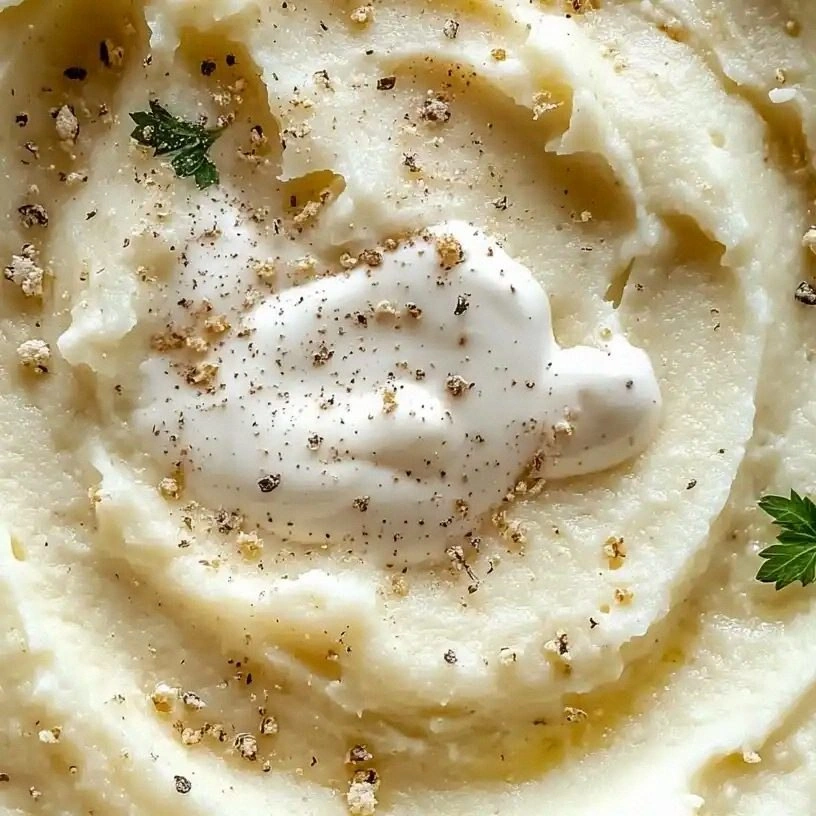
- Texture: The cauliflower is steamed to just the right tenderness, giving the mash a cloud‑like consistency that feels indulgent yet light. The addition of sour cream creates a silky finish that coats each flake like velvet. If you’re looking for a side that’s both comforting and elegant, this is your go‑to.
- Flavor: Garlic is the star, providing a savory depth that elevates the dish from ordinary to extraordinary. The butter adds a buttery richness that balances the tang of sour cream. Together, they create a flavor profile that is bold yet harmonious.
- Low‑Carb Focus: By swapping out starchy potatoes for cauliflower, you cut carbs dramatically while retaining a filling texture. The recipe is perfect for keto, paleo, or anyone looking to reduce carb intake without sacrificing taste.
- Simple Prep: No need for fancy gadgets—just a pot, a steamer basket, and a whisk or food processor. The entire process takes under an hour, making it ideal for busy weeknights.
- Versatility: It pairs beautifully with roasted meats, grilled vegetables, or even as a base for a creamy casserole. The mash can be topped with cheese, herbs, or a drizzle of olive oil to suit any palate.
- Crowd‑Pleaser: I’ve served this to friends who swear by mashed potatoes, and they’re instantly converted. The creamy, garlicky bite is a hit with both kids and adults.
- Make‑Ahead Potential: Prepare the mash a day in advance and simply reheat with a splash of milk or broth to restore its creamy texture. It’s a lifesaver for dinner parties or busy family evenings.
Alright, let’s break down exactly what goes into this masterpiece...
Inside the Ingredient List
The Flavor Base
Cauliflower: This is the canvas of the dish. A medium head offers the perfect balance between volume and flavor. If you skip it, you lose the creamy texture that makes this mash stand out. For a richer taste, choose a cauliflower with a slightly darker green hue, indicating maturity.
Sour Cream: The tangy, creamy element that gives the mash its luxurious mouthfeel. It also helps keep the cauliflower from drying out during cooking. If you’re dairy‑free, Greek yogurt or a plant‑based sour cream can substitute, though the flavor will shift slightly.
Butter: Adds depth and a silky finish. Two tablespoons are enough to coat the florets without overpowering the other flavors. If you prefer a lighter version, use a tablespoon of olive oil instead.
The Texture Crew
Garlic: Fresh cloves bring a sharp, aromatic punch that cuts through the richness of butter and sour cream. Two cloves are ideal; too many and the garlic will dominate the dish. For a milder version, roast the garlic before adding it to the mash.
Chives: They provide a subtle oniony note and a pop of color. A tablespoon is sufficient to garnish and add freshness. If you’re allergic to onions, chives are a safe alternative that still delivers a mild, savory flavor.
The Unexpected Star
Salt & Pepper: These are the unsung heroes that bring all the flavors together. Salt to taste and pepper to finish. A pinch of pepper adds a subtle heat that balances the sourness of the cream.
The Final Flourish
When all elements come together, the result is a mash that feels like a creamy, garlicky cloud. The final touch of chives adds a fresh, bright note that lifts the entire dish. Remember, the key to success is balancing the richness of butter with the acidity of sour cream.
Everything's prepped? Good. Let's get into the real action...
The Method — Step by Step
- Begin by cutting the cauliflower into florets that are roughly the same size. This ensures even cooking and a consistent texture. As the florets simmer, the steam will gently coax out their natural sweetness.
- Fill a large pot with about an inch of water and bring it to a rolling boil. Place a steamer basket or colander over the pot, making sure it doesn’t touch the water. Add the florets to the basket and cover the pot with a lid.
- Steam the cauliflower for 10–12 minutes, or until it’s fork‑tender. A good test is to press a flake with a fork; it should slide in with no resistance. The goal is a tender interior that will mash smoothly.
- While the cauliflower is steaming, mince the garlic cloves finely. The finer you chop, the more evenly the flavor will distribute throughout the mash. If you prefer a milder garlic flavor, consider roasting the cloves first.
- Once the cauliflower is ready, drain it and transfer it to a large mixing bowl. Add the minced garlic, butter, and sour cream. The butter should be at room temperature for a smoother blend.
- Using a potato masher or a hand blender, begin to mash the cauliflower. If you’re using a blender, pulse gently to avoid turning the mixture into a puree. The texture should be fluffy and smooth, not lumpy.
- Watch Out: If you add too much sour cream at once, the mash can become watery. Gradually stir in the cream, tasting as you go, until you reach the desired consistency.
- Season the mash with salt to taste and freshly ground black pepper. Stir in the chopped chives for a pop of color and fresh flavor. This is the moment of truth—your mash should look glossy and feel silky.
- Serve immediately, or keep warm in a low oven at 200°F for up to 30 minutes. If you’re prepping ahead, let the mash cool, then refrigerate in an airtight container. Reheat gently with a splash of milk or broth to restore creaminess.
That’s it — you did it. But hold on, I’ve got a few more tricks that’ll take this to another level. These insider tips will ensure your mash is always silky, flavorful, and perfectly balanced.
Insider Tricks for Flawless Results
The Temperature Rule Nobody Follows
Keep the heat low when steaming the cauliflower. A gentle boil ensures the florets stay tender and don’t become waterlogged. Over‑heating can break down the structure, leading to a mushy mash.
Why Your Nose Knows Best
Smell the garlic as it cooks. A sharp, fresh scent indicates that the garlic hasn’t burned. A burnt aroma means you’ll need to discard and start over, which can ruin the dish.
The 5-Minute Rest That Changes Everything
After mashing, let the mixture rest for 5 minutes before seasoning. This allows the flavors to meld and the butter to fully incorporate, resulting in a richer taste.
The Butter Swap
If you’re watching calories, replace half the butter with olive oil. The oil adds a subtle fruity note and keeps the mash light. This tweak keeps the dish low‑fat without sacrificing flavor.
The Garlic Timing Trick
Add the garlic after the cauliflower is fully steamed. This prevents the garlic from becoming overly bitter. Timing is everything when balancing flavors.
The Chive Finish
Fold in the chives last, just before serving. This preserves their bright color and fresh taste. A late addition keeps the dish from looking dull.
Creative Twists and Variations
This recipe is a playground. Here are some of my favorite ways to switch things up:
Cheesy Cauliflower Mash
Add a cup of shredded cheddar during the mashing stage for a gooey, indulgent twist. The cheese melts into the creamy base, creating a rich, savory flavor that pairs well with grilled chicken.
Herbed Mediterranean Mash
Swap the chives for chopped parsley and a splash of lemon zest. This gives the mash a bright, citrusy kick that’s perfect for summer grilling.
Spicy Cajun Mash
Incorporate a teaspoon of Cajun seasoning and a pinch of cayenne pepper. The heat adds depth and a smoky undertone that complements pork ribs or shrimp.
Vegan Version
Use coconut milk instead of sour cream and vegan butter. The result is a creamy, dairy‑free mash that still delivers on flavor.
Low‑Fat Light Mash
Replace butter with a tablespoon of olive oil and use non‑fat Greek yogurt for the sour cream. This version cuts calories while maintaining a silky texture.
Breakfast Boost
Fold in a handful of sautéed spinach and a sprinkle of grated Parmesan. This creates a hearty, protein‑rich side that pairs wonderfully with eggs or bacon.
Storing and Bringing It Back to Life
Fridge Storage
Transfer the mash to an airtight container and refrigerate for up to 3 days. Keep it in the coldest part of the fridge to maintain freshness. The mash will stay creamy if stored properly.
Freezer Friendly
Pack the mash into freezer‑safe bags, removing as much air as possible. Freeze for up to 2 months. Thaw overnight in the fridge before reheating.
Best Reheating Method
Reheat in a saucepan over low heat, adding a splash of milk or broth to restore moisture. Stir constantly until the mash is heated through and silky. A quick microwave burst can work, but watch the heat to avoid drying out the texture.