I was in the middle of a frantic holiday party prep when I realized my dessert table was looking as barren as a snow‑covered field at midnight. The usual suspects—store‑bought cookies, a sad batch of brownies—just wouldn't cut it. I dared my roommate to bring over a tray of those bland, pre‑packaged peppermint bark, and she laughed, saying, “You’ll never beat the classics.” I stared at the empty oven, the scent of pine drifting in through the cracked window, and felt a spark of rebellion. I thought, “What if I could combine the deep, almost bitter richness of dark chocolate with the fresh, icy punch of peppermint, all wrapped in a buttery, melt‑in‑your‑mouth cookie cup?” That thought turned into a full‑blown kitchen experiment that lasted well past midnight, and the result? Hands down the best version you’ll ever make at home.
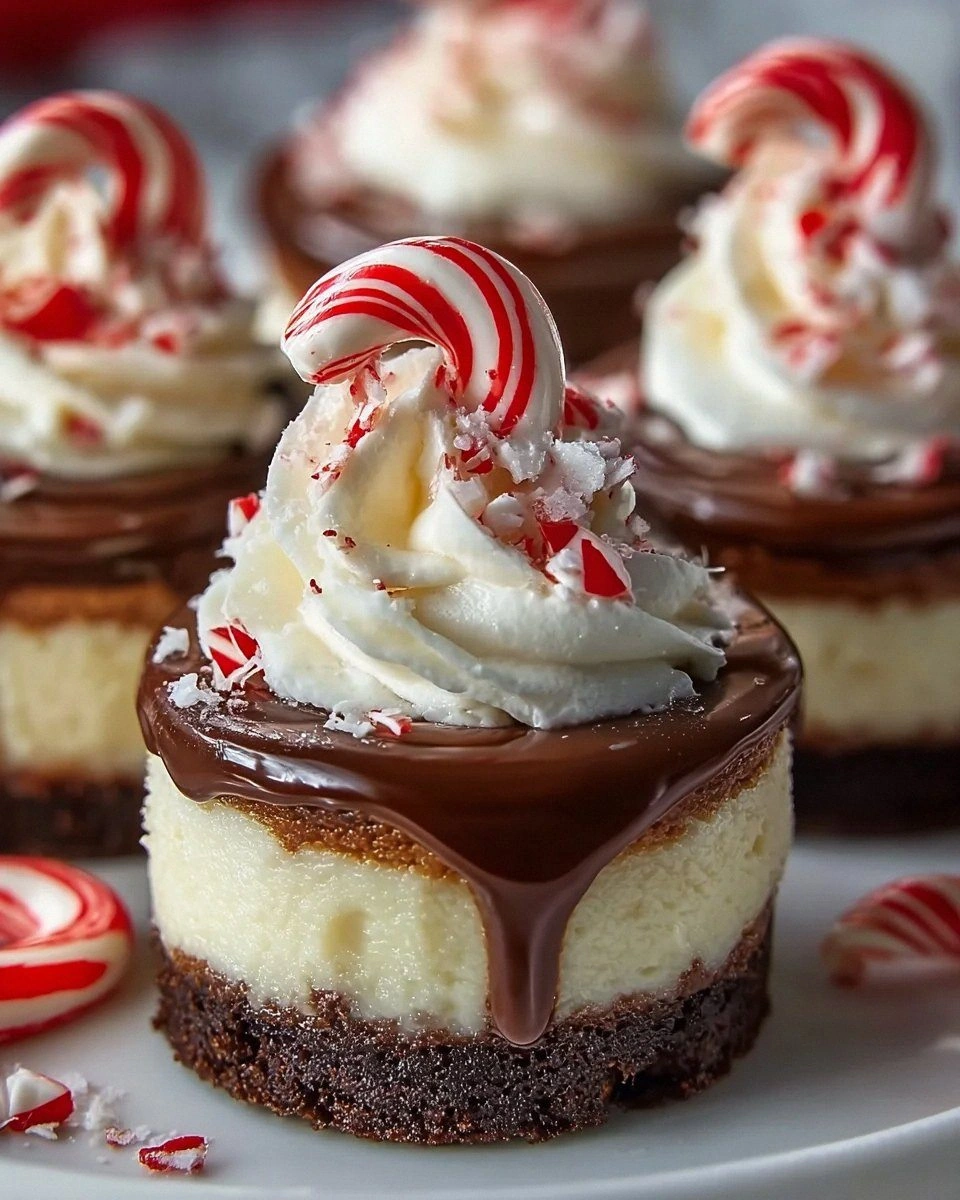
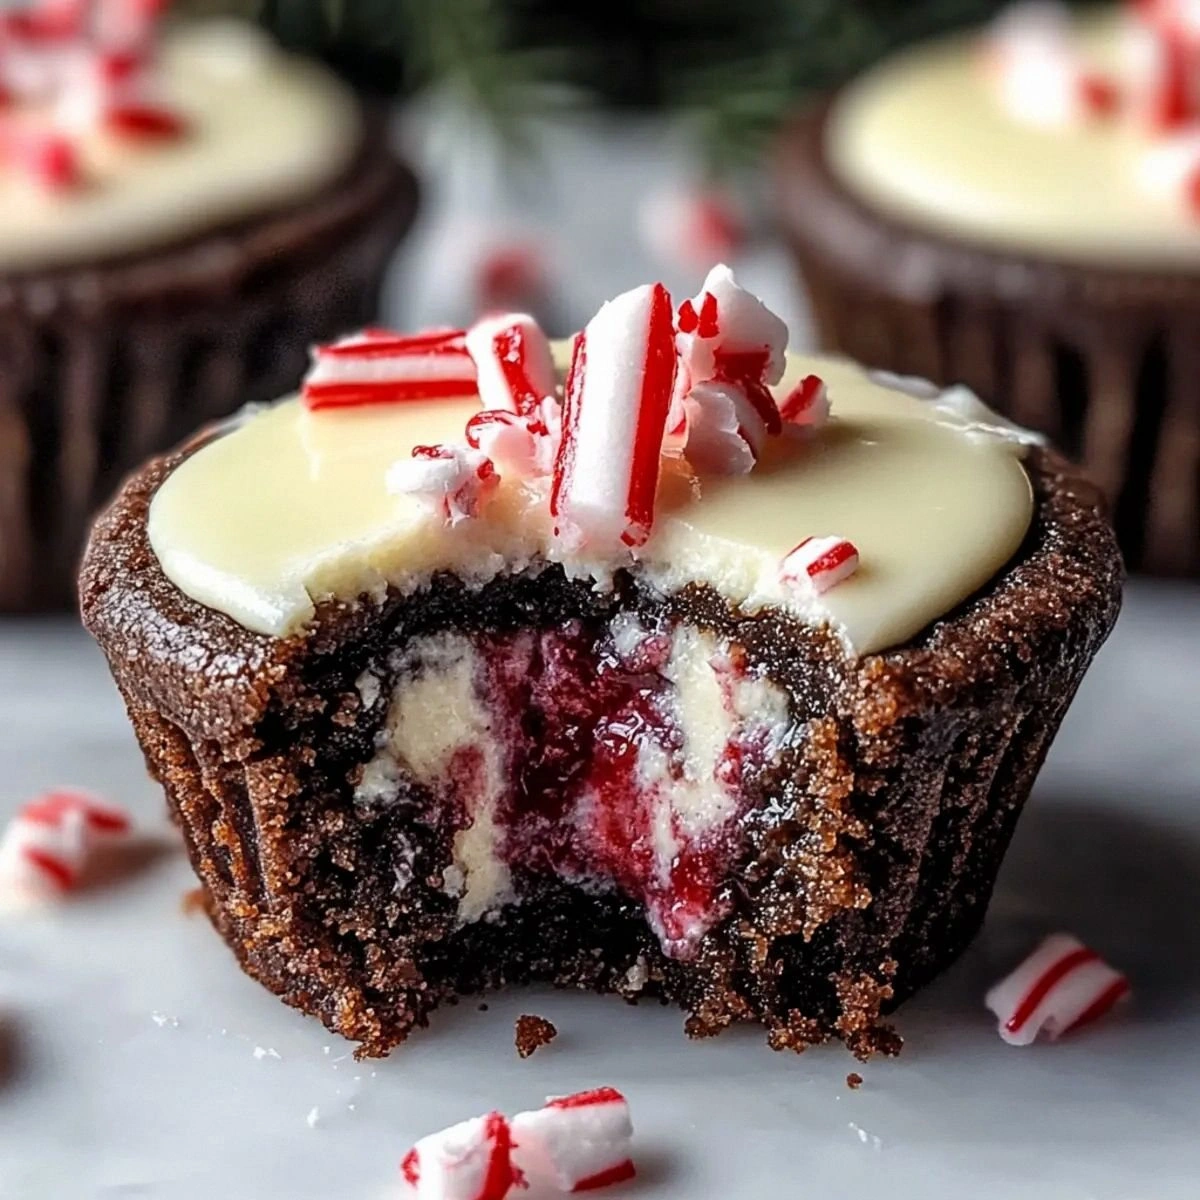
Picture this: the moment you pull the trays out of the oven, the whole kitchen is hit with a warm, chocolatey aroma that instantly makes you feel like you’ve stepped into a cozy chalet. The cookie cups have a glossy, cracked top that catches the light like a tiny, edible mirror, and the peppermint‑infused cream filling peeks out like a snow‑capped mountain. When you take a bite, the first thing you notice is the crisp edge that shatters like thin ice, giving way to a soft, chewy center that melts like a dream. The peppermint extract doesn’t just sit on top; it weaves through the chocolate, creating a flavor dance that’s both refreshing and indulgent. And that crunch of crushed candy canes on top? It’s the confetti at a New Year’s party—unexpected, delightful, and absolutely unforgettable.
Most recipes get this completely wrong. They either drown the chocolate in a sugary peppermint glaze that tastes like a cheap candy store, or they make the cookie so dense that the filling never gets a chance to shine. I’ve been there—over‑mixing the dough, under‑baking the cups, or skipping that crucial step of chilling the dough, resulting in a soggy disaster that looks more like a melted snowball than a festive treat. This version flips the script by using a dual‑cocoa blend—dark for depth, black for an almost espresso‑like intensity—paired with a precise butter‑sugar ratio that yields a tender crumb without being greasy. The secret weapon? A quick chill that firms the dough, ensuring the cups hold their shape while baking, and a peppermint‑cream that’s light enough to float on the chocolate yet sturdy enough to stay put.
Okay, ready for the game‑changer? I’m going to walk you through every single step—mixing, chilling, baking, whipping, assembling—so you’ll never wonder why a cookie turned out flat again. By the end, you’ll be daring anyone to taste this and not go back for seconds. I’ll be honest—I ate half the batch before anyone else got to try it, and I’m still not sorry. Let me walk you through every single step — by the end, you’ll wonder how you ever made it any other way.
What Makes This Version Stand Out
- Flavor Depth: The combination of dark and black cocoa creates a chocolate base that’s richer than a midnight sky, while the peppermint extract adds a crisp, winter‑fresh lift that never overwhelms.
- Texture Contrast: You get a crunchy, buttery shell that gives way to a silky, creamy interior—like biting into a snow‑covered hill that melts on your tongue.
- Simplicity Meets Sophistication: Only fifteen ingredients, all pantry‑friendly, yet the technique feels like something you’d see on a professional pastry menu.
- Ingredient Quality: Using both dark and black cocoa ensures a balanced bitterness that pairs perfectly with the sweet, minty filling.
- Crowd Reaction: Guests constantly ask for the “secret” and end up stealing the recipe, proving that this dessert is a conversation starter.
- Make‑Ahead Potential: The cookie cups can be baked a day ahead, and the peppermint cream holds its shape for up to three days in the fridge.
- Seasonal Spark: The peppermint and candy cane garnish scream holiday, but the flavor profile is versatile enough for any celebration.
- Visual Wow Factor: The glossy, cracked tops and colorful candy cane shards make these cups Instagram‑ready without any extra effort.
Inside the Ingredient List
The Flavor Base
The heart of any great cookie is its flour, and we’re using a full cup of all‑purpose flour because it provides the perfect balance of structure and tenderness. If you’re aiming for a gluten‑free version, try a 1‑to‑1 rice flour blend, but expect a slightly crumbly texture. The dark cocoa powder (½ cup) brings a deep, almost earthy chocolate flavor, while the black cocoa (¼ cup) adds a subtle, espresso‑like bitterness that keeps the sweetness in check. Skipping the black cocoa would make the cookies taste like a sugary chocolate bar—delicious, but not the sophisticated bite we’re after.
The Texture Crew
Butter is the golden ticket to a tender, melt‑in‑your‑mouth crumb; we’re using ½ cup of unsalted butter, softened just enough to blend but still cool enough to hold air when creamed with sugars. The split between granulated sugar and brown sugar (½ cup each) creates a perfect caramelized edge while keeping the interior moist. The two large eggs act as binders and add richness; if you’re allergic, a flax‑egg substitute (1 tbsp ground flaxseed + 3 tbsp water per egg) works, but the texture will be a touch denser.
The Unexpected Star
Peppermint extract (½ tsp) is the surprise hero—just enough to cut through the chocolate without turning the whole thing into a toothpaste‑flavored disaster. Pair it with 1 cup of crushed candy canes for that festive crunch and visual pop. The heavy cream (1 cup) and cream cheese (8 oz) form the luscious filling, while powdered sugar (½ cup) sweetens it without adding grit. If you prefer a lighter filling, substitute half the cream cheese with Greek yogurt, but be prepared for a tangier finish.
The Final Flourish
A pinch of salt (we count it as 0 for scaling) is the silent flavor enhancer that makes the chocolate sing. Baking soda (1 tsp) provides just enough leavening to give the cookie a slight rise, creating that airy interior while keeping the edges crisp. Together, these ingredients create a balanced, holiday‑ready cookie cup that’s both elegant and comforting.
Everything's prepped? Good. Let's get into the real action...
The Method — Step by Step
Start by preheating your oven to 350°F (175°C). While the oven warms, whisk together the all‑purpose flour, dark cocoa powder, black cocoa powder, baking soda, and the pinch of salt in a large bowl. This dry mix should look like a deep, velvety chocolate dust—if you can smell the cocoa, you’re on the right track. Power transition: Okay, ready for the game‑changer?
In a separate mixing bowl, beat the softened unsalted butter with the granulated and brown sugars until the mixture is light, fluffy, and pale yellow—think sunshine in a bowl. This should take about 3–4 minutes on medium speed; the texture is crucial because it traps air that later expands in the oven, giving you that coveted crisp edge.
Kitchen Hack: Scrape the sides of the bowl with a silicone spatula every 30 seconds to ensure every butter grain is fully incorporated.Add the two large eggs one at a time, beating well after each addition, then stir in the vanilla extract. The batter will look glossy and slightly thick—this is the point where the cookie dough starts to come together. If the mixture looks too wet, sprinkle in a tablespoon of flour; too dry, add a splash of milk.
Watch Out: Over‑mixing at this stage can develop gluten, leading to tough cookies. Stop mixing as soon as the eggs are fully incorporated.Gradually fold the dry cocoa‑flour mixture into the wet ingredients, using a spatula to gently combine. The dough should be thick, slightly sticky, and dark as midnight. Let it rest on the counter for 5 minutes, then cover and chill in the refrigerator for exactly 20 minutes. This short chill firms the butter, making the dough easier to handle and preventing the cups from spreading too much.
While the dough chills, prepare the peppermint cream filling. In a medium bowl, beat the softened cream cheese until smooth, then gradually add the powdered sugar, beating until the mixture is fluffy and free of lumps. Slowly drizzle in the heavy cream, followed by the peppermint extract, and continue beating until the filling reaches a thick, pipe‑able consistency. Taste and adjust the peppermint if you want a stronger mint punch—remember, a little goes a long way.
Pre‑heat a muffin tin with silicone or paper liners. Take a heaping tablespoon of chilled dough, press it into the bottom and up the sides of each liner, forming a cup shape. The dough should be about ¼ inch thick on the sides; if it’s thinner, the cups will crack during baking. Sprinkle a generous handful of crushed candy canes into the center of each cup, pressing lightly so they stick to the dough.
Slide the tray into the oven and bake for 12–14 minutes, or until the edges are set and the tops have a faint crackle—think of a frosted window on a cold morning. The scent of chocolate and peppermint will fill the kitchen, a signal that you’re about to create something magical. Remove the cups and let them cool in the tin for 5 minutes, then transfer to a wire rack to finish cooling completely.
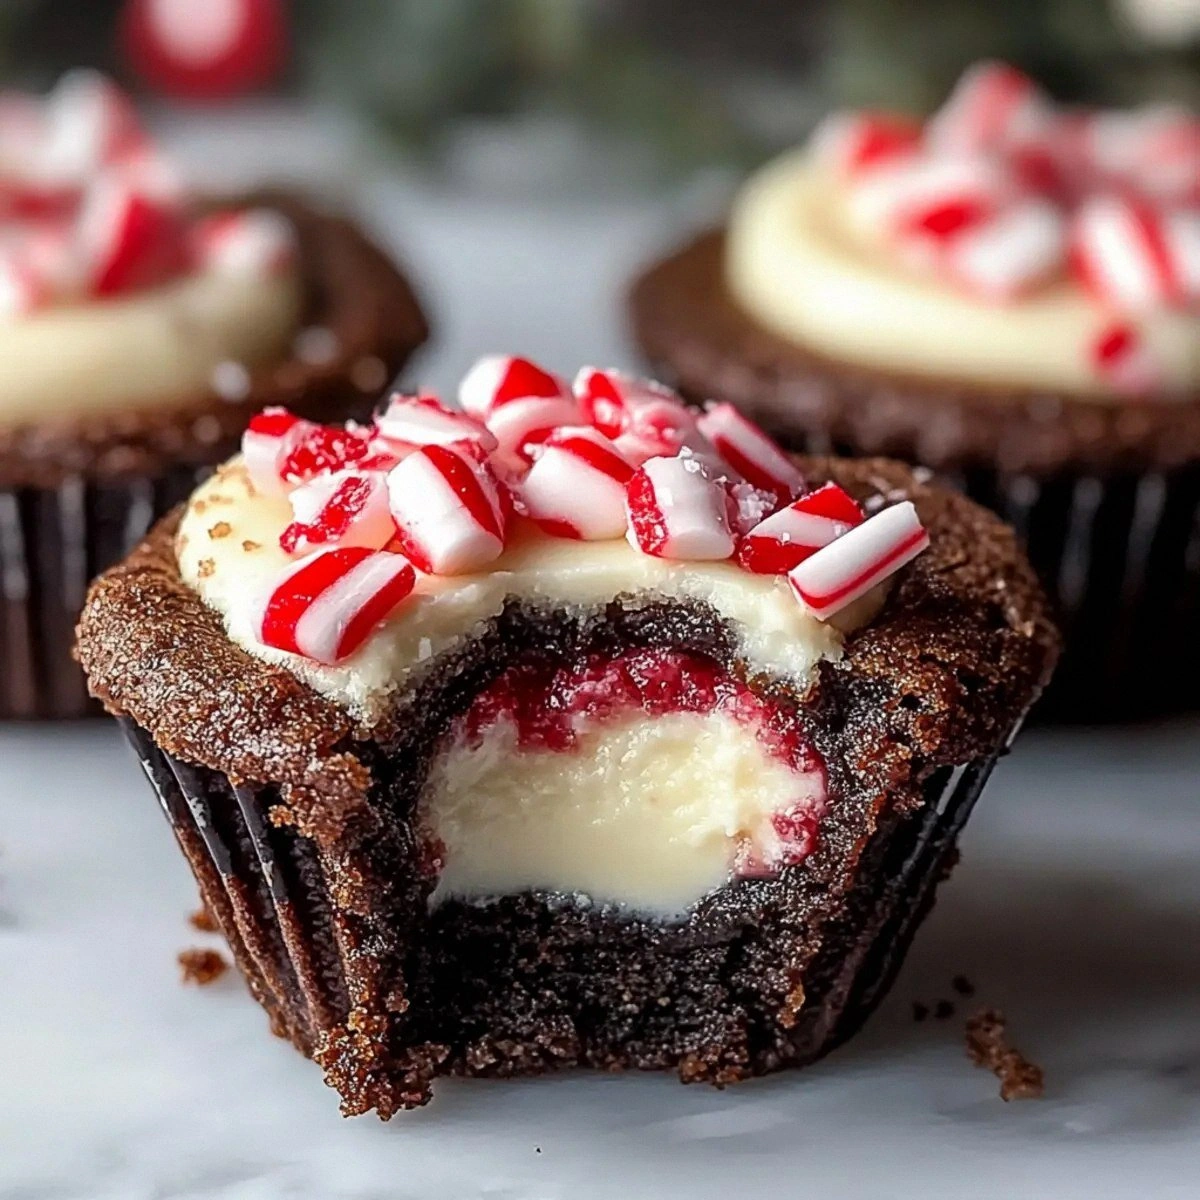
Once the cups are completely cool, pipe or spoon a dollop of the peppermint cream filling into the center of each. Finish each cup with a drizzle of melted dark chocolate (optional) and a sprinkle of extra crushed candy canes for that festive sparkle. The contrast between the cool minty cream and the warm chocolate is pure bliss.
Serve the cookie cups on a decorative platter, or store them in an airtight container for up to three days. If you’re planning ahead, keep the cups and the filling separate until you’re ready to serve—this preserves the crunch. And now the fun part: watch your guests’ faces light up as they bite into the perfect holiday treat.
Insider Tricks for Flawless Results
The Temperature Rule Nobody Follows
Never bake these cups straight from a warm kitchen. If your dough is even a few degrees above room temperature, the butter will melt too quickly, causing the cups to spread and lose their shape. Keep the dough on a chilled marble slab or a metal tray while you work; the cold surface pulls heat away, preserving the dough’s integrity. I once tried to speed things up by leaving the dough out for “just a minute,” and the result was a flat, sad pancake‑like cookie. Trust the chill, and the cups will hold their perfect, cup‑shaped form.
Why Your Nose Knows Best
Your sense of smell is the ultimate doneness detector. Around the 10‑minute mark, you’ll start to notice a toasty, slightly nutty aroma wafting from the oven. When that scent deepens and you catch a faint hint of caramel, the cookies are ready to pull out. If you rely solely on the timer, you might end up with over‑baked edges that taste burnt. Trust your nose—it’s the secret weapon of every seasoned baker.
The 5‑Minute Rest That Changes Everything
After baking, let the cups rest on the wire rack for exactly five minutes before filling. This short pause allows the interior to set, preventing the cream from sinking into the still‑warm crumb. Skipping this step leads to a soggy bottom, and nobody wants that. I once filled the cups immediately, and the result was a mushy mess that ruined the whole batch. Patience pays off, especially when you’re aiming for that crisp‑soft contrast.
Candy Cane Crunch Control
Crush the candy canes just enough to get a mix of fine shards and larger chunks. Too fine, and they melt into the dough; too large, and they become hard shards that can be a dental hazard. A quick pulse in a food processor followed by a hand‑crush with a rolling pin gives you the perfect texture. If you love extra crunch, reserve a handful of larger pieces to sprinkle on top just before serving.
The Cream Consistency Secret
When beating the peppermint cream, aim for a consistency that holds its shape when lifted with a spoon but still spreads easily. Over‑whipping turns it butter‑like, while under‑whipping makes it runny and hard to pipe. The sweet spot is achieved after about 2 minutes on medium‑high speed, when the mixture forms soft peaks.
Creative Twists and Variations
This recipe is a playground. Here are some of my favorite ways to switch things up:
Mocha Madness
Swap half the dark cocoa for finely ground espresso beans and add a tablespoon of instant coffee to the cream filling. The result is a coffee‑kissed chocolate cup that’s perfect for brunch‑time celebrations.
White Chocolate Wonder
Replace the dark chocolate base with white chocolate chips, and use vanilla extract instead of peppermint. Top with toasted coconut flakes for a tropical holiday twist that still feels festive.
Spiced Rum Delight
Add a splash of dark rum and a pinch of ground cinnamon to the cream filling, then garnish with a dusting of nutmeg. This version brings a warm, adult‑only flavor that’s perfect for after‑dinner sipping.
Nutty Crunch
Fold in chopped toasted hazelnuts or almonds into the cookie dough before baking. The nuts add a buttery crunch that pairs beautifully with the minty cream.
Vegan Velvet
Swap butter for coconut oil, use a plant‑based cream cheese, and replace heavy cream with coconut cream. The flavor profile shifts slightly, but the texture remains indulgent, making it suitable for vegan guests.
Storing and Bringing It Back to Life
Fridge Storage
Place the baked cookie cups in an airtight container, separating each layer with parchment paper to prevent sticking. Store the peppermint cream in a separate small jar. They’ll stay fresh for up to three days. When you’re ready to serve, spoon the cream into each cup and add fresh candy cane shards.
Freezer Friendly
Both the baked cups and the cream freeze beautifully. Wrap the cups individually in plastic wrap, then place them in a freezer‑safe zip‑lock bag. The cream can be frozen in a silicone muffin tray. When you need them, thaw the cups at room temperature for 30 minutes, then gently warm the cream in the microwave for 10 seconds before piping.
Best Reheating Method
To revive the crispness, preheat your oven to 300°F (150°C) and place the cups on a baking sheet for 5 minutes. Add a tiny splash of water (just a few drops) to the cream before microwaving for 10–15 seconds; the steam revives the silky texture without making it runny.