I remember the night I tried to impress a friend who claimed to be a “snack connoisseur.” I had a handful of Snickers bars, a jar of salted caramel, a block of chocolate, and a bowl of roasted peanuts. I thought, “Why not make a tart that feels like a dessert and a snack in one?” The kitchen was a chaos of melted chocolate, caramel drips, and peanut butter swirls. The aroma was a sweet, nutty, buttery storm that made the whole house smell like a candy shop. I was about to turn a simple idea into a masterpiece when the timer went off and the chocolate began to set like a stubborn promise. That moment, my friend’s eyes widened, and I realized I had stumbled upon a recipe that would change how we think about Snickers-inspired desserts.
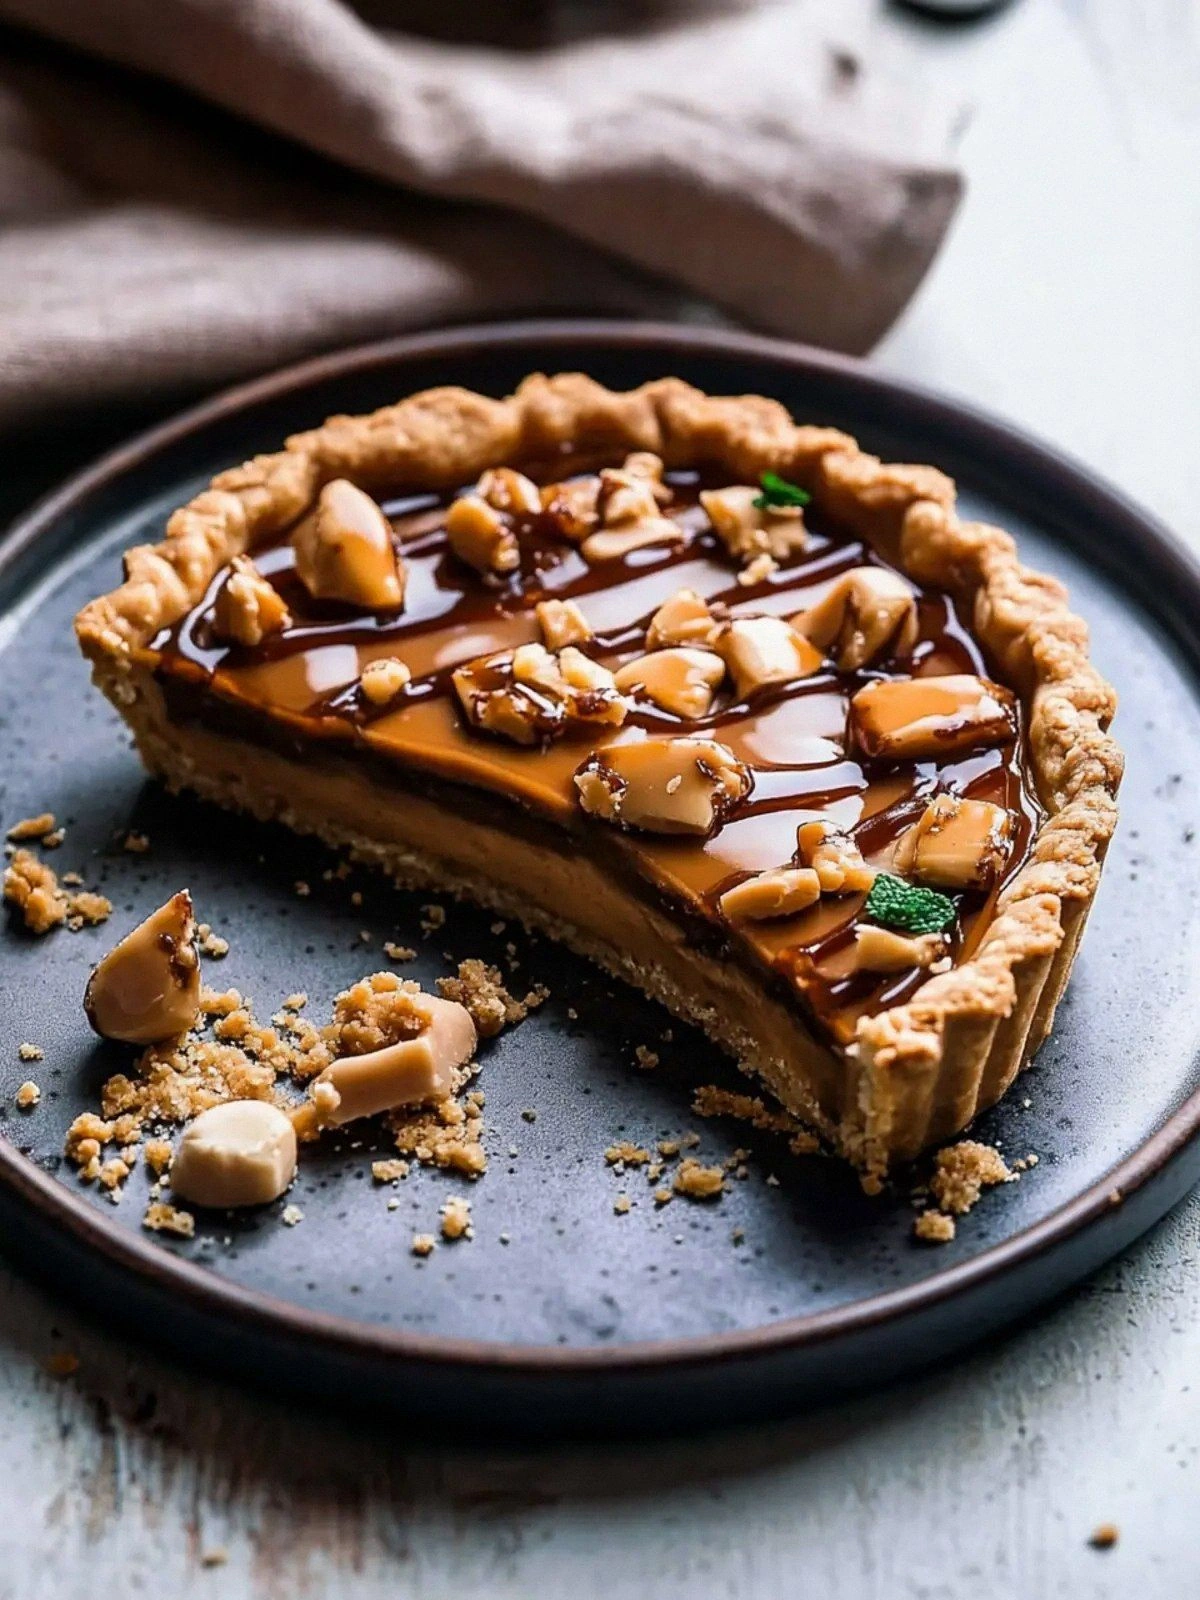
Picture yourself pulling this out of the oven, the whole kitchen smelling incredible, the crust golden and flaky, the filling glossy and decadent. The first bite is a symphony: the crunch of roasted peanuts, the creamy melt of caramel, the deep bite of chocolate, all wrapped in a buttery, crisp shell. It’s the kind of treat that makes you pause mid‑sentence and say, “I dare you to taste this and not go back for seconds.” That is the promise of this tart, and it’s not just a dessert; it’s a declaration that you can recreate the magic of a Snickers bar at home with a twist that’s both nostalgic and daring.
What sets this version apart is the way it balances textures and flavors without overwhelming the palate. I’m not talking about a dense, gooey mess or a brittle, dry crumble. Think of it as a carefully choreographed dance: the chocolate is silky but firm enough to hold its shape, the caramel is luscious yet not syrupy, the peanut butter is spread like a velvety blanket, and the peanuts add a satisfying crunch that snaps like thin ice. The crust is buttery, slightly sweet, and has a hint of sea salt that cuts through the richness. If you’ve ever struggled to make a dessert that feels indulgent yet balanced, you’re not alone, and I’ve got the fix.
I’ll be honest — I ate half the batch before anyone else got to try it. I was so proud, so excited, I almost forgot to let the tart cool. But that’s the beauty of this recipe: it’s so addictive that you’ll want to share it, but the secret is in the technique that keeps it from becoming a mess. By the end of this guide, you’ll wonder how you ever made it any other way. Let me walk you through every single step — by the end, you’ll wonder how you ever made it any other way.
What Makes This Version Stand Out
- Flavor Depth: The combination of chocolate, caramel, peanut butter, and roasted peanuts creates a layered taste experience that mimics the original Snickers bar but elevates it with a gourmet twist. Each bite delivers a complex profile that satisfies the sweet tooth and the craving for crunch.
- Texture Contrast: The crust provides a buttery, flaky base, the filling is silky and glossy, and the peanuts add a crisp crunch that shatters like thin ice. This interplay keeps each mouthful exciting.
- Simple Yet Elegant: The recipe uses just a handful of high‑quality ingredients and a straightforward method. You don’t need fancy equipment or exotic spices; the magic comes from technique.
- Make‑Ahead Friendly: Once the tart is assembled, it can sit in the fridge for up to 48 hours, allowing the flavors to meld. The crust stays crisp, and the filling stays glossy.
- Crowd‑Pleaser: Whether you’re hosting a party or a quiet family dinner, this tart is guaranteed to be the highlight. Guests will ask for the recipe, and you’ll have a bragging right that’s worth every bite.
- Ingredient Quality: Using premium chocolate and salted caramel ensures that the base flavors are rich and authentic. The peanuts are roasted to bring out their natural sweetness.
- Minimal Cleanup: The method uses a single pan for the crust and a separate bowl for the filling, which means fewer dishes to wash.
- Versatile Serving Options: Serve it warm with a dusting of powdered sugar, or let it cool and top with a drizzle of melted chocolate for a decadent finish.
Alright, let's break down exactly what goes into this masterpiece...
Inside the Ingredient List
The Flavor Base
The chocolate is the backbone of this tart. I recommend using a high‑cocoa, dark chocolate with at least 70% cacao to give the tart a deep, slightly bitter undertone that balances the sweetness of caramel and peanut butter. If you prefer a milder taste, you can switch to milk chocolate, but the overall richness will be less pronounced. Skipping the chocolate will strip the tart of its signature depth, leaving you with a caramel‑peanut butter combo that feels flat.
When selecting chocolate, look for a smooth, glossy finish and no visible grains. Dark chocolate with a silky texture melts evenly, preventing clumps that can ruin the filling’s smoothness. If you’re buying a bar, cut it into small pieces so it melts uniformly. For a budget option, consider chocolate chips, but be aware they might melt faster and could lead to a runnier filling.
The Texture Crew
Peanut butter is the creamy binder that holds the filling together. A natural, unsweetened peanut butter works best because it doesn’t compete with the caramel’s sweetness. If you’re a fan of extra nuttiness, choose a crunchy variant; the bits will add a delightful texture. If you’re allergic or simply dislike peanuts, you can substitute with almond butter, but expect a different flavor profile.
Salted roasted peanuts are the star of the crunch department. The salt enhances every flavor, while the roasting brings out a caramelized nutty aroma that lingers long after the first bite. If you can’t find salted roasted peanuts, regular roasted peanuts will still work, but the salt component will be missing, resulting in a less balanced taste. A pinch of sea salt on top of the crust also amplifies the overall flavor experience.
The Unexpected Star
Salted caramel is the sweet, buttery liquid that gives the tart its signature sheen and a subtle, complex sweetness. It should be thick enough to coat the back of a spoon but still pourable. If you use a store‑bought caramel sauce that’s too runny, the filling will become overly wet and the crust may become soggy. A homemade caramel made from brown sugar and butter will give you full control over the thickness and flavor.
When choosing caramel, opt for a version that includes sea salt or a pinch of salt; this will complement the peanuts and chocolate. If you prefer a less sweet version, you can add a splash of espresso to deepen the flavor, but keep in mind it will alter the overall sweetness.
The Final Flourish
The crust is the foundation of the tart, providing a buttery, flaky base that contrasts with the glossy filling. I use a simple shortcrust pastry made from all‑purpose flour, butter, sugar, and a hint of salt. The butter should be cold and cut into cubes to ensure a tender crumb. A pinch of sea salt on the crust brings out the richness of the filling.
If you’re short on time, a store‑bought shortcrust pastry works fine, but homemade gives you control over the texture and flavor. The crust should be baked just until it’s golden, about 12–15 minutes at 350°F. Overbaking will make it too dry; underbaking will leave it soggy.
Everything's prepped? Good. Let's get into the real action...
The Method — Step by Step
- Prepare the crust: Combine 1 ½ cups all‑purpose flour, ½ cup cold butter cubes, ¼ cup granulated sugar, and ½ tsp sea salt. Using a pastry cutter or your fingertips, blend until the mixture resembles coarse crumbs. Press the dough into a 9‑inch tart pan, ensuring it’s evenly distributed and fluted at the edges. Chill for 10 minutes to firm up before baking.
- Bake the crust: Preheat the oven to 350°F (175°C). Poke holes in the bottom with a fork to prevent bubbling. Bake for 12–15 minutes until the edges are golden brown and the center is just set. Remove from the oven and let cool completely on a wire rack. The crust must be fully baked; a soft crust will absorb the filling and ruin the texture.
- Make the filling: In a medium saucepan, melt 6 oz dark chocolate over low heat, stirring constantly to prevent scorching. Once melted, remove from heat and whisk in ½ cup creamy peanut butter until smooth. This step is crucial; if the mixture is too hot, the peanut butter will separate. Add 1 cup salted caramel slowly, whisking until the mixture is glossy and homogenous.
- Incorporate the peanuts: Gently fold in 1 cup salted roasted peanuts, reserving a handful for topping. The peanuts should be evenly distributed throughout the filling to maintain consistent crunch. If you prefer a smoother texture, you can crush them slightly before folding.
- Cool the filling: Let the mixture sit at room temperature for 10 minutes to thicken slightly. Then, refrigerate for 30 minutes to allow the flavors to meld and the mixture to set enough to pour.
- Assemble the tart: Spoon the filling into the cooled crust, spreading it evenly with a spatula. The filling should be smooth and glossy, with a slight sheen. Press the reserved peanuts onto the top for a decorative and crunchy finish.
- Optional bake: For a caramelized top, place the assembled tart in the oven at 350°F for an additional 5–7 minutes. Watch closely; the crust should remain golden, and the filling should just start to set at the edges. This step is optional but adds a delightful caramelized finish.
- Cool and chill: Remove the tart from the oven and let it cool to room temperature. Then refrigerate for at least 2 hours, preferably overnight, to allow the filling to firm up. The longer it sits, the more the flavors will meld, creating a deeper, richer taste.
- Serve: Before serving, dust the top with powdered sugar or drizzle a thin layer of melted chocolate for an extra touch of decadence. Slice with a warm knife for clean cuts. The first bite should feel like a smooth, silky chocolate wave with a crunch that snaps like thin ice.
That's it — you did it. But hold on, I've got a few more tricks that'll take this to another level...
Insider Tricks for Flawless Results
The Temperature Rule Nobody Follows
Chocolate melts best at a steady, low temperature. I’ve found that a double boiler or a heat‑proof bowl over simmering water keeps the chocolate from scorching. If you’re using a microwave, heat in 20‑second bursts and stir each time. Skipping this step can lead to a gritty, uneven filling that looks unappealing.
Why Your Nose Knows Best
When you’re ready to add the caramel, pause and inhale. The caramel should smell buttery, slightly burnt sugar, and a hint of sea salt. If it smells too sweet or too raw, it’s not ready. Trust your nose; the aroma is a reliable indicator of the caramel’s readiness.
The 5‑Minute Rest That Changes Everything
After pouring the filling into the crust, let it rest for 5 minutes before refrigerating. This brief pause allows the mixture to settle, preventing air bubbles that can cause uneven texture. A friend tried skipping this step once, and the result was a lumpy, uneven tart that didn’t hold its shape.
The Crunch Factor
If you want a more pronounced crunch, toast the peanuts for an extra 2 minutes in a dry skillet. This enhances their flavor and gives them a crispier bite. Remember to cool them before adding to the filling, or they’ll melt into the chocolate.
The Dusting Trick
Just before serving, dust the top with a light sprinkle of sea salt or cocoa powder. This subtle touch elevates the flavor profile and adds a visual pop. It’s a simple step that makes the tart feel like a professional dessert.
Creative Twists and Variations
This recipe is a playground. Here are some of my favorite ways to switch things up:
Nutella Swirl
Swap the peanut butter for Nutella, and add a swirl of hazelnut spread for a chocolate‑hazelnut twist. The Nutella adds a sweeter, more indulgent flavor that pairs beautifully with the salted caramel.
Coconut Crunch
Replace the roasted peanuts with toasted coconut flakes and add a splash of coconut milk to the filling. This tropical variation offers a light, airy crunch that contrasts with the rich chocolate.
Espresso Explosion
Add 1 tsp of instant espresso powder to the chocolate mixture for a subtle coffee undertone. The espresso deepens the chocolate flavor and adds a slight bitterness that balances the sweetness.
Almond Delight
Use almond butter instead of peanut butter and replace the peanuts with slivered almonds. This version offers a different nutty profile and a slightly firmer texture.
Maple Magic
Swirl in a few spoonfuls of pure maple syrup into the filling for a natural sweetness and a hint of caramel flavor. The maple pairs well with the chocolate and caramel base.
Sea Salt & Honey
Drizzle honey over the top and sprinkle extra sea salt before serving. The honey adds a floral sweetness, and the salt enhances every bite, creating a sophisticated flavor profile.
Storing and Bringing It Back to Life
Fridge Storage
Store the tart in an airtight container in the refrigerator for up to 48 hours. The filling will remain firm, and the crust will keep its crispness. If the crust softens slightly, a quick bake at 350°F for 5 minutes will revive its texture.
Freezer Friendly
Wrap the tart tightly in plastic wrap and then in aluminum foil before freezing. It can stay frozen for up to 3 months. Thaw in the refrigerator overnight, then let it come to room temperature before serving.
Best Reheating Method
To reheat, place the tart on a baking sheet and warm in a preheated 300°F oven for 5–7 minutes. This gentle heat restores the glossy finish without melting the filling. If you prefer a quick fix, microwave on low power for 15–20 seconds, watching closely to avoid overheating.
Add a tiny splash of water before reheating — it steams back to perfection, keeping the chocolate smooth and the caramel glossy. This trick is essential for maintaining the tart’s texture after multiple reheatings.