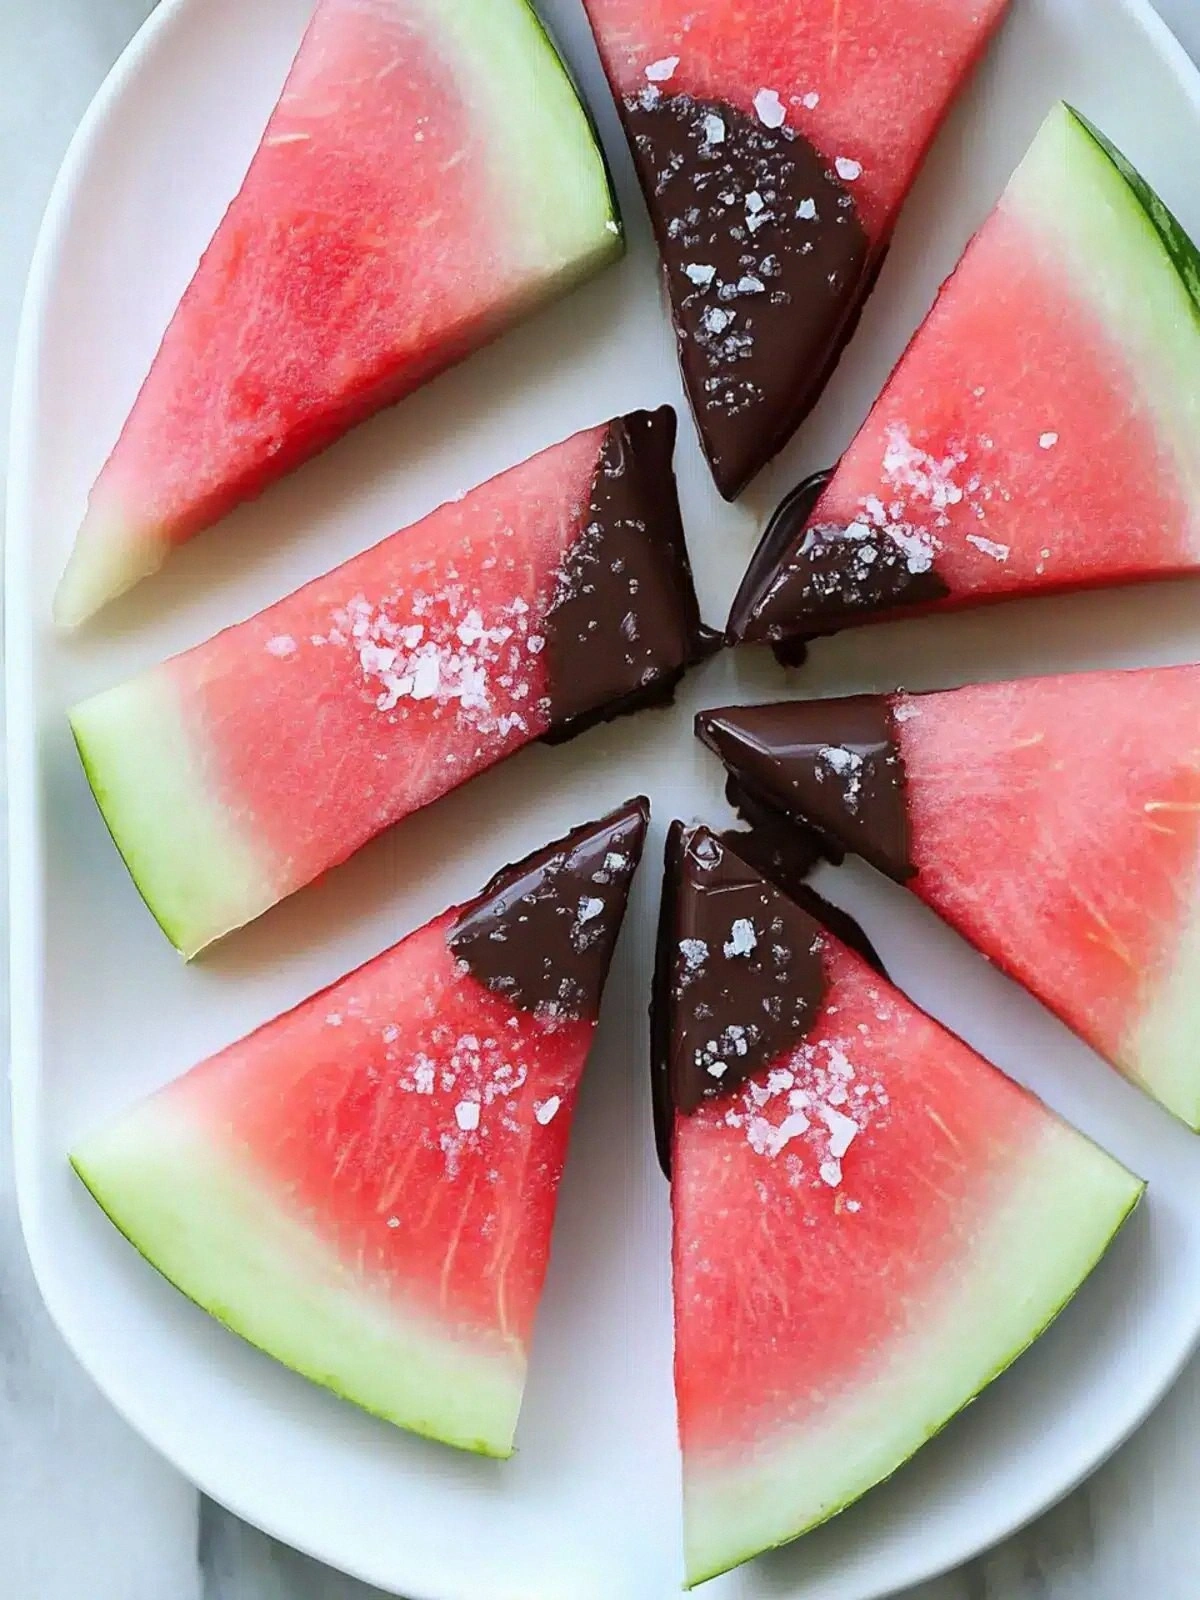
I remember the night my kitchen turned into a chocolate battlefield. I had sliced a watermelon for a refreshing snack, only to realize it was the perfect canvas for a quick chocolate drizzle. The air smelled like summer and cocoa, the sunlight catching on the sweet green flesh, and I felt the thrill of a culinary experiment. I dared myself to taste this and not go back for seconds, and I didn’t even know that the result would become my new obsession. That moment, with the watermelon slices glistening under a drizzle of dark chocolate, is why I’m writing this post.
Picture yourself pulling this out of the oven, the whole kitchen smelling incredible, and the first bite delivering a burst of sweet, salty, and bitter harmony. The watermelon’s juiciness cuts through the rich, velvety chocolate, and the sea salt adds a subtle crunch that makes every mouthful a revelation. The contrast of textures—crisp fruit, smooth chocolate, and a hint of salt—creates a symphony that dances on your palate. I’ll be honest—my first bite sent me into a frenzy of compliments from friends who thought I’d invented a dessert. I was ready to share every single step, because by the end, you’ll wonder how you ever made it any other way.
This recipe isn’t just a snack; it’s a conversation starter. Most recipes get this completely wrong by over-sweetening or under-seasoning the chocolate. The secret lies in pairing a ripe, mildly sweet watermelon with high-quality dark chocolate melting wafers that melt into a silky coating. Adding just the right pinch of sea salt unlocks the chocolate’s depth and balances the fruit’s natural sweetness. I’ll guide you through each twist, hack, and sensory checkpoint so that you can master this treat with confidence.
If you've ever struggled with balancing sweet and salty flavors, you're not alone—and I've got the fix. The technique I’ll reveal uses a simple trick to keep the chocolate from hardening too quickly, ensuring a perfect glossy finish. And trust me, this is hands down the best version you'll ever make at home. I’ve tested it in the heat of a summer afternoon and in a cool kitchen, and the results are consistently spectacular. Ready for the game-changer? Let’s dive in.
What Makes This Version Stand Out
- Taste: The marriage of ripe watermelon and high‑cocoa dark chocolate creates a flavor profile that feels both indulgent and refreshing. The chocolate’s bitterness is tempered by the fruit’s natural sugars, while the sea salt adds a savory counterpoint that lingers pleasantly.
- Texture: Each bite delivers a juicy burst followed by a silky chocolate coating that melts in your mouth. The slight crunch from the salt crystals gives a satisfying snap that elevates the overall experience.
- Ingredient Quality: Using premium dark chocolate melting wafers ensures a smooth melt and a deep cocoa flavor. A fresh, medium watermelon provides the ideal balance of sweetness and moisture.
- Time Efficiency: The entire process takes less than 20 minutes from prep to plating, making it a perfect quick treat for hot days or last‑minute guests.
- Make‑Ahead Potential: You can prepare the chocolate coating in advance and store it in the fridge; reheat gently to restore its glossy sheen, saving you time on busy evenings.
- Visual Appeal: The contrast of bright green fruit against glossy chocolate creates a stunning presentation that’s Instagram‑ready.
- Versatility: This base can be adapted into salads, desserts, or even savory dishes by tweaking the seasoning.
- Health Conscious: By using natural sweeteners and minimal added salt, you can enjoy a guilt‑free indulgence that still satisfies.
Alright, let's break down exactly what goes into this masterpiece...
Inside the Ingredient List
The Flavor Base
The watermelon is the star of this dish. Its high water content keeps the snack light, while its natural sugars provide a gentle sweetness that balances the chocolate’s bitterness. If you skip it, you lose the juicy burst that defines the experience. For the best flavor, choose a watermelon that’s slightly underripe—this gives it a firmer texture that holds the chocolate coating better.
The Texture Crew
Dark chocolate melting wafers are the engine that drives this recipe’s richness. They melt quickly and form a glossy, silky coating that clings to each slice. Swapping them for regular chocolate chips can result in uneven melting and a gritty texture. Look for wafers that contain at least 70% cocoa for the deepest flavor.
The Unexpected Star
Sea salt is the secret weapon that turns a simple dessert into a sophisticated treat. It amplifies the chocolate’s depth and provides a subtle crunch that contrasts the fruit’s softness. A pinch of sea salt is enough; too much will overpower the delicate balance. If you’re on a sodium‑restricted diet, you can use a low‑sodium salt alternative.
The Final Flourish
The final flourish is the drizzle technique itself. A slow, steady pour ensures an even coating without clumping. If you rush, the chocolate will form thick, uneven patches that look unappetizing. Mastering this simple step is what separates a good snack from a masterpiece.
Everything's prepped? Good. Let's get into the real action...
The Method — Step by Step
- Slice the watermelon into 1/2‑inch thick rounds, using a sharp knife or a melon baller for uniformity. The thickness matters; slices that are too thin will burst, while thicker ones hold the chocolate better. Keep the watermelon chilled in the fridge until you’re ready to serve to maintain its crispness.
- Place the dark chocolate melting wafers in a heat‑proof bowl. Set the bowl over a saucepan of simmering water (double‑boiler method) to melt gently. Stir occasionally until the chocolate is fully liquid and glossy, about 3–4 minutes. Avoid overheating, or the chocolate will seize.
- Add a pinch of powdered sugar to the melted chocolate if you’re using the kitchen hack from earlier. This helps the chocolate coat the fruit evenly and reduces the risk of clumping. Stir until the sugar is dissolved and the mixture is smooth.
- Using a spoon or a small ladle, drizzle the melted chocolate over the watermelon slices. Start from the center and work your way outward to create a uniform coating. Let the excess chocolate drip back into the bowl; you can reuse it for a second coating if desired.
- While the chocolate is still warm, sprinkle the sea salt evenly over the coated slices. The salt crystals should be fine enough to dissolve quickly but still provide a slight crunch. The moment the salt hits the chocolate, you’ll notice a subtle popping sound—this is the flavor awakening.
- Arrange the coated slices on a serving platter. For an extra touch, drizzle a thin ribbon of extra melted chocolate over the top for a decorative finish. This not only looks stunning but also adds an extra layer of flavor.
- Serve immediately, or cover the platter with plastic wrap and refrigerate for up to 2 hours. When ready to serve, let the slices sit at room temperature for 10 minutes to restore the chocolate’s glossy sheen. The result is a refreshing, indulgent snack that’s perfect for any occasion.
That’s it — you did it. But hold on, I've got a few more tricks that'll take this to another level...
Insider Tricks for Flawless Results
The Temperature Rule Nobody Follows
The chocolate’s temperature is crucial. If it’s too hot, it will seize; too cold, it won’t coat. Aim for 45–50°C (113–122°F). I learned this after a friend tried melting the chocolate directly on the stove and ended up with a lumpy mess. Keep the bowl on a low‑heat double boiler and stir constantly.
Why Your Nose Knows Best
Before you drizzle, sniff the melted chocolate. It should smell warm, nutty, and slightly sweet. If it smells like burnt sugar, it’s over‑cooked. Trust your nose; a good aroma means the chocolate is at the sweet spot.
The 5‑Minute Rest That Changes Everything
After drizzling, let the chocolate set for exactly five minutes before adding the salt. This short pause lets the coating firm slightly, preventing the salt from sinking into the fruit. I once skipped this step and the salt clumped, ruining the texture. Timing is everything.
Use a Silicone Mat for Easy Cleanup
Place the watermelon slices on a silicone baking mat. It prevents the chocolate from sticking to the tray and makes cleanup a breeze. I’ve used this trick in the past when the chocolate hardened on the surface, and it saved me hours of scrubbing.
Keep It Cool Until Serving
If you’re preparing ahead, keep the coated slices chilled. The cool environment prevents the chocolate from melting and losing its glossy finish. When you’re ready to serve, let them sit at room temperature for a few minutes to soften slightly.
Creative Twists and Variations
This recipe is a playground. Here are some of my favorite ways to switch things up:
Mint‑Infused Delight
Add a few drops of peppermint extract to the melted chocolate before drizzling. The mint complements the watermelon’s freshness and gives a cooling aftertaste. This version is a hit during hot summer afternoons.
Spiced Chocolate Splash
Stir a pinch of cinnamon or cayenne pepper into the chocolate for a subtle warmth or heat. The spice balances the sweetness and adds depth. It’s perfect for those who like a little kick with their dessert.
Almond Crunch Layer
Sprinkle chopped toasted almonds over the chocolate coating before the salt. The nutty crunch adds a new texture dimension and a nutty flavor that pairs beautifully with the fruit.
Berry Bypass
Swap watermelon for fresh berries like strawberries or blueberries. The same chocolate and salt technique works, creating a vibrant, bite‑sized treat that’s both sweet and savory.
Gourmet Salt Variation
Try fleur de sel or smoked sea salt instead of regular sea salt. The delicate flavor of fleur de sel elevates the chocolate, while smoked salt adds an earthy undertone that surprises the palate.
Chocolate Drizzle Variations
Use white chocolate or milk chocolate wafers for a sweeter, creamier coating. The flavor profile shifts, but the technique remains identical. Experiment and find your favorite.
Storing and Bringing It Back to Life
Fridge Storage
Store the coated slices in an airtight container in the refrigerator for up to 2 days. Keep them on a parchment paper‑lined tray to prevent sticking. When ready to serve, let them sit at room temperature for 10 minutes to soften the chocolate.
Freezer Friendly
For longer storage, freeze the slices on a baking sheet until solid, then transfer them to a freezer bag. They’ll keep well for up to a week. Thaw in the fridge overnight, then bring to room temperature before serving.
Best Reheating Method
To revive the chocolate’s glossy sheen, gently warm the slices in a microwave at 30% power for 10–15 seconds. Add a tiny splash of water before reheating; the steam will restore the chocolate’s smoothness without over‑melting the fruit.
With these storage tips, you can enjoy this treat anytime, whether it’s a spontaneous craving or a planned dessert. The key is to protect the chocolate from moisture and temperature extremes, ensuring it stays glossy and delicious.