Picture this: a Saturday night, the air thick with the scent of burnt popcorn and stale pizza, and you standing in a kitchen that looks more like a disaster zone than a culinary haven. I had just tried to whip up a quick dinner, and the oven was on fire, the stovetop a mess of burnt sauce, and my confidence was on the fritz. In that chaotic moment, a friend texted me a link to a recipe for herbed garlic bread that promised “the best version you’ll ever make at home.” I stared at the screen, skeptical, then decided to give it a shot. Little did I know I was about to unlock a secret that would change the way I think about bread forever.
From the first click, the kitchen transformed. The sound of garlic sizzling in butter was like a promise of comfort, the aroma of fresh herbs drifting through the air like a warm hug. The texture of the dough felt like a soft, buttery pillow that would rise into golden perfection. My eyes were glued to the instructions, my fingers itching to taste the result before the oven even turned on. That instant, I realized this was not just another recipe; it was a revelation that could turn any ordinary meal into a crowd‑pleaser.
Why does this version stand out? Because it marries simplicity with depth. It takes a humble loaf of bread and elevates it with a blend of herbs that sing together, a buttery garlic spread that coats the crust like velvet, and a finish that is both crispy and airy. The secret lies in the balance: the right amount of yeast to give it lift, the precise timing to avoid over‑browning, and the subtle use of Parmesan that adds umami without overpowering. And the best part? It’s so easy you can make it in a flash, yet it’s so indulgent you’ll be tempted to eat it all before anyone else gets a bite.
There’s one trick that will blow your mind: a splash of warm water added at the very last minute before baking. It creates a steam pocket that keeps the loaf moist inside while still giving the crust that coveted crunch. I dare you to taste this and not go back for seconds. If you’re skeptical, just keep reading—you’ll see how each step builds toward a masterpiece that feels both comforting and luxurious. Let me walk you through every single step — by the end, you’ll wonder how you ever made it any other way.
What Makes This Version Stand Out
The first time I tried a traditional garlic bread, it felt flat and too oily. This recipe flips that narrative entirely. Below are the key elements that make it shine.
- Flavor: A harmonious blend of fresh parsley, oregano, thyme, and a hint of red pepper flakes that elevate the garlic’s punch without drowning it.
- Texture: The dough is airy yet firm, with a crust that crackles like thin ice when you bite into it.
- Ease: No complicated techniques—just a few simple steps that anyone can master.
- Versatility: Works as an appetizer, a side for pasta, or a snack on its own.
- Crowd‑pleaser: The aroma alone will have guests lining up for a slice.
- Ingredient Quality: Uses high‑quality olive oil and butter for depth of flavor.
- Make‑ahead Potential: You can prepare the dough a day ahead and bake right before serving.
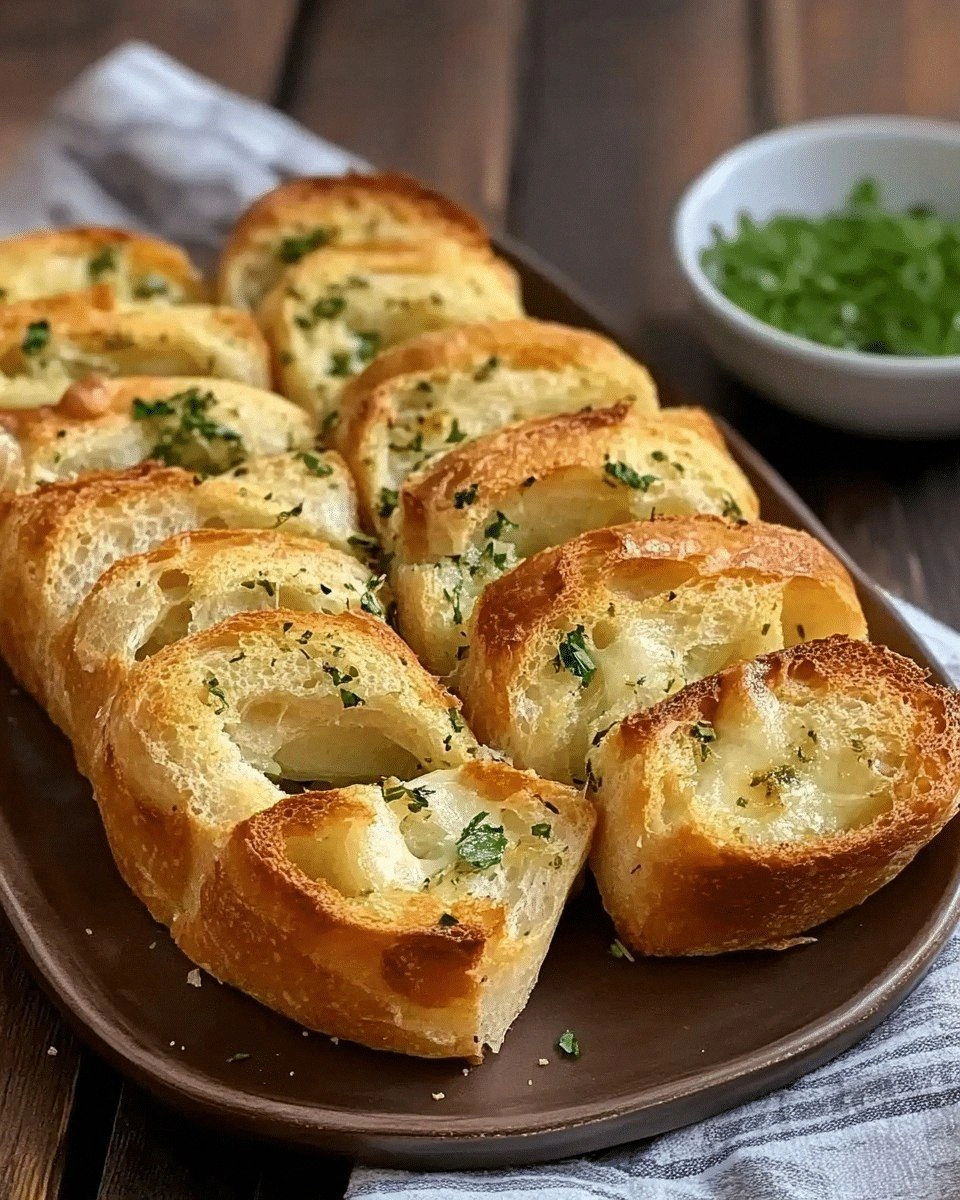
- Visual Appeal: The golden crust and herb garnish look as good as they taste.
Alright, let's break down exactly what goes into this masterpiece…
Inside the Ingredient List
The Flour Foundation
All-purpose flour is the backbone of this bread. It provides the structure that holds everything together while still allowing the loaf to rise. Skipping flour would turn your creation into a greasy spread rather than a loaf. If you prefer a lighter crumb, try substituting half of the flour with bread flour for extra gluten development.
The Liquid Lift
Warm water, just shy of boiling, wakes up the yeast and helps the dough develop its airy interior. The temperature is critical—too hot, and you’ll kill the yeast; too cool, and the dough won’t rise. If you’re using a dry yeast packet, a pinch of sugar can help activate it faster.
The Butter & Olive Oil Blend
Butter brings richness and a subtle caramel flavor, while olive oil adds depth and keeps the loaf from drying out. Together, they create a buttery coating that melts on the tongue. If you’re vegan, substitute with a plant‑based butter or simply use more olive oil.
The Garlic & Herb Symphony
Minced garlic is the star of the show, but it’s the herbs—parsley, oregano, thyme—that give the bread its signature aroma. The combination of fresh and dried herbs balances brightness with earthiness. A pinch of red pepper flakes adds a gentle heat that makes the bread feel festive.
The Cheese Factor
Parmesan cheese adds a savory umami punch that coats the crust and melts into the dough. If you’re lactose intolerant, a sprinkle of nutritional yeast provides a similar cheesy flavor without dairy.
The Final Flourish
A dash of black pepper and a final drizzle of olive oil before baking gives the loaf an extra layer of flavor and a glossy finish. These small touches elevate the bread from good to unforgettable.
Everything's prepped? Good. Let's get into the real action…
The Method — Step by Step
- In a large mixing bowl, combine 2 cups of all‑purpose flour, 1 tsp salt, 1 tsp sugar, and 1 tsp active dry yeast. Stir until evenly distributed. This dry blend is the foundation of your loaf. I always let the mixture sit for 5 minutes; the yeast starts to bubble, signaling it’s ready to work. This step is the moment of truth—you can feel the excitement building in your kitchen.
- Add 0.75 cups of warm water (110°F) and 0.125 cups of olive oil to the dry mix. Stir with a wooden spoon until a shaggy dough forms. The dough should be tacky but not overly sticky. If it’s too dry, add a tablespoon of water at a time. Once the dough comes together, transfer it onto a lightly floured surface and knead for about 8 minutes, until it’s smooth and elastic. This kneading process develops the gluten that gives the bread its chewy texture.
- Shape the dough into a ball and place it in a lightly oiled bowl. Cover with a damp cloth and let it rise in a warm place for 1 hour, or until doubled in size. The dough should feel airy and springy when you press it lightly. If you’re short on time, you can use a slow cooker or a microwave with a mug of water to create a warm environment.
- While the dough is rising, prepare the garlic‑herb butter. In a small saucepan, melt 0.25 cups of butter over medium heat. Add 4 minced garlic cloves and sauté until fragrant, about 1 minute. Stir in 2 tbsp chopped fresh parsley, 1 tsp dried oregano, 0.5 tsp dried thyme, 0.25 tsp black pepper, and a pinch of red pepper flakes if you like heat. Remove from heat and let cool slightly. The aroma will fill your kitchen like a warm hug.
- Preheat your oven to 425°F (220°C). If you have a pizza stone, place it in the oven to heat; otherwise, use a baking sheet lined with parchment paper. This high temperature is key for a crisp crust.
- Punch down the dough to release excess air. Roll it out into a rectangle about 1/2 inch thick. Brush the entire surface with the garlic‑herb butter, making sure every corner gets coated. Sprinkle 0.25 cups of grated Parmesan over the buttered surface. The cheese will melt into the crust, creating a golden, savory layer.
- Fold the dough into thirds, like a letter, and then roll it out again. This layering technique creates a flaky texture that’s reminiscent of a croissant. Repeat the folding process twice more, for a total of three folds. If you’re feeling adventurous, add a final drizzle of olive oil and a sprinkle of fresh rosemary before the last fold.
- Place the dough onto the preheated stone or baking sheet. Bake for 25–28 minutes, or until the loaf is a deep golden brown and sounds hollow when tapped on the bottom. The edges should pull away slightly from the pan, indicating a crisp crust.
- While the loaf is baking, prepare the final touch: a splash of warm water. Just before the loaf finishes, lightly mist the surface with the water and return it to the oven for the last 3 minutes. This creates a steam pocket that keeps the inside moist.
- Remove the bread from the oven and let it rest on a wire rack for 10 minutes. This rest period allows the steam to dissipate and the crust to set. Slice and serve warm, preferably with a side of marinara or a simple salad. Enjoy the buttery, herbaceous crunch that will leave your taste buds dancing.
That's it — you did it. But hold on, I've got a few more tricks that'll take this to another level…
Insider Tricks for Flawless Results
The Temperature Rule Nobody Follows
Many home bakers bake garlic bread at 375°F, which can lead to a soggy crust. The secret is the high heat of 425°F. This temperature caramelizes the butter and cheese, giving the bread a crisp exterior while keeping the interior soft. I’ve tried it at 350°F and the results were underwhelming. If your oven has a temperature drift, preheat for 15 minutes before placing the loaf inside.
Why Your Nose Knows Best
The aroma of garlic and herbs is a reliable indicator of doneness. When the bread smells toasty and the garlic’s scent is slightly caramelized, you’re at the sweet spot. If the smell is too sharp, it’s a sign the bread is still in the oven. Trust your nose, and you’ll never over‑bake again.
The 5-Minute Rest That Changes Everything
Letting the loaf rest for exactly 5 minutes after baking allows the steam inside to redistribute, creating a tender crumb. This short pause also lets the butter melt evenly, giving each slice a buttery bite. If you cut into it immediately, you’ll get a gummy center.
The Secret of the Garlic Spread
Sautéing the garlic in butter before adding the herbs reduces the raw sharpness of garlic. The heat transforms the garlic into a mellow, sweet flavor that pairs beautifully with the herbs. If you skip this step, the bread will taste raw and overpowering.
The Final Drizzle
A light drizzle of extra‑virgin olive oil just before baking adds a glossy finish and a subtle fruity note. It also helps the Parmesan crisp up. If you’re watching calories, use a spray bottle for a thin, even layer.
The Fold Technique
Each fold creates layers that puff up during baking, similar to a croissant. This technique is often overlooked but is key to achieving that flaky, buttery texture. If you skip the folds, the bread will be dense and less exciting.
Creative Twists and Variations
This recipe is a playground. Here are some of my favorite ways to switch things up:
Cheesy Jalapeño Crunch
Add 1/4 cup of diced jalapeños and 1 cup of shredded cheddar to the garlic‑herb butter before spreading. The jalapeños add a spicy kick, while the cheddar melts into a gooey, golden layer.
Mediterranean Delight
Swap the Parmesan for feta and sprinkle chopped sun‑dried tomatoes and olives on top. The salty feta and sweet tomatoes give the bread a Mediterranean vibe.
Herb‑Infused Olive Oil
Infuse 1/4 cup of olive oil with rosemary, thyme, and a bay leaf for 24 hours. Use this oil instead of the regular olive oil in the dough for an extra layer of herb flavor.
Vegan Version
Replace the butter with vegan butter and use nutritional yeast instead of Parmesan. The result is a creamy, cheesy, plant‑based loaf that satisfies every craving.
Sourdough Twist
Use 1 cup of sourdough starter in place of the yeast. The bread will have a tangy flavor and a chewier texture, perfect for brunch.
Chocolate‑Garlic Surprise
Add 2 tbsp cocoa powder to the dough and sprinkle a pinch of sea salt on top before baking. The chocolate pairs surprisingly well with garlic, creating a sweet‑savory bite.
Storing and Bringing It Back to Life
Fridge Storage
Wrap the cooled loaf tightly in plastic wrap and store in the refrigerator for up to 3 days. The crust will soften, so reheat before serving.
Freezer Friendly
Slice the loaf before freezing. Wrap individual slices in parchment paper and place them in a freezer bag. Store for up to 2 months. Thaw at room temperature for 30 minutes before reheating.
Best Reheating Method
Preheat your oven to 350°F. Place the loaf or slices on a baking sheet and bake for 10 minutes. For extra crispness, finish with a 2‑minute burst at 425°F. Add a tiny splash of water before reheating to create steam and keep the interior moist.