Picture this: a Saturday afternoon, the kitchen lights dimmed, and the aroma of burnt chocolate drifting from the oven. I was halfway through a batch of classic chocolate mousse, only to discover that the cocoa powder had been misplaced in the spice rack, leaving me with a lumpy, under‑seasoned dessert. I stared at the pot, realizing that the only way to salvage the night was to reinvent the dish entirely. That night, I whisked together cottage cheese, cocoa, and maple syrup, and the result was a silky, creamy ice‑cream‑like treat that defied expectations. I dared you to taste this and not go back for seconds.
The moment the mixture hit the glass bowl, the sweet scent of maple syrup mingled with the mild tang of cottage cheese, creating an aroma that was both comforting and daring. The texture felt like a cloud that could melt in your mouth without the need for a freezer; it was velvety, yet light, with a hint of chocolate that clung to the tongue like a second skin. My friends who tried it first whispered that it tasted like dessert and breakfast rolled into one, a paradox that left them craving more. The dish is simple enough to make on a whim, yet sophisticated enough to impress at a dinner party. If you’ve ever struggled with making a chocolate dessert that’s both rich and airy, you’re not alone — and I’ve got the fix.
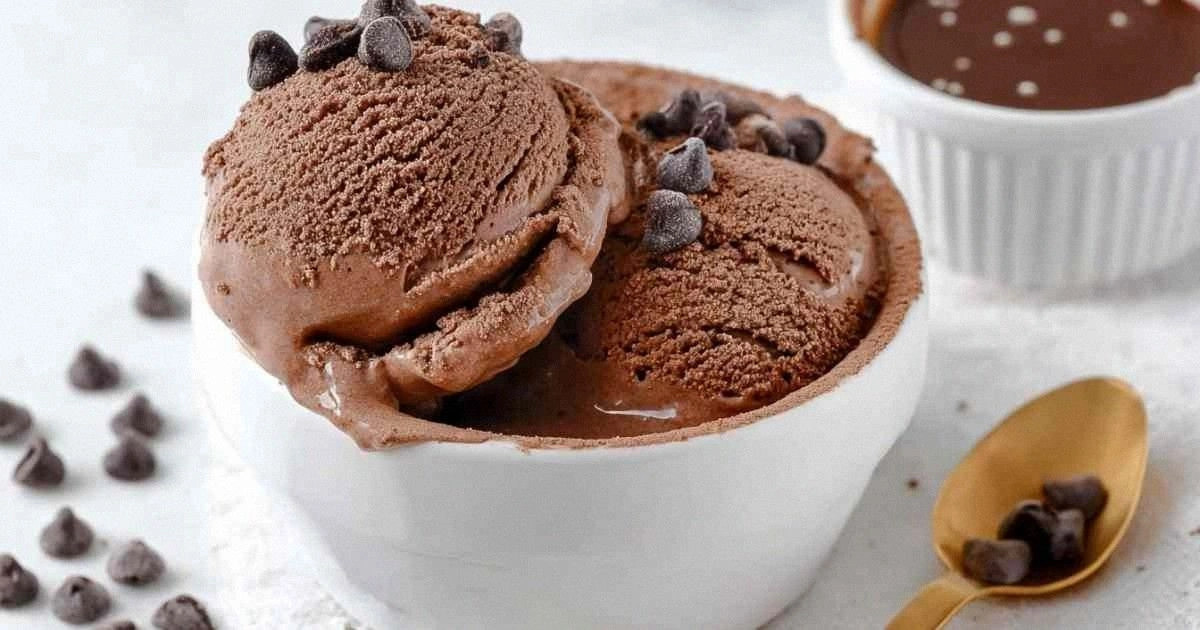
What sets this version apart is that it uses cottage cheese as the base, turning a protein‑packed staple into a luscious, low‑fat chocolate treat. The maple syrup isn’t just a sweetener; it’s a binder that gives the mixture a glossy sheen and a subtle caramel undertone. The cocoa powder is the hero, delivering deep, roasted flavor without the bitterness that sometimes plagues homemade chocolate. The result is a dessert that feels indulgent but is surprisingly healthy, with a protein punch that makes it perfect for post‑workout recovery. Most recipes get this completely wrong by over‑mixing or using heavy cream, but here, the secret is gentle folding and a quick chill.
Picture yourself pulling this out of the bowl, the whole kitchen smelling incredible, and the first spoonful melting into a silky, chocolate‑cottage cheese cloud. The experience is pure magic, and I promise you, this is hands down the best version you'll ever make at home. Okay, ready for the game‑changer? Let me walk you through every single step — by the end, you'll wonder how you ever made it any other way.
What Makes This Version Stand Out
- Texture: The cottage cheese gives a light, airy consistency that feels like a frozen mousse, yet it holds together without the need for an ice cream maker.
- Flavor: The cocoa powder delivers a deep, roasted chocolate bite that balances the subtle sweetness of maple syrup.
- Nutrition: With 25 grams of protein per serving and no added dairy fat, this dessert is a protein‑rich treat that satisfies without guilt.
- Convenience: No churning, no refrigeration for hours—just a few minutes of whisking and a quick chill.
- Versatility: It can be served as a dessert, a snack, or even a post‑workout recovery bite, making it a true multi‑use creation.
- Cost: Cottage cheese and maple syrup are pantry staples that won’t break the bank, unlike fancy chocolate ganache or heavy cream.
- Make‑ahead Potential: Prepare it a day early, store in an airtight container, and it stays creamy for up to 48 hours.
- Visual Appeal: The glossy sheen and chocolate swirls create a dessert that looks as good as it tastes.
Inside the Ingredient List
The Flavor Base
Cottage cheese is the star of this dish, providing a mild, slightly tangy backdrop that lets the chocolate shine. Its high protein content gives the dessert body without the heaviness of cream. If you skip it, the mixture collapses into a watery mess that can’t hold its shape. When choosing cottage cheese, opt for a low‑fat version to keep calories down while still maintaining that creamy texture.
The Texture Crew
Cocoa powder is more than flavor; it thickens the mixture and gives that glossy finish you’ll see in the image. Use a finely ground Dutch‑process cocoa for a smoother bite. If you can’t find cocoa powder, a small amount of cocoa nibs can work, but they’ll add crunch instead of smoothness. A pinch of sea salt enhances the chocolate notes, but it’s optional if you prefer a sweeter profile.
The Unexpected Star
Maple syrup is the sweetener that binds everything together. It introduces a subtle caramel undertone that pairs beautifully with chocolate. A tablespoon of maple syrup per cup of cottage cheese gives the right balance; too much will make it syrupy, too little will leave it dry. For a lower‑sugar option, replace maple syrup with a sugar‑free sweetener that has a chocolate‑compatible flavor.
The Final Flourish
A dash of vanilla extract or a pinch of espresso powder can elevate the chocolate flavor profile, adding depth and complexity. If you’re feeling adventurous, sprinkle a pinch of chili powder for a spicy kick that balances the sweetness. Remember, the key is subtlety—too much of any add‑on can overpower the delicate cottage cheese base. Keep the additions minimal to let the core flavors shine.
Everything's prepped? Good. Let's get into the real action.
The Method — Step by Step
-
Begin by placing the cottage cheese in a medium bowl and whisking on low speed for 30 seconds. This step breaks down the curds and creates a smooth base that will accept the cocoa without clumping. If you notice any lumps, pause and scrape the sides with a spatula before resuming. The goal is a silky texture that feels like a thick yogurt.
-
Sift the cocoa powder over the cottage cheese to avoid any gritty bits. Stir in a pinch of sea salt, which amplifies the chocolate notes and balances the maple sweetness. The mixture should look like a deep chocolate batter, not a light foam. Taste a small spoonful; it should have a rich, slightly bitter edge that invites the maple to come forward.
-
Add the maple syrup gradually, stirring continuously. The syrup should blend in smoothly, creating a glossy sheen across the surface. Once incorporated, the mixture will thicken slightly, resembling a thick custard. This is the moment of truth—if it feels too runny, add a teaspoon of cocoa powder to bring it to the right consistency.
-
If you’re using vanilla or espresso, stir them in now. These aromatics will enhance the flavor profile without overpowering the base. Let the mixture sit for 5 minutes; this resting period allows the flavors to meld and the texture to settle. During this time, you can chill the bowl in the refrigerator for a quick cool.
-
Transfer the mixture to a shallow container and place it in the freezer for 20 minutes. After 20 minutes, remove it and stir vigorously with a whisk or fork, breaking up any ice crystals that have formed. Return to the freezer and repeat this process every 20 minutes for 3 cycles. This technique creates a creamy, ice‑cream‑like texture without the need for an ice cream maker.
-
Once the mixture has reached a soft‑serve consistency, give it a final stir. If it’s too thick, add a splash of milk or water to loosen it slightly; if it’s too runny, return it to the freezer for a few more minutes. The final texture should be smooth, airy, and slightly firm—ready to scoop or spoon into a cup.
-
Serve immediately for the best experience, or store in an airtight container in the freezer for up to 48 hours. If you’re serving it later, let it sit at room temperature for 5 minutes before scooping to soften the texture. Garnish with a drizzle of maple syrup or a sprinkle of cocoa powder for an extra touch of elegance.
-
Enjoy the silky, chocolate‑cottage cheese cloud that melts on the tongue, leaving a lingering, sweet aftertaste that will have you reaching for more. The finish is clean, with no dairy heaviness—just pure chocolate bliss. This dessert is a testament to the power of simple ingredients when combined with the right technique.
That's it — you did it. But hold on, I've got a few more tricks that'll take this to another level.
Insider Tricks for Flawless Results
The Temperature Rule Nobody Follows
The secret to a smooth finish is keeping the mixture cold before the first freeze. If the cottage cheese is too warm, it will form ice crystals that are hard to break down. Chill the bowl in the fridge for 30 minutes before whisking, and keep the freezer at 0°F to ensure quick freezing. This step eliminates that gritty texture that can ruin the silky mouthfeel.
Why Your Nose Knows Best
Trust your nose when adding maple syrup. If it smells too sweet, dial it back; if it’s barely noticeable, add a splash more. The aroma is a reliable indicator of balance. I once added too much maple and the dessert became syrupy; the fix was a quick whisk and a pinch of cocoa to restore depth.
The 5‑Minute Rest That Changes Everything
After the first freeze cycle, let the mixture rest for 5 minutes before the next stir. This pause allows the ice crystals to settle, making the next whisk more effective. Skipping this step results in a lumpy texture that feels more like a frozen pudding than a chocolate cloud.
The Subtle Salt Boost
A pinch of sea salt is the unsung hero of chocolate desserts. It brightens the cocoa’s flavor and balances the maple’s sweetness. Without it, the chocolate can taste flat. Add just a few grains, and the flavor profile will shift dramatically.
The Quick Chill Trick
If you’re in a hurry, place the bowl in a larger bowl filled with ice water for 10 minutes before whisking. This rapid chill prevents the mixture from warming up and keeps the texture silky. The trick works well for those who don’t want to wait for the freezer to kick in.
Creative Twists and Variations
This recipe is a playground. Here are some of my favorite ways to switch things up:
Nutty Crunch
Add a handful of chopped almonds or hazelnuts before the final freeze. The crunch contrasts the smoothness, creating a delightful texture. Sprinkle extra nuts on top for a decorative finish. This variation is a hit with anyone who loves a bit of bite in their dessert.
Spicy Kick
Stir in a pinch of cayenne pepper or a dash of chili powder. The heat cuts through the sweetness and adds depth. Serve with a dollop of whipped cream for a balanced flavor profile. This version is perfect for those who enjoy a spicy‑sweet combo.
Berry Fusion
Fold in a cup of fresh berries after the first freeze cycle. The berries add a tart contrast that brightens the chocolate. Top with a swirl of berry puree for a vibrant presentation. This twist is ideal for a summer dessert.
Coffee Boost
Add a tablespoon of instant espresso powder to the mix. The coffee deepens the chocolate flavor and gives a subtle aftertaste. Serve with a sprinkle of cocoa powder on top. Coffee lovers will appreciate this sophisticated upgrade.
Vanilla‑Infused
Replace maple syrup with vanilla‑flavored simple syrup for a milder sweetness. The vanilla adds a floral note that pairs beautifully with chocolate. Finish with a dusting of vanilla‑infused cocoa. This variation is great for those who prefer a more subtle flavor.
Storing and Bringing It Back to Life
Fridge Storage
Store the dessert in an airtight container in the refrigerator for up to 48 hours. The cold environment keeps the texture firm yet scoopable. When ready to serve, let it sit at room temperature for 5 minutes to soften slightly. This method is perfect for meal prep or a quick snack.
Freezer Friendly
For longer storage, place the mixture in a freezer‑safe container and seal tightly. It will keep well for up to 2 weeks. When you want to enjoy it, let it thaw in the refrigerator overnight. The dessert retains its creamy consistency after thawing.
Best Reheating Method
To revive a frozen batch, microwave on low for 15 seconds, then stir. Add a tiny splash of water or milk to create steam, which helps restore the silky texture. Repeat in 15‑second increments until the desired consistency is reached. Avoid overheating, or the dessert will become rubbery.