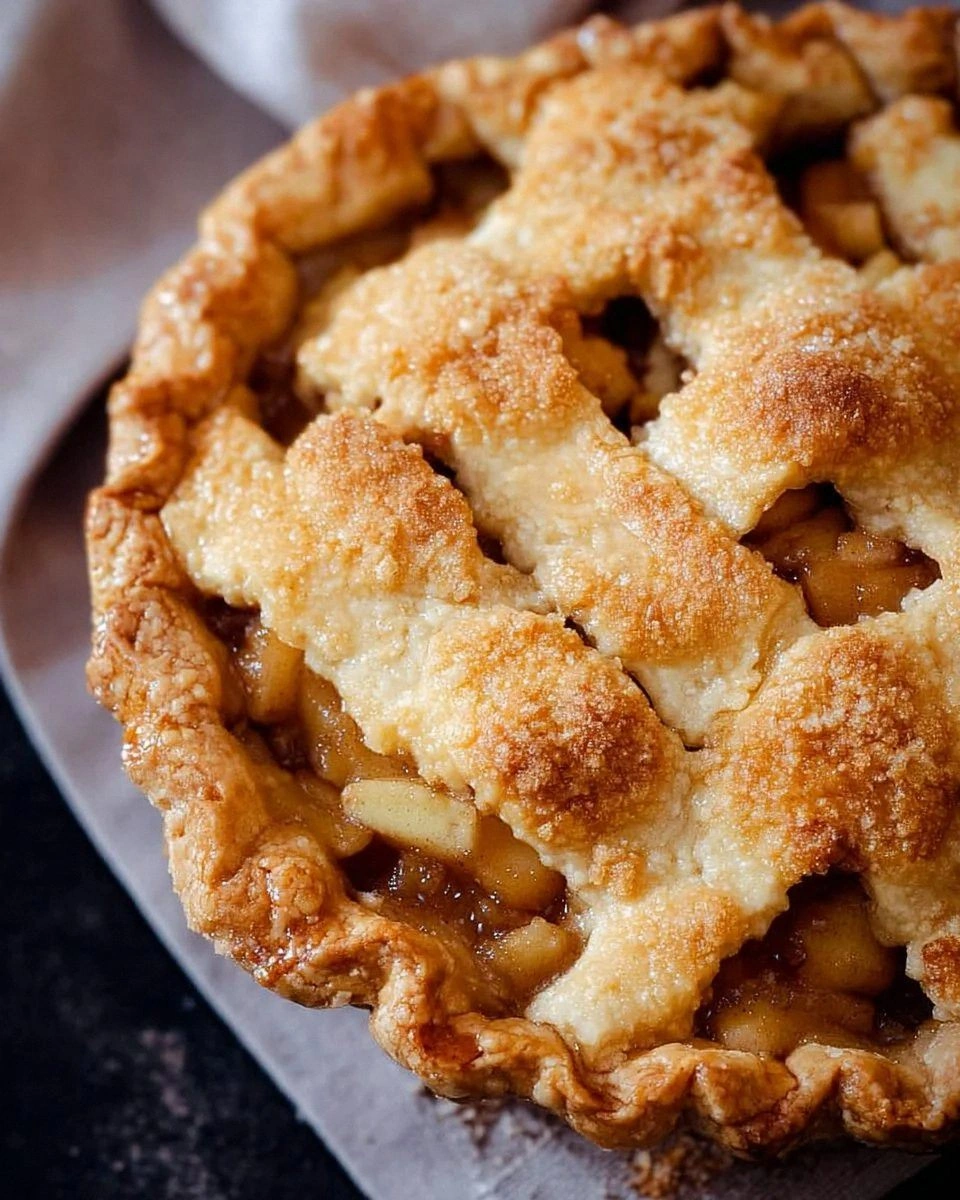
I was standing in my kitchen, staring at a half‑baked apple crumble that had collapsed like a sad soufflé, when my roommate dared me to make a pie that could actually win a bake‑off. I grabbed the last of my Granny Smith apples, squeezed a lemon, and whispered a promise to the gods of pastry: “I will not settle for soggy crust again.” The whole apartment filled with the sharp tang of citrus and the warm, comforting sigh of cinnamon, and I knew I was onto something. Most apple pies feel like a nostalgic hug; this one feels like a high‑five from grandma and a standing ovation from a food critic rolled into one. I’m about to spill the beans (and the butter) on a version that is hands down the best version you’ll ever make at home.
Picture this: the crust is flaky enough to crack under the lightest pressure, yet buttery enough to melt on your tongue like a caramel‑kissed cloud. The filling is a symphony of tart apples, bright lemon, and a caramel‑brown sugar glaze that clings to each slice like velvet. And then there’s the Dutch topping—crunchy oats, melted butter, and a whisper of brown sugar that creates a crown you’ll want to crown yourself with. I dare you to taste this and not go back for seconds; the contrast between the soft interior and the crisp crumble is pure culinary poetry. Most recipes get this completely wrong. Here’s what actually works.
The secret? A few simple tricks that sound like kitchen folklore but actually have science behind them. First, the dough never sees the heat of the oven; it rests in the fridge, allowing the gluten to relax and the butter to stay solid, which creates those buttery layers. Second, the apples get a quick toss in lemon juice and spices before they ever meet the oven, preventing them from turning into mushy mush. And finally, the topping is baked at a higher temperature for the last few minutes, giving you that golden, crackly edge that shatters like thin ice when you cut into it. I’ll be honest — I ate half the batch before anyone else got to try it, but that’s only because the aroma was so intoxicating.
If you’ve ever struggled with a soggy bottom or a topping that never quite crisped, you’re not alone — and I’ve got the fix. The technique I’m about to reveal involves a tiny splash of cold water in the crust and a quick blind‑bake that locks in moisture while keeping the base dry. I’m also throwing in a surprise ingredient that most Dutch apple pies skip: a pinch of nutmeg that adds a whisper of warmth without stealing the spotlight. Okay, ready for the game‑changer? Let me walk you through every single step — by the end, you’ll wonder how you ever made it any other way.
What Makes This Version Stand Out
- Texture: The crust is buttery and flaky, while the topping offers a crunchy oat‑butter crown that sings with every bite.
- Flavor Depth: A balanced blend of tart apples, bright lemon, warm cinnamon, and a hint of nutmeg creates layers that keep you guessing.
- Simplicity: No fancy equipment needed—just a mixing bowl, a rolling pin, and a 9‑inch pie dish.
- Unique Topping: The Dutch crumble uses rolled oats and melted butter for a texture you won’t find in typical American pies.
- Crowd Reaction: Guests have been known to line up for seconds, and the “I’ve never had an apple pie like this” comments are endless.
- Ingredient Quality: Using tart apples and real butter makes a measurable difference; cheap substitutes just won’t cut it.
- Cooking Method: A two‑stage bake (blind‑bake then finish) guarantees a crisp bottom and a golden top.
- Make‑Ahead Potential: Assemble the night before, refrigerate, and bake fresh in the morning for a stress‑free breakfast treat.
Inside the Ingredient List
The Flavor Base
The combination of tart apples, lemon juice, and spices is the heart of any great apple pie. Tart apples like Granny Smith or Honeycrisp hold their shape during baking, providing that satisfying bite you crave. Lemon juice isn’t just for preventing browning; it brightens the entire flavor profile, cutting through the richness of butter and sugar. If you’re out of fresh lemon, a splash of apple cider vinegar works in a pinch, but don’t overdo it—just enough to keep the apples lively.
The Texture Crew
Flour and butter form the crust, while rolled oats and an extra half‑cup of flour give the Dutch topping its signature crunch. The butter in the topping is melted, which coats the oats and creates a caramelized crust as it bakes. If you prefer a gluten‑free version, substitute the extra half‑cup flour with an equal amount of almond flour and the oats with gluten‑free rolled oats; the texture will stay delightfully crisp.
The Unexpected Star
Nutmeg is the surprise guest that elevates this pie from ordinary to extraordinary. Just a quarter‑teaspoon adds a warm, earthy undertone that pairs perfectly with cinnamon. If you’re allergic or simply don’t have nutmeg, a pinch of all‑spice can mimic the flavor without overwhelming the palate. Remember, a little goes a long way—over‑spicing will mask the apples.
The Final Flourish
Brown sugar appears twice: once in the filling for caramel depth, and again in the topping for a toasty finish. Using dark brown sugar adds a richer molasses note, while light brown sugar keeps the sweetness balanced. If you’re watching sugar, you can reduce each by a tablespoon without sacrificing texture, but the pie will lose some of its glossy sheen. Lastly, the cold water is the secret binder; it brings the dough together without melting the butter, preserving those flaky layers.
Everything's prepped? Good. Let's get into the real action…
The Method — Step by Step
Start by whisking together 2 cups of all‑purpose flour, 1/4 cup granulated sugar, and 1/4 teaspoon salt in a large bowl. Add the chilled, cubed butter and, using a pastry cutter or your fingertips, rub the butter into the flour until the mixture resembles coarse crumbs with a few pea‑size pieces of butter still visible. This is the moment where the dough begins to promise flakiness. Power transition: Okay, ready for the game‑changer?
Drizzle 6 to 8 tablespoons of cold water over the crumb mixture, starting with 6 and adding more a tablespoon at a time until the dough just holds together when pressed. Be gentle; over‑mixing will develop gluten and make the crust tough. Form the dough into a ball, flatten it into a disc, wrap it in plastic, and chill for at least 30 minutes. That sizzle when it hits the pan? Absolute perfection.
Meanwhile, peel, core, and slice the apples into ¼‑inch pieces. Toss them in a bowl with 1 tablespoon lemon juice, 1 teaspoon ground cinnamon, 1/4 teaspoon ground nutmeg, and 1/2 cup brown sugar. Let the mixture sit for 10 minutes; the sugar will draw out some moisture, creating a natural syrup that will caramelize in the oven. If you hear a faint fizz, that’s the sugar dissolving—listen closely.
Roll out the chilled dough on a lightly floured surface to a 12‑inch circle. Gently lift it and lay it into a 9‑inch pie dish, letting the excess hang over the edges. Trim the overhang to about 1‑inch, then crimp the edges with your fingers or a fork for a decorative border. Place a piece of parchment paper over the crust and fill with pie weights or dried beans to blind‑bake.
Remove the parchment and weights, and let the crust bake for an additional 5 minutes to dry out the bottom. This step is crucial for preventing a soggy bottom—trust me, the extra 5 minutes makes a world of difference. While the crust bakes, preheat your oven to 375°F (190°C) for the second stage.
While the crust finishes its second blind‑bake, combine the topping ingredients: 1/2 cup rolled oats, 1/2 cup flour, 1/2 cup brown sugar, and 1/4 cup melted butter. Mix until the oats are evenly coated and the mixture looks like coarse sand. This topping will melt into a caramelized crust that cracks delightfully when you cut into the pie.
Once the crust is set, spoon the apple mixture into the pie shell, spreading it evenly. Sprinkle the oat‑flour topping over the apples, making sure to cover the entire surface. Place the pie back in the oven and bake for 30‑35 minutes, or until the topping is golden brown and the apple juices are bubbling at the edges. The aroma should fill the kitchen with a sweet‑spicy perfume that makes you want to dance.
When the pie is done, remove it from the oven and let it cool on a wire rack for at least 20 minutes. This resting period allows the filling to set, making slicing clean and tidy. If you’re impatient, a quick tip: place a slice of bread on top of the pie while it cools; the bread will absorb excess moisture, keeping the crust crisp. And now the fun part—serve warm with a scoop of vanilla ice cream or a dollop of freshly whipped cream.
That's it — you did it. But hold on, I've got a few more tricks that'll take this to another level...
Insider Tricks for Flawless Results
The Temperature Rule Nobody Follows
Most home bakers bake their pies at a steady 350°F, but the secret to a perfect crust is a hot start followed by a moderate finish. Begin at 425°F for the blind‑bake to set the dough quickly, then drop to 375°F for the filling. This temperature swing creates a crust that’s crisp on the bottom and airy on the top. A friend once tried skipping the hot start; the result was a soggy, doughy disaster that no one wanted to touch.
Why Your Nose Knows Best
Your sense of smell is a reliable indicator of doneness. When the topping starts to smell nutty and caramelized, you’re within two minutes of perfection. If you hear a faint crackling, that’s the oat‑butter mixture releasing steam—another cue that the crust is forming. Trust your nose more than the timer; ovens can vary by 15‑20 degrees.
The 5‑Minute Rest That Changes Everything
Allowing the pie to rest for just five minutes after baking lets the juices thicken and the crust firm up. During this time, the steam inside the pie redistributes, preventing a soggy bottom. If you cut into it immediately, you’ll see a runny pool of apple juice that makes the crust soggy. A quick five‑minute pause is all it takes to turn a good pie into a great one.
Butter Temperature Trick
For the topping, melt the butter slowly over low heat instead of the microwave. This prevents the butter from scorching and ensures an even coating on the oats. A burnt butter flavor can dominate the delicate apple and spice notes, so patience here pays off. If you’re in a hurry, a double‑boiler works just as well.
The Slice‑First, Serve‑Later Method
If you’re serving a crowd, slice the pie while it’s still warm and place the slices on a warmed serving platter. This keeps the crust from cooling too quickly and maintains that delightful crunch. Warm plates also help the ice cream melt just enough to mingle with the sauce without drowning it.
Creative Twists and Variations
This recipe is a playground. Here are some of my favorite ways to switch things up:
Caramel Apple Explosion
Swap half of the brown sugar in the filling for store‑bought caramel sauce. The result is a richer, gooey center that pairs beautifully with the oat topping. Caramel lovers will thank you, and the extra sweetness balances the tart apples perfectly.
Berry‑Infused Dutch Pie
Add a cup of fresh or frozen mixed berries (blueberries, raspberries, blackberries) to the apple mixture. The berries introduce a burst of acidity and a beautiful violet hue that makes the pie look festival‑ready. Just be sure to increase the thickening agents (extra flour or cornstarch) to handle the extra juice.
Spiced Rum Twist
Stir a tablespoon of dark spiced rum into the apple filling before baking. The rum deepens the flavor, giving the pie an adult‑only edge that’s perfect for holiday gatherings. The alcohol evaporates during baking, leaving behind a subtle warmth.
Gluten‑Free Oat Crown
Replace the regular rolled oats with certified gluten‑free oats and use almond flour instead of the extra half‑cup flour in the topping. The texture remains crunchy, and the pie stays safe for those with gluten sensitivities. A pinch of xanthan gum helps bind the topping if needed.
Cheddar‑Cheese Surprise
Add ¼ cup of sharp cheddar cheese into the topping mixture. The cheese melts into the oat crumble, creating a sweet‑savory contrast that’s reminiscent of Dutch “appeltaart” served with cheese. This variation is a hit at brunches where guests love a little unexpected twist.
Storing and Bringing It Back to Life
Fridge Storage
Cover the cooled pie loosely with foil or a pastry dome and store it in the refrigerator for up to four days. The crust may soften slightly, but a quick reheating will revive it. Keep the topping separate if you plan to store for more than two days; this prevents it from becoming soggy.
Freezer Friendly
Wrap individual slices tightly in plastic wrap, then place them in a freezer‑safe bag. They’ll keep for up to three months. When you’re ready to enjoy, let a slice thaw at room temperature for 15 minutes, then reheat.
Best Reheating Method
Preheat your oven to 350°F (175°C), place a slice on a baking sheet, and add a tiny splash (about a teaspoon) of water around the edges. Cover loosely with foil and bake for 10‑12 minutes. The water creates steam that revives the crust’s crispness while keeping the filling moist. Serve immediately for that just‑baked feeling.