I still remember the exact moment these Peppermint Oreo Truffles were born, and it wasn't some Instagram-worthy kitchen moment with twinkling fairy lights and matching aprons. It was 11:47 PM on a Tuesday, I was wearing mismatched socks and my hair looked like I'd been electrocuted by a rogue mixer. My friend had dared me to create something that tasted like Christmas morning and childhood nostalgia had a beautiful baby, and I was determined to win that bet or die trying. The kitchen looked like a crime scene — Oreo crumbs everywhere, chocolate splattered on the walls like abstract art, and me standing there with peppermint extract in one hand and a wooden spoon in the other, looking like a mad scientist who had just discovered the cure for boring desserts.
That first bite though? Pure magic. The way the crisp chocolate shell shattered against my teeth, revealing that impossibly creamy, mint-kissed center studded with those signature Oreo flecks — I actually did a little dance right there on the cold tile floor. My neighbor banged on the wall because I may have let out a victory whoop that rattled the windows. These aren't just another truffle recipe; they're little spheres of holiday joy that make grown adults close their eyes and sigh with pleasure. The espresso powder is my secret weapon — it doesn't make them taste like coffee, but it amplifies the chocolate so intensely that regular truffles suddenly taste flat and one-dimensional in comparison.
Here's what makes me absolutely giddy about this recipe: it looks like you spent hours slaving away in the kitchen, but you could literally make these in your sleep. Okay, maybe don't actually sleep-cook, but you get my drift. The hardest part is waiting for them to chill before you can dive in, and trust me, that waiting game will test every ounce of your willpower. I've seen self-proclaimed dessert haters demolish an entire batch, then sheepishly ask if I could make more for their office party. Picture yourself walking into your next holiday gathering with a plate of these beauties — you'll be the culinary rockstar everyone crowds around, recipe cards clutched in hopeful hands.
Let me walk you through every single step — by the end, you'll wonder how you ever made it any other way.
What Makes This Version Stand Out
Flavor Explosion: Most peppermint desserts taste like you're eating toothpaste with sugar mixed in. These truffles get the balance just right — the mint is present but not overwhelming, dancing beautifully with the rich chocolate and those little Oreo cookie bits that add texture and depth. You'll taste chocolate first, then a cooling whisper of mint that lingers like a pleasant memory.
Texture Paradise: The contrast between the snappy chocolate shell and the velvety, almost mousse-like interior is what makes people close their eyes when they bite into these. Those tiny cookie pieces suspended in cream cheese create little pockets of crunch that keep things interesting with every bite. It's like a party in your mouth where everyone's invited and they all get along perfectly.
Foolproof Simplicity: If you can crush cookies and stir, you can make these truffles. There's no tempering chocolate, no complicated techniques, no special equipment required. I've taught this recipe to my nephew who once burned water (don't ask), and he nailed it on the first try. You'll spend more time waiting for them to chill than actually making them.
Unexpected Depth: That tiny amount of espresso powder is the game-changer that separates amateur truffles from professional-quality ones. It doesn't add coffee flavor — it just makes the chocolate taste more chocolatey, like someone turned up the volume on your favorite song. People will ask what your secret is, and you can smile mysteriously or spill the beans.
Crowd Control: These disappear faster than free samples at Costco. I've watched people who claimed they were "too full for dessert" somehow find room for three more truffles. They're the perfect size for popping in your mouth, which means they vanish at an alarming rate. Make a double batch if you want any left for yourself.
Make-Ahead Magic: These beauties actually improve after a day in the fridge, making them perfect for holiday prep. You can roll them weeks ahead and freeze them, then just dip in chocolate when you need them. Try finding another impressive dessert that works on your schedule like that.
Inside the Ingredient List
The Flavor Base
Oreo cookies aren't just cookies — they're engineering marvels that happen to taste incredible. Those chocolate wafers bring deep cocoa flavor and just enough bitterness to balance all the sweetness, while that creamy filling adds vanilla notes that make everything taste more expensive than it is. When you blitz them into crumbs, you're creating a flavor foundation that would make a Michelin-starred pastry chef weep with joy. Don't even think about using generic sandwich cookies here — the real deal matters, and your taste buds will absolutely know the difference. If you're feeling particularly rebellious, try the mint Oreos for an extra punch of peppermint that'll make your eyes water in the best possible way.
The Texture Crew
Full-fat cream cheese is the unsung hero that transforms crushed cookies into something luxurious and truffle-worthy. The fat content is crucial — low-fat versions will give you sad, weepy truffles that taste like diet food, and nobody wants that kind of negativity in their life. When it's properly softened, it creates this silky network that binds everything together while keeping the interior lusciously smooth. The Philadelphia brand works best because it has the perfect balance of tang and richness, but any full-fat block will do in a pinch. Just promise me you won't use the whipped kind from a tub — we're making truffles here, not science experiments.
The Unexpected Star
Peppermint extract is where most recipes go completely sideways — they dump in way too much and suddenly you're eating candy canes. You want just enough to create that cooling sensation that makes chocolate taste even more chocolatey, like a breath of winter air on a snowy day. Start with less than you think you need — you can always add more, but you can't take it out once it's in there. I learned this the hard way after creating a batch that cleared everyone's sinuses. The good stuff is worth the splurge — McCormick's or Nielsen-Massey will give you clean, pure peppermint flavor without any weird artificial aftertaste.
The Final Flourish
Semi-sweet chocolate for coating needs to be good enough to eat on its own, because it's doing heavy lifting here. Those chocolate chips in your pantry? Perfect, as long as they're decent quality — Ghirardelli or Trader Joe's work beautifully without breaking the bank. The coconut oil or canola oil isn't just for show — it creates that gorgeous, glossy finish that makes truffles look like they came from an expensive chocolatier. Without it, your chocolate will set dull and streaky, like it got dressed in the dark. Pro tip: if you use coconut oil, pick the refined kind unless you want a subtle coconut flavor competing with your peppermint.
The Method — Step by Step
- Start by pulsing your Oreos into submission — and by submission, I mean fine crumbs that look like fancy coffee grounds. This isn't the time for rustic chunks; you want everything uniformly small so your truffles roll smoothly without weird bumpy bits. I use a food processor because I'm not a masochist, but a zip-top bag and rolling pin works if you're feeling particularly aggressive and need to work out some frustrations. The goal is crumbs so fine they could pass for potting soil, but infinitely more delicious. Don't be tempted to eat half the cookies before crushing — I know it's hard, but future you will thank present you for showing some restraint.
- Now comes the moment where magic happens — scraping every last bit of that cream cheese into your bowl. It should be so soft that a gentle stir leaves trails like clouds across a summer sky. Add your peppermint extract here, but here's the thing: hold the bottle high above the bowl and let just a few drops fall like rain. You want to be able to smell mint when you lean in, but not feel like you just walked into a toothpaste factory. Stir everything together until it looks like cookies and cream ice cream that's been left in the sun just long enough to get melty and irresistible.
- Time to get your hands dirty — and yes, I mean literally. Those food-safe gloves gathering dust in your drawer? Now's their moment to shine, unless you enjoy having Oreo-blackened hands for three days. Scoop out tablespoon-sized portions and roll them between your palms like you're making Play-Doh balls, but infinitely more sophisticated. They should be about the size of ping pong balls, maybe slightly smaller if you want to feel dainty while eating twelve of them. Place them on a parchment-lined baking sheet and try not to eat them all before they get their chocolate bath.
- Into the freezer they go for at least 30 minutes — this isn't optional, folks. Cold centers mean the chocolate will set quickly instead of sliding off in a sad, streaky mess. While they're chilling, prep your chocolate coating by melting semi-sweet chocolate with your oil of choice. I use the microwave method because I'm impatient, heating in 30-second bursts and stirring like my life depends on it. The chocolate should be smooth and glossy, like liquid velvet that you want to dive into headfirst.
- Here's where things get exciting — and by exciting, I mean potentially messy in the most delicious way possible. Drop a chilled truffle into the melted chocolate and roll it around with a fork until it's completely coated. Lift it out with the fork, give it a gentle tap against the side of the bowl to shake off excess chocolate, and slide it onto a fresh parchment sheet. Work quickly here because cold truffles plus warm chocolate equals beautiful, streak-free results. If you're feeling fancy, sprinkle some crushed candy canes on top before the chocolate sets.
- The waiting game begins — and it's torture, pure torture. Let them sit until the chocolate sets completely, which takes about 20 minutes if your kitchen isn't tropical. You can speed this up with a quick stint in the fridge, but don't leave them in there too long or condensation will make them sweat like nervous teenagers. When the chocolate has lost its glossy wet look and feels firm to the touch, you're in business. Try one and tell me it isn't the best thing you've made all year — I'll wait.
- Storage is simple but crucial — these little gems need to stay cold to maintain their perfect texture. Layer them in an airtight container with parchment between layers, like you're tucking them into bed. They'll keep for a week in the fridge, though I've never personally tested this limit because they vanish within days. The flavors actually meld and improve after 24 hours, making them perfect for advance prep when you've got a million other things to do before your party.
That's it — you did it. But hold on, I've got a few more tricks that'll take this to another level...
Insider Tricks for Flawless Results
The Temperature Rule Nobody Follows
Room temperature isn't just a suggestion — it's the difference between truffles that roll like butter and ones that crack and crumble like ancient pottery. Your cream cheese needs to be so soft that it practically spreads itself, and your Oreos should be at room temperature too unless you enjoy watching your chocolate seize into a lumpy disaster. I set everything out an hour before I start, then get distracted by Instagram and remember two hours later — works every time. Cold ingredients make the mixture seize up, and you'll find yourself wrestling with a bowl of concrete that refuses to cooperate no matter how nicely you ask.
Why Your Nose Knows Best
When adding peppermint extract, lean in and take a whiff after stirring — you should smell mint the way you smell it when you walk past a candy store, not like you just stuck your head in a bottle of mouthwash. If the aroma punches you in the face, you've gone too far and your truffles will taste like you're eating Christmas decorations. Start with half of what you think you need, then add more drop by drop until it smells like a gentle winter breeze rather than an avalanche of candy canes. Remember, you can always add more extract, but you can't un-mint your truffles once they've gone to the dark side.
The 5-Minute Rest That Changes Everything
After rolling your truffles, let them sit at room temperature for exactly five minutes before the freezer treatment. This brief rest lets the cream cheese soften the cookie crumbs just enough to eliminate any air pockets that could cause cracking later. It's like a quick meditation session for your truffles — they relax, get their act together, and emerge better versions of themselves. Skip this step and you'll find tiny fissures appearing in your chocolate coating like fault lines across a desert. I've rushed this step before and ended up with truffles that looked like they'd been through a war zone instead of a kitchen.
The Chocolate Temperature Sweet Spot
Your melted chocolate should feel warm but not hot when you touch it to your lip — think baby's bottle temperature, not coffee that's been sitting in the car too long. Too hot and it'll melt the truffles, creating a chocolate swamp that never quite sets right. Too cool and it goes thick and gloppy, coating your truffles like mud instead of silk. I test it like I'm testing a baby's bottle because apparently motherhood has taught me more about chocolate than any cooking class ever did. When it's just right, it flows like liquid velvet and coats everything in a glossy sheen that makes you look like a professional chocolatier instead of someone who just learned to make truffles last week.
Creative Twists and Variations
This recipe is a playground. Here are some of my favorite ways to switch things up:
The White Chocolate Wonderland
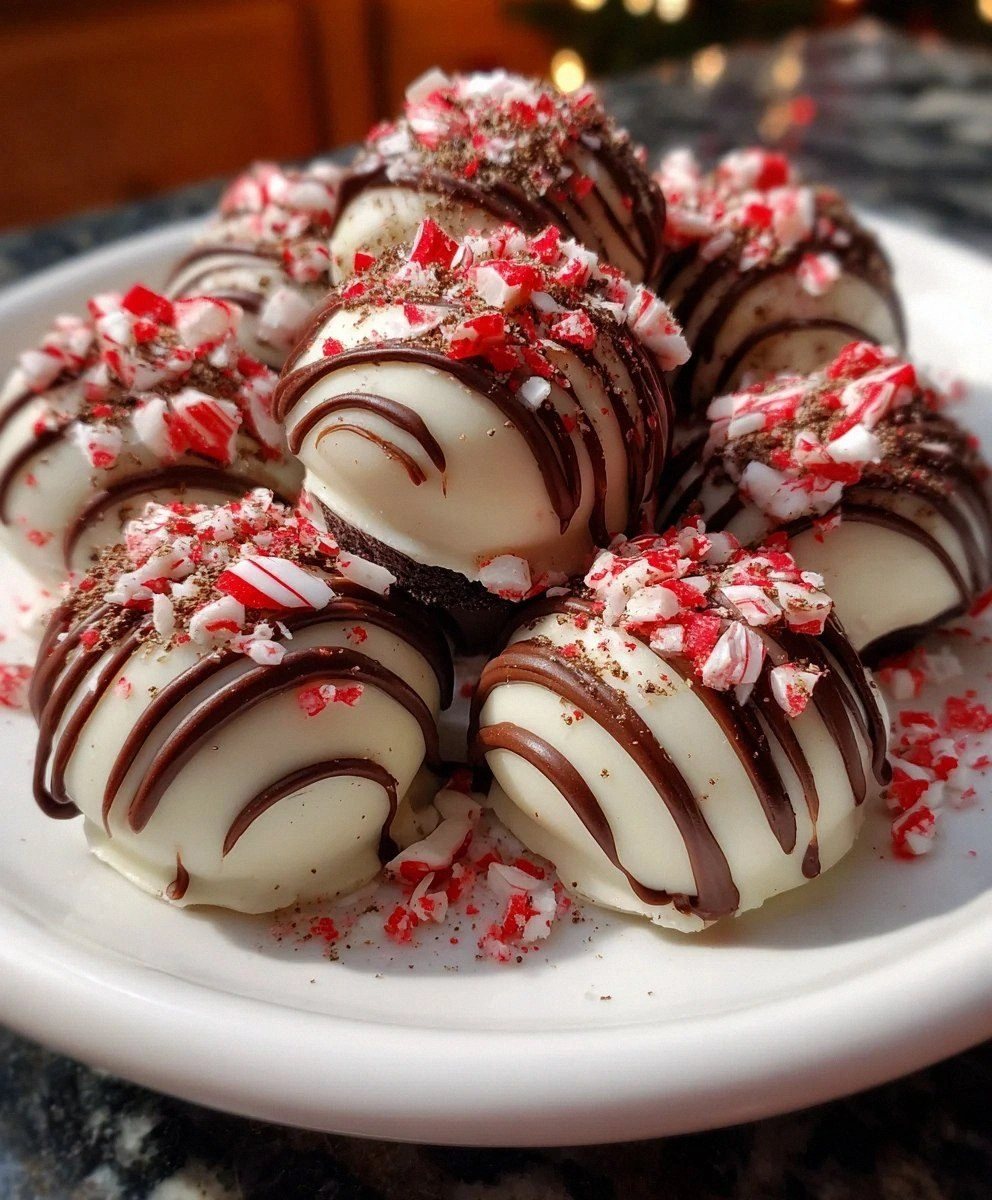
Swap the semi-sweet chocolate coating for white chocolate and suddenly you're in a winter wonderland of sweetness. The white chocolate creates this gorgeous contrast against the dark cookie interior, like snow on chocolate soil. Add some crushed candy canes on top and you've got truffles that look like they belong in a ski lodge gift shop, but taste infinitely better than anything you'd find there. The peppermint flavor really shines through here because white chocolate doesn't compete for attention the way darker chocolate does.
The Double Chocolate Decadence
Use chocolate Oreos for the base but coat them in dark chocolate that's been infused with a tiny bit of orange zest. The combination of chocolate, mint, and orange creates this sophisticated flavor profile that tastes like you went to pastry school instead of just following a recipe from the internet. People will ask if you studied in France — let them think you did. The citrus brightens everything up and makes the chocolate taste even more intense, like someone turned the contrast up on your taste buds.
The Adult-Only Version
Add a tablespoon of peppermint schnapps to the mixture and suddenly these become the life of the holiday party. The alcohol doesn't cook off because there's no cooking involved, so these pack a little punch that sneaks up on you after the third or fourth truffle. They're like the sophisticated older cousin of regular truffles — they wear lipstick and know how to change a tire. Just make sure to label them clearly so little hands don't grab them by mistake, unless you want your holiday gathering to become a very different kind of party.
The Vegan Victory
Swap regular cream cheese for vegan cream cheese and use dairy-free chocolate chips for coating. The result is so good that even my most devoted carnivore friends can't tell the difference. The texture is identical, the flavor is spot-on, and suddenly everyone can enjoy these regardless of their dietary choices. Use coconut oil instead of canola for the chocolate coating, and you'll get this subtle coconut undertone that plays beautifully with the peppermint like they were always meant to be together.
The Spicy Surprise
Add a pinch of cayenne pepper to the Oreo mixture — just enough to create this warming sensation that builds slowly after you swallow. It's like a little surprise party for your mouth, where everyone's having a good time until someone brings out the hot sauce. The cool peppermint and the warm cayenne create this push-pull sensation that's completely addictive. Start with just an eighth of a teaspoon unless you enjoy watching your guests' eyes water while they reach for another one anyway.
The Holiday Hybrid
Mix in some finely chopped dried cranberries for pops of tartness that cut through all the richness. The red flecks look like little jewels suspended in the truffle interior, making them look way fancier than they have any right to be. It's like Christmas morning exploded inside your dessert, but in the most sophisticated way possible. The tart berries wake up your palate and make you want to keep eating them just to experience that sweet-tart-chocolate-mint rollercoaster all over again.
Storing and Bringing It Back to Life
Fridge Storage
These beauties need to live in the fridge, nestled in an airtight container like they're hibernating for winter. Layer them with parchment paper between levels because nobody wants truffle casualties stuck together like best friends who won't separate. They'll keep for up to a week, though I've never personally witnessed them surviving that long. The cold actually improves their texture, making the chocolate snap even more satisfyingly when you bite into them. Just remember to let them sit at room temperature for about ten minutes before serving — cold chocolate doesn't release its full flavor symphony the way slightly warmer chocolate does.
Freezer Friendly
Here's where this recipe really shines — you can freeze these for up to three months and they'll emerge tasting exactly like the day you made them. Freeze them uncoated first, then dip in chocolate while they're still frozen solid. The chocolate sets almost instantly, creating this gorgeous glossy finish that looks professionally done. I make massive batches in November and freeze them, then dip as needed throughout the holiday season. It's like having a secret weapon in your freezer that transforms you into a dessert hero at a moment's notice. Just label them clearly — frozen truffles look suspiciously similar to frozen meatballs, and you don't want to mix those up at your holiday party.
Best Serving Method
Ten minutes before you're ready to serve, pull them from the fridge and let them warm up just enough to take the chill off. The chocolate develops this gorgeous satin finish, and the interior softens to that perfect creamy texture that makes people close their eyes involuntarily. If they've been in the freezer, give them 15 minutes at room temperature. Serve them slightly chilled but not arctic-cold — you want them firm enough to hold their shape but not so cold that the flavors are muted. And always serve them in paper candy cups because we're not animals, and presentation matters when you've worked this hard.