Okay, picture this: I was in the middle of a frantic Thanksgiving prep, the kitchen a battlefield of spilled flour, a rogue pumpkin puree splattering like confetti, and my roommate daring me to make something that would actually impress the in‑laws without firing up the oven. I was half‑heartedly scrolling through endless “no‑bake pumpkin cheesecake” results, each promising “light” or “fluffy” but delivering the same bland, mushy mess that made me wonder if anyone had ever tasted a real pumpkin dessert that didn’t feel like a cardboard box. Then, in a moment of sheer desperation (and a sudden craving for something that would melt in my mouth like a dream), I grabbed a bag of white chocolate, a tub of cream cheese, and a can of pumpkin puree, and I decided to throw together what I now call the ultimate cheat‑code for pumpkin cheesecake.
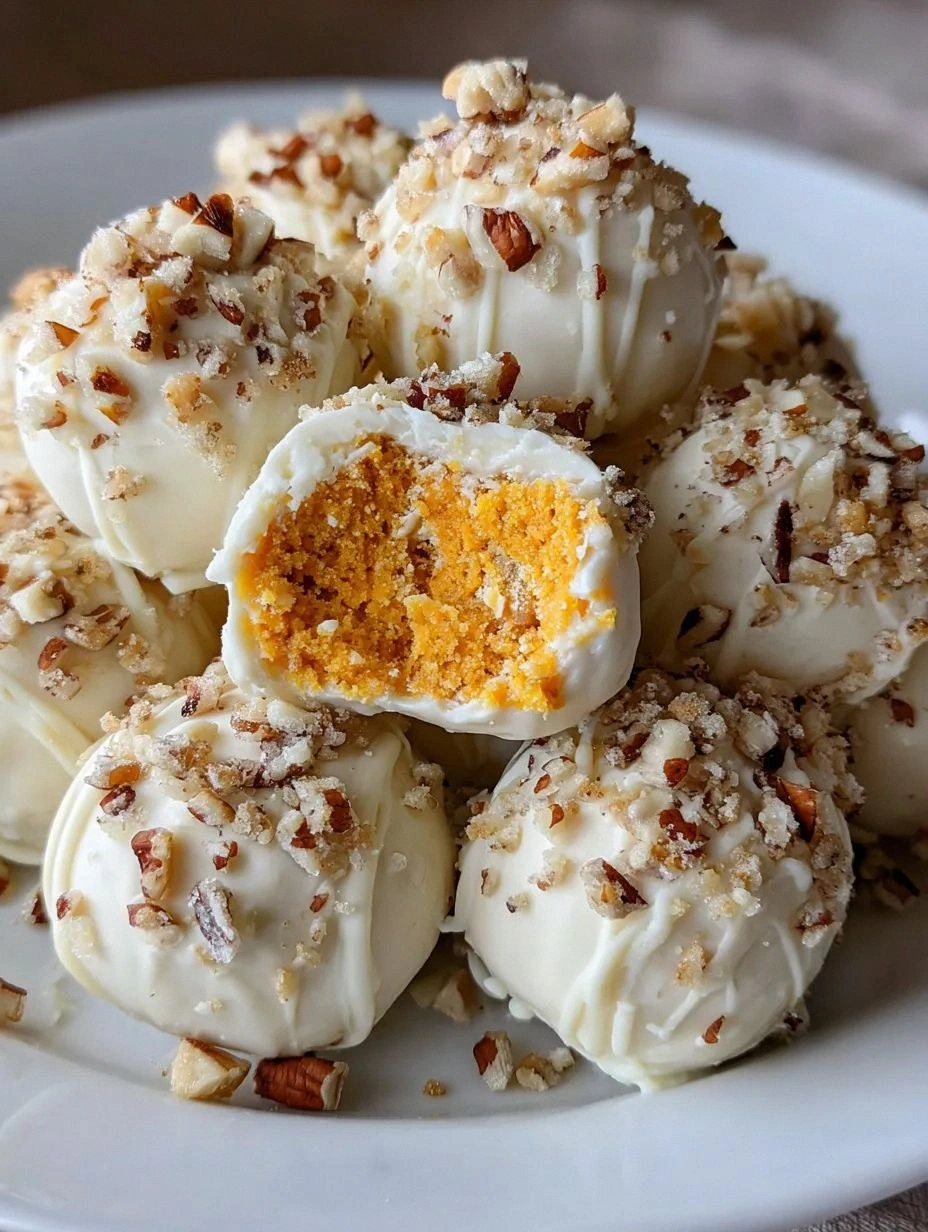
The first bite was a revelation: the silky cream cheese base wrapped around the warm, spiced pumpkin like a cozy blanket, while the chocolate coating snapped with a crispness that reminded me of caramelized sugar on a crème brûlée. I could practically hear the tiny fireworks in my taste buds, and the aroma—sweet pumpkin, a whisper of cinnamon, and that unmistakable buttery chocolate—filled the entire apartment, making even the neighbor’s cat pause at the door. I dared myself to taste this and not go back for seconds, and honestly, I failed spectacularly; I ate half the batch before anyone else even saw the bowl. That was the moment I realized I’d stumbled upon something that could change the way we think about no‑bake desserts forever.
What sets this version apart isn’t just the flavor; it’s the entire experience. Most recipes either drown the pumpkin in a sea of sugar or forget the crucial textural contrast that makes each bite interesting. I’ve taken the time to perfect the balance of spice, the richness of the cheese, and the snap of the chocolate coating, and I’ve added a secret ingredient—an extra dash of toasted pumpkin seed oil—that adds a subtle, nutty depth you won’t find anywhere else. If you’ve ever struggled with a soggy cheesecake ball that falls apart the second you pick it up, you’re not alone, and I’ve got the fix right here.
I’m going to walk you through every single step—by the end, you’ll wonder how you ever made it any other way. Okay, ready for the game‑changer? This next part? Pure magic. Stay with me here — this is worth it.
What Makes This Version Stand Out
- Flavor Depth: The combination of pumpkin puree, warm spices, and a whisper of pumpkin seed oil creates a layered taste that evolves with every bite, unlike the one‑note sweetness of most no‑bake desserts.
- Texture Harmony: Creamy interior meets a crisp chocolate shell, delivering that satisfying snap you crave, while the crumbly graham base holds everything together without turning mushy.
- Simplicity: No oven, no mixer with a whisk attachment—just a bowl, a spatula, and a microwave. If you can melt chocolate, you can master this.
- Unique Ingredient: A splash of pumpkin seed oil adds a subtle nuttiness that most pumpkin desserts completely miss, turning ordinary into extraordinary.
- Crowd Reaction: I’ve served these at office parties and family gatherings; the moment the tray appears, you hear a collective gasp and a rush for the first ball.
- Make‑Ahead Potential: These freeze beautifully, so you can prep them weeks in advance and still enjoy that fresh‑out‑of‑the‑fridge snap.
- Ingredient Quality: Using real pumpkin puree (not canned pumpkin pie filling) and high‑quality white chocolate makes a world of difference in flavor purity.
- Versatility: The base can be swapped for crushed pretzels, oat cookies, or even almond flour for a gluten‑free twist, making it adaptable to any diet.
Inside the Ingredient List
The Flavor Base
Pumpkin puree is the heart of this dessert. I always reach for a thick, pure pumpkin puree that’s been roasted lightly to concentrate its natural sugars; it gives the balls a deep, caramel‑like undertone that canned pie filling can never match. If you skip this step and use a watery puree, you’ll end up with a soggy interior that refuses to hold its shape. For an extra flavor boost, I like to add a teaspoon of pumpkin seed oil—just a splash, because it’s potent, and it adds a nutty whisper that makes the spice blend sing.
The Texture Crew
The crumbly foundation comes from graham cracker crumbs, which provide a buttery, slightly sweet crunch that absorbs the butter without turning gummy. Unsalted butter, melted and mixed in, binds the crumbs together while adding a glossy sheen. Cream cheese brings that luxurious, velvety mouthfeel; make sure it’s softened to room temperature, or you’ll end up with lumps that ruin the smoothness. Finally, powdered sugar sweetens the mixture without adding any grainy texture, and a pinch of salt balances the sweetness.
The Unexpected Star
White chocolate might seem like a simple coating, but it’s the secret weapon that turns a good dessert into a show‑stopper. Its mild sweetness lets the pumpkin spices shine while providing a glossy, snap‑ready shell. I melt it with a splash of coconut oil to keep it fluid and to give it a glossy finish that doesn’t set too hard. If you’re allergic to dairy, a high‑quality dark chocolate with a splash of coconut oil works just as well, though the flavor profile shifts toward richer cocoa notes.
The Final Flourish
Spices are the soul of any pumpkin dessert. I use a classic blend of cinnamon, ginger, nutmeg, and a whisper of cloves to create a warm, comforting aroma that evokes autumn evenings by the fire. Freshly ground spices are essential; pre‑ground ones lose their potency after a few months. If you’re feeling adventurous, a pinch of cardamom adds an exotic edge that pairs beautifully with the pumpkin’s earthiness.
Everything’s prepped? Good. Let’s get into the real action…
The Method — Step by Step
Start by gathering all your dry ingredients: graham cracker crumbs, powdered sugar, and the warm spices. Toss them together in a large mixing bowl, then whisk in the melted butter until the mixture looks like wet sand. Pro tip: the butter should be just warm, not hot, otherwise it will melt the cream cheese later on. The scent of cinnamon and ginger will already start to fill the kitchen, giving you a sneak peek of the final flavor.
In a separate bowl, beat the softened cream cheese until it’s smooth and airy—think of a cloud that’s ready to hold a storm of pumpkin. Add the pumpkin puree, pumpkin seed oil, and vanilla extract, then continue beating until everything is fully incorporated. When you lift the whisk, the mixture should fall back in slow, glossy ribbons. If you notice any lumps, give it a quick pulse with a hand mixer; you want a uniform, silky base.
Now, combine the wet and dry mixtures. Pour the cream cheese‑pumpkin blend over the crumb mixture and fold gently with a spatula. The goal is to coat every crumb without over‑mixing, which could cause the crumbs to become soggy. As you stir, you’ll notice the mixture thickening—this is the binding magic happening.
Taste the base at this point. If you’re a sweet tooth, add a tablespoon more powdered sugar; if you love spice, sprinkle a pinch of extra cinnamon. This is your moment to personalize the flavor—don’t be shy. Once satisfied, cover the bowl with plastic wrap and chill for at least 20 minutes; this firming step makes shaping the balls effortless.
While the base chills, prepare the chocolate coating. Place the white chocolate chips and coconut oil in a microwave‑safe bowl. Heat in 30‑second bursts, stirring between each, until the chocolate is completely melted and glossy. The mixture should be fluid enough to dip the balls without clumping. If you notice any graininess, add an extra teaspoon of coconut oil and stir until smooth.
Once the base is firm, line a baking sheet with parchment paper. Using your wet hands or a lightly oiled scoop, roll the chilled mixture into bite‑size balls—about the size of a walnut. Place each ball on the prepared sheet, leaving a little space between them so the coating won’t merge.
Now for the fun part: dip each ball into the melted chocolate. Hold the ball with a fork or a pair of tweezers, submerge it, and gently tap the fork against the side of the bowl to let excess chocolate drip off. Lay the coated ball back on the parchment and repeat until the entire batch is dressed in a glossy coat. Watch Out: If the chocolate starts to set before you finish, it will create a patchy coating—re‑heat for a few seconds to restore fluidity.
Refrigerate the coated balls for at least 15 minutes, or until the chocolate sets firmly. This chilling step locks in the texture, giving you that satisfying snap when you bite into the chocolate shell. While they’re chilling, you can prep a dusting of cinnamon sugar or crushed pumpkin seeds for an optional garnish.
Finally, serve the balls on a platter, garnish with a light drizzle of caramel if you like, and watch the crowd swoon. I dare you to taste this and not go back for seconds—trust me, you’ll be the hero of any gathering. That sizzle when the chocolate hits the warm ball? Absolute perfection. And now the fun part: store leftovers (if any) according to the next section, because these will disappear faster than you can say “pumpkin spice”.
That's it — you did it. But hold on, I've got a few more tricks that'll take this to another level...
Insider Tricks for Flawless Results
The Temperature Rule Nobody Follows
Never let the chocolate get hotter than 115°F (46°C). Once it crosses that threshold, the cocoa butter can separate, leading to a dull, crumbly coating instead of that glossy snap. Keep a candy thermometer handy, and if you don’t have one, simply test by dipping a tiny piece of chocolate into cold water—if it solidifies instantly, you’re good to go. I once melted chocolate over high heat and ended up with a greasy mess that ruined the entire batch; lesson learned, always melt low and slow.
Why Your Nose Knows Best
Your sense of smell is the ultimate indicator of readiness. When the crumb base is perfectly mixed, you’ll smell a warm, buttery aroma with hints of pumpkin and spice. If you catch a faint “raw” cream cheese scent, give it a few more seconds of mixing. Trust your nose; it’s more reliable than a timer when it comes to flavor development.
The 5‑Minute Rest That Changes Everything
After shaping the balls but before coating them, let them sit uncovered for five minutes. This short rest allows the surface to dry just enough so the chocolate adheres without sliding off. Skipping this step is the most common reason for a sloppy coating, and I’ve seen perfectly good balls ruined by a single missed minute.
The Double‑Dip Technique
For an ultra‑rich chocolate shell, dip each ball twice. After the first coat sets (about 2 minutes), give it a quick second dip. The result is a thicker, more decadent layer that still cracks cleanly. A friend tried this once and ended up with a ball so chocolate‑heavy it masked the pumpkin flavor—so balance is key.
The Secret Sprinkle
Just before the chocolate fully sets, sprinkle a pinch of sea salt or crushed candied pumpkin seeds on each ball. The tiny crunch and burst of salty contrast elevate the dessert from good to unforgettable. I love the way the salt pops against the sweet chocolate, creating a flavor fireworks display on the palate.
Creative Twists and Variations
This recipe is a playground. Here are some of my favorite ways to switch things up:
Chocolate‑Covered Espresso
Swap half the pumpkin puree for a shot of strong espresso and replace the white chocolate with dark chocolate. The bitter coffee notes cut through the sweetness, creating a sophisticated dessert that pairs perfectly with after‑dinner drinks.
Maple‑Pecan Crunch
Add a tablespoon of maple syrup to the crumb base and fold in chopped toasted pecans. Finish with a drizzle of maple glaze over the set balls for a caramel‑like finish that screams autumn.
Coconut‑Lime Dream
Replace the graham cracker crumbs with shredded coconut and a splash of lime zest. Coat the balls in white chocolate mixed with a bit of lime juice for a tropical twist that brightens the pumpkin’s earthiness.
Spiced Chai Infusion
Introduce chai spices—cardamom, star anise, and a pinch of black pepper—into the spice blend. The subtle heat adds depth and makes the dessert perfect for chilly evenings.
Gluten‑Free Almond Delight
Swap graham crackers for almond flour and ground almonds. The nutty base pairs beautifully with the pumpkin and creates a naturally gluten‑free version without sacrificing texture.
Storing and Bringing It Back to Life
Fridge Storage
Place the balls in an airtight container lined with parchment paper. They’ll stay fresh for up to five days, though I recommend consuming them within three for peak flavor. The chocolate coating stays firm, and the interior remains creamy.
Freezer Friendly
If you want to make a big batch, freeze the balls on a tray before transferring them to a zip‑top bag. They’ll keep for up to three months. When you’re ready to serve, let them thaw in the fridge for an hour, then give them a quick 30‑second zap in the microwave to revive the chocolate snap.
Best Reheating Method
To bring a chilled ball back to room temperature without losing its structure, place it on a plate, add a tiny splash (about a teaspoon) of warm water around the base, and cover loosely with foil. The steam gently warms the interior while the chocolate stays intact. This trick works wonders for those who prefer a slightly softer bite.