I was in the middle of a frantic Tuesday night when my roommate challenged me to make something that would make her forget about the pizza she was eyeing on the delivery menu. I stared at a bag of plain flour, a stick of butter, and a half‑empty carton of heavy cream and thought, “What if I could turn these humble pantry staples into clouds that explode with custard?” The kitchen was a mess of splattered flour and a timer that kept beeping like a frantic metronome, but the aroma that started to drift from the oven was pure, buttery promise. That moment, when the first puff puffed up and the scent of toasted butter hit my nose, felt like the universe was giving me a high‑five.
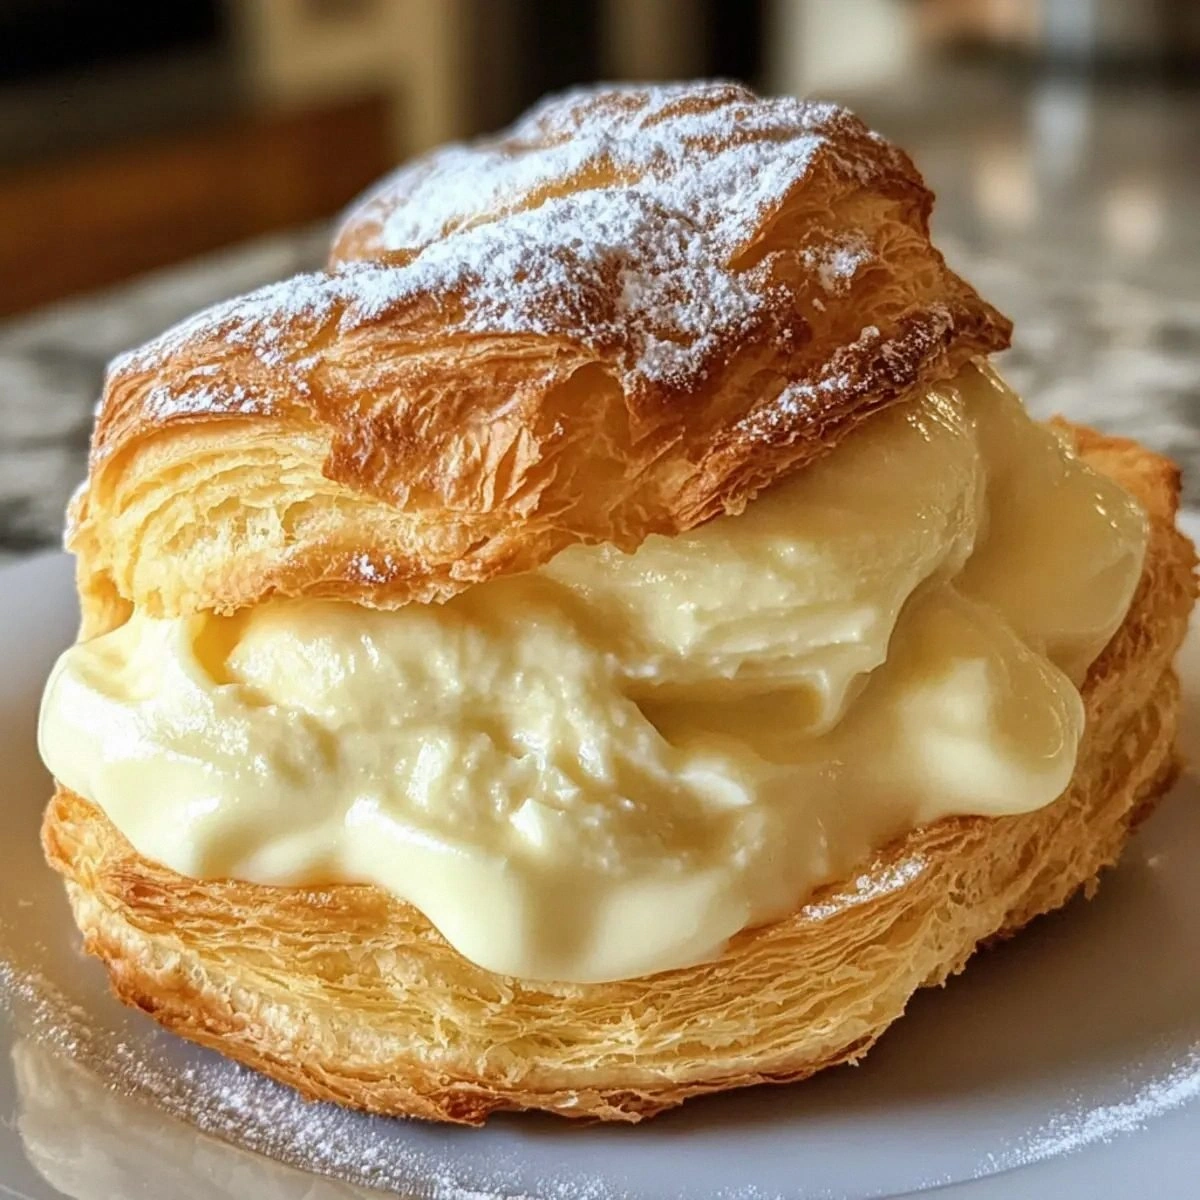
Picture this: a golden‑brown shell that cracks under the lightest pressure, revealing a silky custard that slides out like a waterfall of vanilla‑kissed silk. You hear the faint sigh of steam escaping the pastry as you slice into it, and the first bite is a contrast of crisp edges that shatter like thin ice and a soft, airy interior that melts on your tongue. The taste? A perfect balance of sweet, buttery, and just‑right vanilla that makes you close your eyes and swear you’re back in a little Italian bakery on a cobblestone street. The texture is so airy that you’ll swear the puffs are made of clouds, yet the custard is thick enough to hold its shape without leaking like a busted pipe.
Most recipes out there either over‑mix the dough, giving you a dense, soggy puff, or they under‑cook the custard, leaving you with a runny center that slides off the spoon. This version flips the script by using a classic French choux technique paired with an Italian‑style zabaglione custard that’s enriched with a splash of heavy cream and a whisper of vanilla bean. The secret? A precise temperature dance and a few kitchen hacks that guarantee a flawless rise every single time. I’ll be honest — I ate half the batch before anyone else got a chance to try it, and that was the best mistake ever.
If you’ve ever struggled with puff pastry that collapses, or custard that curdles, you’re not alone — and I’ve got the fix. I’m daring you to taste this and not go back for seconds; I guarantee you’ll be the hero of any gathering, whether it’s a casual brunch or a fancy dinner party. Okay, ready for the game‑changer? Let me walk you through every single step — by the end, you’ll wonder how you ever made it any other way.
What Makes This Version Stand Out
- Flavor: The vanilla bean infuses the custard with a floral depth that ordinary extracts can’t match, creating a perfume‑like finish that lingers on the palate.
- Texture: The choux shell is airy yet sturdy, holding the custard without sogging, thanks to the perfect butter‑water ratio and a precise bake time.
- Simplicity: Only ten ingredients, no fancy equipment, and a single pan for the dough – perfect for busy cooks who still crave gourmet results.
- Uniqueness: Combining French choux with an Italian zabaglione twist gives you a cross‑cultural masterpiece that feels both familiar and novel.
- Crowd Reaction: Guests often say “I could eat these every day” and then immediately ask for the recipe, which is the ultimate compliment.
- Ingredient Quality: Using real butter and whole‑milk custard elevates the flavor profile far beyond store‑bought mixes.
- Cooking Method: The two‑stage bake (initial high heat, then lower heat) guarantees that the puffs rise like balloons and stay crisp.
- Make‑Ahead Potential: You can prep the shells a day ahead and fill them just before serving, keeping everything fresh and stress‑free.
Inside the Ingredient List
The Flavor Base
The unsalted butter is the cornerstone of both the dough and the custard. Butter adds richness, flavor, and that coveted golden color. If you skimp on butter, the shells will be dry and the custard will lack that buttery silkiness. For the best result, use European‑style butter with a higher fat content; it melts slower and creates a more stable emulsion. A cheap margarine will turn the dough greasy and the custard grainy. Pro tip: cut the butter into small cubes before melting so it integrates evenly with the water.
The Texture Crew
All‑purpose flour provides the structure needed for the choux to puff up. The ratio of flour to liquid is critical – too much flour and the dough becomes stiff, too little and the puffs won’t hold shape. I always sift the flour to avoid lumps and to aerate it, which contributes to the lightness of the final puff. The eggs act as a leavening agent; their proteins coagulate during baking, trapping steam and giving the puff its lift. If you use smaller eggs, add a splash more water to keep the batter fluid.
The Unexpected Star
Vanilla bean (or extract) is the secret whisper that turns a good custard into a show‑stopper. The tiny specks of vanilla seeds create tiny bursts of flavor that dance on your tongue. If you’re out of fresh beans, a high‑quality Madagascar vanilla extract works just as well. The heavy cream enriches the custard, providing a buttery mouthfeel that milk alone can’t achieve. Skipping the cream will give you a thinner custard that can’t stand up to the puff’s crisp shell.
The Final Flourish
Powdered sugar and heavy cream are the finishing touches for the whipped topping that crowns each puff. Powdered sugar dissolves instantly, preventing a gritty texture, while the cream adds body and a glossy sheen. If you prefer a less sweet finish, you can reduce the powdered sugar to 1 tablespoon and add a pinch of sea salt to the whipped cream. This contrast heightens the custard’s vanilla notes and adds a sophisticated edge.
Everything's prepped? Good. Let's get into the real action...

The Method — Step by Step
Preheat your oven to 425°F (220°C). While the oven is heating, line two baking sheets with parchment paper and set a wire rack on top of one sheet. This rack will let the puffs cool without steaming, preserving that coveted crispness. The high initial temperature creates a burst of steam that inflates the dough like a balloon. Power transition: Okay, ready for the game‑changer?
In a medium saucepan, combine ½ cup unsalted butter, 1 cup water, and a pinch of salt. Bring to a rolling boil, letting the butter melt completely and the mixture bubble vigorously. Once boiling, remove from heat and immediately whisk in 1 cup all‑purpose flour all at once. The dough will form a smooth ball that pulls away from the sides of the pan – that’s the sign of a perfect choux base.
Kitchen Hack: After adding the flour, return the pan to low heat for 1‑2 minutes while stirring. This “dry‑out” step removes excess moisture and helps the dough achieve that glossy sheen.Let the dough cool for about 5 minutes – you want it warm, not scorching. Then, one at a time, beat in 4 large eggs. The mixture will look like a thick batter, glossy and slightly glossy. If the dough looks too runny, add a splash more flour; if it’s too stiff, a tablespoon of warm water will loosen it. The batter should flow like a thick honey when you lift the spoon.
Using a piping bag fitted with a large round tip (or a zip‑lock bag with a corner snipped off), pipe 1‑inch rounds onto the prepared parchment, spacing them about 2 inches apart. This spacing allows the puffs to expand without touching. Watch Out: If the rounds are too close, they’ll merge into one giant, soggy blob.
Watch Out: Over‑filling the bag will cause uneven puffs; aim for a uniform size for even baking.Slide the sheet into the oven and bake at 425°F for 10 minutes. You’ll hear a faint hiss as the steam bursts out – that’s the puff’s heart expanding. After 10 minutes, lower the temperature to 350°F (175°C) and continue baking for another 15‑20 minutes, or until the shells are a deep golden‑brown and sound hollow when tapped. The edges should pull away from the parchment, a visual cue that they’re fully cooked.
While the shells are cooling, whisk together 2 cups whole milk, 1 tsp vanilla bean (or extract), 4 large egg yolks, ½ cup granulated sugar, and ¼ cup cornstarch in a saucepan. Cook over medium heat, stirring constantly, until the mixture thickens and coats the back of a spoon – about 6‑8 minutes. Then, remove from heat and stir in 1 cup heavy cream for extra silkiness. Transfer the custard to a bowl, cover with plastic wrap directly on the surface to prevent a skin, and chill for at least 30 minutes.
Once the custard is chilled, pipe or spoon it into the cooled puff shells. Fill each puff about three‑quarters full, leaving a little room at the top for the whipped topping. If you’re feeling fancy, pipe a swirl of whipped cream on top and dust with a pinch of powdered sugar.
For the whipped topping, beat 1 cup heavy cream with 2 tbsp powdered sugar until soft peaks form. This light, airy crown adds a buttery finish that balances the custard’s richness. Serve immediately or store the filled puffs in the fridge for up to 24 hours; they’ll stay crisp if you keep the shells separate from the custard until serving.
That’s it — you did it. But hold on, I’ve got a few more tricks that'll take this to another level. Stay with me here — this is worth it.
Insider Tricks for Flawless Results
The Temperature Rule Nobody Follows
Never underestimate the power of a hot oven at the start. The initial 425°F blast creates a steam pocket that inflates the dough like a balloon. If you lower the temperature too early, the puff will deflate and become dense. I always set a timer for exactly 10 minutes before dropping the heat – this precision makes the difference between a pillow‑soft interior and a soggy mess.
Why Your Nose Knows Best
Your sense of smell is a secret ally. When the edges of the puffs start to turn a deep amber and you catch that nutty, toasted butter scent, you know they’re done. Trust that nose cue more than the clock; ovens can vary by 25°F, and the visual cue of “golden‑brown” can be deceptive.
The 5‑Minute Rest That Changes Everything
After you pull the shells from the oven, let them rest on a wire rack for at least five minutes before filling. This short pause allows the interior steam to escape, preventing the custard from making the shell soggy. I once tried to fill them while still hot and ended up with a mushy mess – lesson learned.
Egg Yolks vs. Whole Eggs
Using only yolks in the custard gives you a richer, silkier texture, while whole eggs can introduce a subtle graininess. If you’re short on yolks, you can substitute each missing yolk with a tablespoon of cornstarch mixed into the milk, but the authentic custard flavor will be slightly muted.
The Secret of the Pinch
A pinch of salt in the dough may seem trivial, but it amplifies the butter flavor and balances the sweetness of the custard. Skipping it makes the final product taste flat, like a dessert that forgot to bring its personality to the party.
Creative Twists and Variations
This recipe is a playground. Here are some of my favorite ways to switch things up:
Lemon Zest Burst
Add 1 tablespoon of freshly grated lemon zest to the custard and a splash of lemon juice to the whipped topping. The citrus cuts through the richness and adds a bright, summer‑ready zing that pairs beautifully with the buttery shell.
Chocolate Hazelnut Dream
Melt ½ cup of dark chocolate and swirl it into the custard before chilling. Top each puff with a drizzle of chocolate and a sprinkle of toasted hazelnut crumbs for a decadent, Nutella‑inspired treat.
Coffee‑Infused Elegance
Dissolve 1 tablespoon of instant espresso powder in the milk before making the custard. Finish with a dusting of cocoa powder on the whipped cream. This gives the puffs a subtle coffee bitterness that’s perfect for an after‑dinner coffee break.
Berry‑Burst Surprise
Fold a handful of fresh raspberries or blueberries into the custard just before chilling. The fruit bursts add a pop of color and a tart contrast that brightens the overall flavor profile.
Spiced Autumn
Stir a pinch of ground cinnamon, nutmeg, and a dash of pumpkin spice into the custard. Top with a light drizzle of caramel sauce for a cozy, fall‑ready puff that pairs well with a cup of hot cider.
Storing and Bringing It Back to Life
Fridge Storage
Keep the baked shells in an airtight container separate from the custard for up to 2 days. Store the custard in a sealed bowl; when you’re ready to serve, pipe the custard into the shells and add fresh whipped cream. This method preserves the crispness of the shells.
Freezer Friendly
Freeze the unfilled shells on a parchment sheet for 30 minutes, then transfer to a zip‑lock bag. They’ll keep for up to 2 months. Thaw at room temperature, then fill with freshly made custard. The texture remains as airy as the day they were baked.
Best Reheating Method
To revive a day‑old puff, preheat your oven to 300°F (150°C), place the shells on a baking sheet, and warm for 5‑7 minutes. Add a tiny splash of water to the bottom of the pan; the steam will re‑crisp the exterior without drying out the interior. Then fill with custard and top with whipped cream for an instant “just‑baked” experience.