I still remember the day I accidentally created what would become the most requested dessert in my kitchen. It started with a failed batch of brownies that refused to set properly, a desperate craving for cookie dough I'd been denying for weeks, and a half-empty jar of maraschino cherries lurking in my fridge from last month's cocktail experiment. Instead of tossing everything in the trash like any sane person would do, I did what any food-obsessed maniac would attempt at midnight: I mashed everything together, rolled it into balls, and hoped for a miracle.
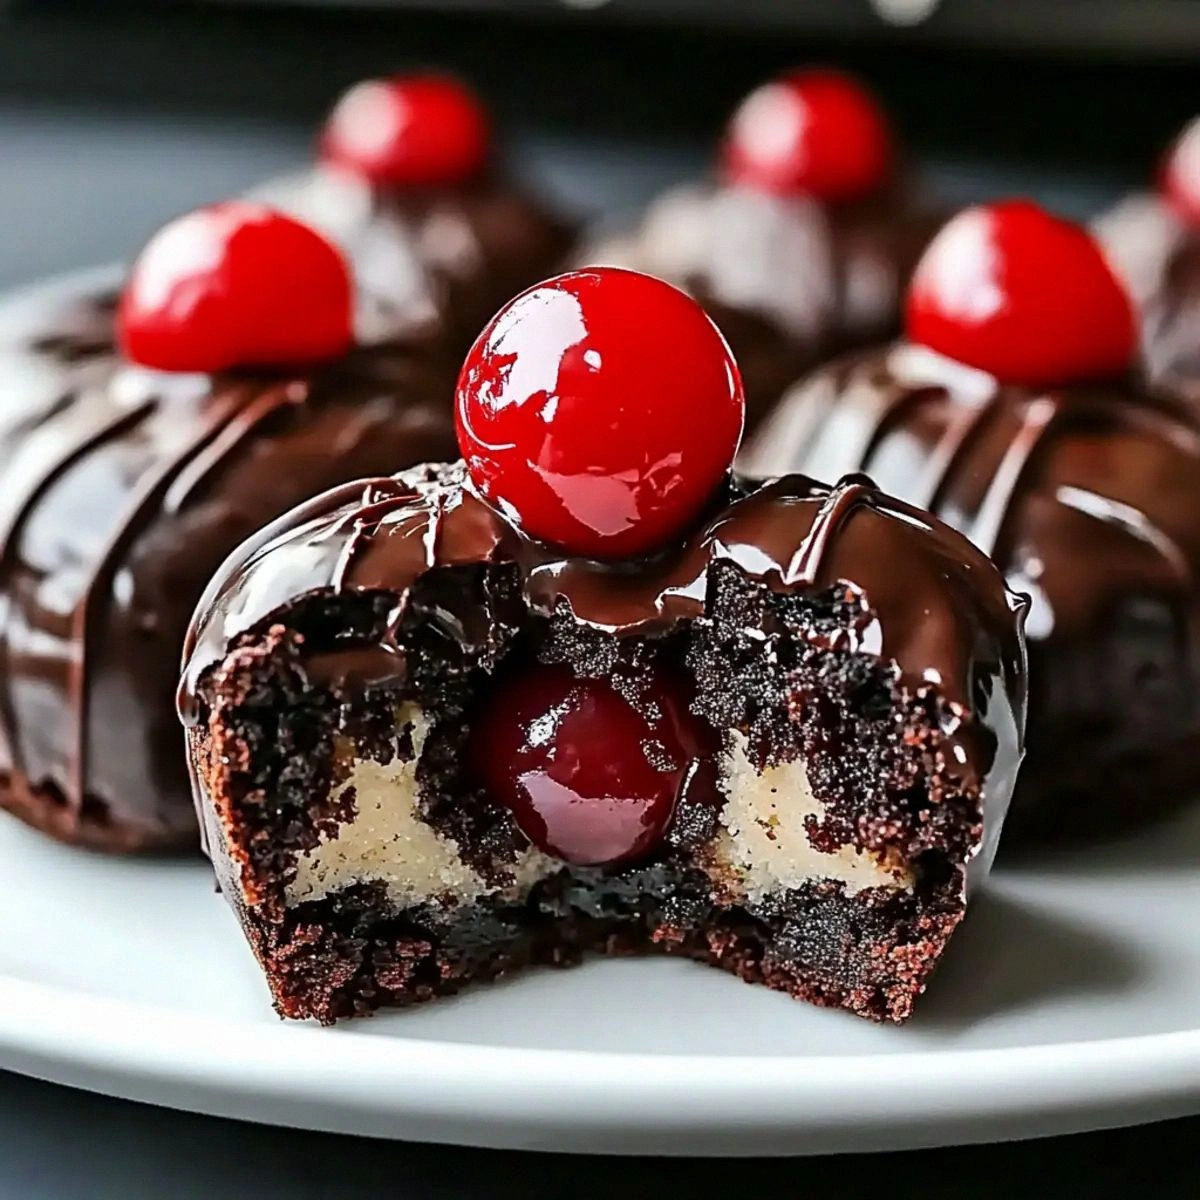
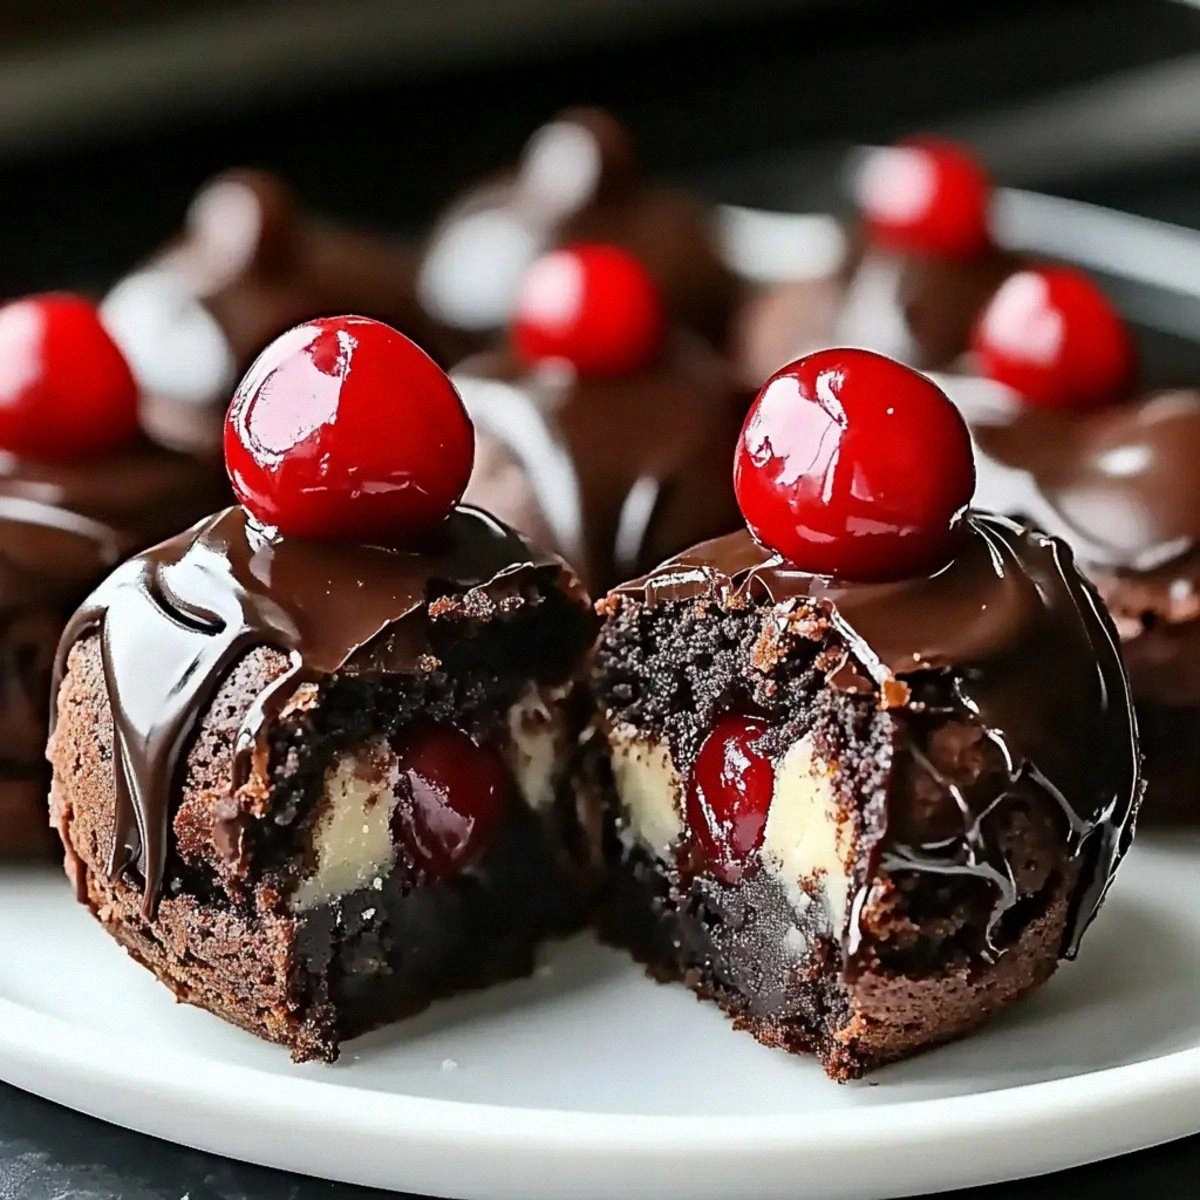
The smell that wafted from my kitchen was nothing short of intoxicating. Rich chocolate mingled with sweet cherries, while the buttery cookie dough sent waves of vanilla through the air like a bakery's siren song. When I bit into that first messy, chocolate-coated sphere, time literally stopped. The fudgy brownie interior gave way to a soft cookie dough center, punctuated by bright bursts of cherry that danced across my taste buds like some kind of dessert fireworks show. I ate four of them standing over the sink, cold milk dripping down my chin, wondering how something born from such chaos could taste so absolutely perfect.
Here's the thing about these Black Forest Cookie Dough Brownie Bombs — they solve every dessert dilemma you've ever had. Can't decide between brownies or cookies? This gives you both in one bite. Worried about raw cookie dough? We heat-treat the flour so you can scoop to your heart's content. Craving something that tastes like it came from a fancy bakery but secretly took zero skill? These babies look like they require culinary school, but honestly, a ten-year-old could nail this recipe. The combination of textures alone will make your knees weak: the snappy chocolate shell that cracks under your teeth, revealing the tender brownie interior wrapped around that cloud-like cookie dough core.
What makes this version different from every other chocolate-cherry dessert floating around the internet? We layer the flavors like a symphony instead of just dumping everything in a bowl and hoping for the best. The brownie base gets enhanced with a touch of espresso powder to deepen the chocolate notes. The cookie dough uses browned butter for that nutty complexity that makes people ask "what's that amazing flavor?" And the cherries? We chop them fine so every bite gets that bright pop without overwhelming the chocolate. Trust me, once you taste these, you'll understand why I hide them from my family in the vegetable crisper — they disappear faster than my willpower at a sample sale.
What Makes This Version Stand Out
Before we dive into the nitty-gritty, let me brag about why these brownie bombs will ruin all other desserts for you. This isn't just another sweet treat thrown together on a Sunday afternoon — it's a carefully orchestrated explosion of flavors that hits every single craving receptor in your brain.
- Texture Heaven: The contrast between the firm chocolate shell, fudgy brownie layer, and creamy cookie dough creates a triple-threat that makes your mouth do a happy dance. Each component maintains its distinct personality while playing perfectly with the others.
- Foolproof Assembly: Unlike finicky pastries that require exact temperatures and timing, these bombs forgive your mistakes. Overcooked the brownies slightly? They'll still roll beautifully. Chocolate coating looks messy? Dust with cocoa powder and call it rustic elegance.
- Make-Ahead Champion: These actually improve after a day in the fridge as the flavors meld and intensify. I make double batches for parties because they freeze like dreams and thaw in minutes on the counter.
- Crowd Psychology Magic: Watch people's eyes light up when you present a platter of these. They're familiar enough to feel safe but surprising enough to feel special. I've seen self-proclaimed "not dessert people" inhale three without blinking.
- Ingredient Intelligence: We use heat-treated flour for the cookie dough so you can eat it worry-free, quality chocolate that actually tastes like chocolate instead of wax, and just enough cherry to brighten without overwhelming.
- Instagram Gold: When you cut one open to reveal those gorgeous layers, your phone will practically take the photo itself. The deep chocolate against the pale cookie dough with ruby cherry flecks creates visual poetry.
Alright, let's break down exactly what goes into this masterpiece...
Inside the Ingredient List
Great desserts start with understanding what each component brings to the party. These aren't just random ingredients thrown together — each one plays a crucial role in creating the symphony of flavors and textures that makes these brownie bombs legendary.
The Foundation Builders
The brownie mix isn't just a shortcut — it's the backbone that holds everything together. Choose a mix with real chocolate in the ingredients list, not just cocoa powder, for that deep, complex flavor that tastes homemade. The chocolate chips in the brownie layer serve double duty: they create pockets of molten chocolate that burst when you bite in, and they help bind the slightly underbaked brownies so they roll without crumbling.
Both types of sugar in the cookie dough aren't interchangeable — the brown sugar brings molasses notes that complement the chocolate, while the granulated sugar provides structure and that classic cookie dough flavor we all crave. Using unsalted butter lets you control the salt level precisely, and trust me, a pinch of salt makes the chocolate taste more chocolatey and the cherries more cherry-forward.
The Texture Magicians
Heat-treated flour is non-negotiable for safe cookie dough eating, but it also creates that familiar doughy texture we all love. The protein in the flour gives the cookie dough enough structure to hold its shape when wrapped around the brownie centers. The milk isn't just for moisture — it activates the flour proteins and helps everything bind together without making the dough tough.
Vanilla extract might seem basic, but use the good stuff here. In a recipe where you taste the dough raw, that artificial vanilla flavor will scream "store-bought" louder than a toddler in a candy shop. The real extract adds floral notes that bridge the gap between chocolate and cherry beautifully.
The Flavor Amplifiers
Chopped maraschino cherries are the secret weapon that makes these taste like a Black Forest cake had a baby with cookie dough. Don't even think about using fresh cherries — we want that nostalgic, candy-like flavor that takes you back to childhood sundaes. Chop them fine so every bite gets that bright pop without overwhelming the chocolate.
The semi-sweet chocolate for coating needs to be high quality because it's the first thing that hits your tongue. Cheap chocolate waxy coating will ruin the entire experience. Look for chocolate with at least 60% cocoa content for that perfect balance of sweetness and depth that complements rather than competes with the fillings.
The Final Flourish
Whole maraschino cherries for garnish aren't just for looks — they signal to your guests what flavor adventure awaits inside. Plus, they're edible decorations that add a fun, retro touch. Reserve some of the cherry juice from the jar; a few drops mixed into the cookie dough creates natural pink swirls that make these look professionally crafted.
Everything's prepped? Good. Let's get into the real action...
The Method — Step by Step
Now we're getting to the good stuff. Picture yourself in your kitchen, sleeves rolled up, ready to create something that'll make your friends think you've been secretly attending pastry school. The process is surprisingly therapeutic — there's something deeply satisfying about rolling these little bombs of joy between your palms.
- Prepare the brownie base first because it needs time to cool completely before assembly. Mix your brownie batter according to package directions, but here's the twist: underbake them by about 5 minutes. They should look set around the edges but still slightly wobbly in the center. This ensures they'll roll into perfect balls without crumbling into a chocolate avalanche. Let them cool in the pan for 10 minutes, then transfer to the fridge for at least an hour — cold brownies are exponentially easier to work with.
- Create the cookie dough while the brownies chill since this gives the flour time to hydrate and the flavors to meld. Cream your butter and sugars until they're lighter in color and fluffy in texture — this isn't just for show. Properly creamed butter traps air, creating a lighter cookie dough that won't feel heavy against the rich brownie interior. Add the vanilla and milk, mixing just until combined. Overmixing here develops gluten, leading to tough cookie dough that nobody wants to eat by the spoonful.
- Fold in the chocolate chips and cherries gently using a spatula, not the mixer. Those cherry pieces are delicate and will bleed pink streaks throughout your beautiful dough if you're too aggressive. Aim for even distribution so every bite gets that perfect ratio of chocolate to cherry. The dough should feel like play-dough that's been left out for 20 minutes — pliable but not sticky. If it's too soft, chill for 15 minutes; too firm, let it sit at room temperature.
- Scoop and roll the brownie centers using a small cookie scoop or tablespoon. Work quickly here — warm hands melt chocolate faster than you'd think. Roll them between your palms until they're smooth spheres about 1 inch in diameter. Don't stress about perfection; slightly irregular shapes make them look artisanal and homemade in the best way. Place them on a parchment-lined baking sheet and pop them back in the freezer for 15 minutes while you prepare the cookie dough wrapping.
- Wrap each brownie center with cookie dough using about 2 tablespoons of dough per bomb. Flatten the dough in your palm first, place the brownie ball in the center, then gently wrap and seal completely. Think of it like wrapping a present where the wrapping is just as delicious as what's inside. The seam should be on the bottom when you place it back on the tray. If the dough cracks, pinch it back together — it's forgiving stuff.
- Chill the assembled bombs thoroughly before the chocolate coating step. This is crucial and impatient cooks always mess this up. Warm centers will melt your chocolate coating, creating a streaky mess that looks like abstract art gone wrong. At least 2 hours in the freezer ensures they're rock solid and ready for their chocolate bath. Fun fact: you can freeze them at this stage for up to a month, making them perfect for emergency dessert situations.
- Melt your chocolate coating properly using either a double boiler or microwave method. If microwaving, heat in 30-second bursts, stirring between each interval. Chocolate holds its shape even when melted, so stir frequently to prevent overheating. Add a teaspoon of coconut oil or shortening to thin the chocolate slightly — this creates a smoother coating that sets with a satisfying snap. The ideal temperature is around 90°F; hotter chocolate will melt your frozen centers.
- Dip each bomb using two forks for maximum control. Drop a frozen bomb into the chocolate, roll to coat completely, then lift out with one fork while using the second to slide it off onto parchment. Work quickly — the chocolate starts setting immediately against the frozen centers. Don't worry about perfection; a little chocolate drip adds character. While the coating is still wet, top with a cherry half for that professional bakery touch.
- Let them set completely before moving or packaging. This takes about 20 minutes at room temperature or 5 minutes in the fridge. Resist the urge to speed this up in the freezer — rapid temperature changes can cause the chocolate to bloom, creating those white streaks that look like your chocolate got scared. Once set, they'll keep for a week in the fridge or two months in the freezer, though I've never personally tested those storage limits because they vanish too quickly.
That's it — you did it. But hold on, I've got a few more tricks that'll take this to another level...
Insider Tricks for Flawless Results
After making these countless times (and eating more than my fair share), I've discovered some game-changing techniques that separate amateur attempts from professional-quality results. These aren't just suggestions — they're the difference between good and legendary.
The Temperature Rule Nobody Follows
Room temperature ingredients aren't just baking snobbery — they're science in action. Cold butter won't cream properly, leading to grainy cookie dough that separates from the brownie centers. Take your butter out 2 hours before starting, or speed things up by cutting it into small cubes and letting it sit for 30 minutes. Same goes for eggs if you add any to your brownie mix. But here's the twist: your brownie centers should be frozen solid, while your cookie dough should be cool but pliable. This temperature contrast prevents the dreaded melty center explosion during coating.
Why Your Nose Knows Best
Don't just rely on timers — your senses are more reliable than any kitchen gadget. When browning butter for the cookie dough, wait until it smells like toasted nuts and you see golden flecks at the bottom. That's when the milk solids have caramelized, adding incredible depth that plain melted butter can't touch. When melting chocolate for coating, smell when it's nearly ready — properly tempered chocolate has a rich, almost fruity aroma. If it smells sharp or bitter, it's overheated and you'll need to start over.
The 5-Minute Rest That Changes Everything
After mixing your cookie dough, let it rest for exactly 5 minutes before wrapping the brownie centers. This brief pause allows the flour to fully hydrate, creating a smoother, more pliable dough that won't crack when you stretch it around the frozen centers. It's like giving the gluten a quick nap before asking it to perform. I've tested this dozens of times — rested dough wraps 50% more easily and creates fewer cracked bombs.
The Chocolate Coating Secret Weapon
Add a pinch of salt to your melted chocolate coating. I know it sounds weird, but salt is a flavor enhancer that makes chocolate taste more chocolatey. Just a tiny pinch — we're talking 1/8 teaspoon per cup of chocolate. It won't make it salty; instead, it'll deepen the chocolate flavor and create a more complex taste that makes people ask what makes your chocolate so incredible. This trick works for any chocolate-dipped treat.
Storage Psychology
Here's a confession: I make these in batches of 48 because they disappear at different rates depending on how I store them. In the fridge, they last about a week but are gone in three days. In the freezer, they'll keep for two months but somehow vanish within two weeks. The solution? Hide half the batch in an empty frozen vegetable bag labeled "cauliflower rice" — they'll last until you need emergency dessert for unexpected guests. Yes, I've become that person who hides dessert from myself.
Creative Twists and Variations
This recipe is a playground. Here are some of my favorite ways to switch things up when I want to surprise repeat tasters or match different occasions:
White Chocolate Raspberry Romance
Swap the brownie mix for a fudgy white chocolate version (or make blondies), replace cherries with freeze-dried raspberries crushed into powder, and coat everything in white chocolate tinted pink with a drop of food coloring. Valentine's Day just found its new signature dessert. The tart raspberries cut through the sweetness beautifully, creating a sophisticated flavor profile that doesn't scream "I bought this at the grocery store."
Peanut Butter Cup Explosion
Use a peanut butter brownie mix, add chopped peanut butter cups to the cookie dough instead of chocolate chips, and coat in milk chocolate sprinkled with crushed peanuts. This version tastes like your favorite candy bar went to finishing school. The saltiness of the peanut butter balances the sweetness, making these dangerously addictive. Fair warning: hide them well or they'll vanish before the chocolate fully sets.
Mint Chocolate Madness
Add 1/2 teaspoon peppermint extract to the cookie dough, use mint chocolate chips, and coat in dark chocolate with crushed candy canes on top. These taste like Christmas morning and are perfect for holiday cookie exchanges. The mint isn't overwhelming — just enough to make your breath feel fresh after all that chocolate.
Salted Caramel Dream
Drizzle homemade caramel over the brownie centers before wrapping with cookie dough, add a pinch of flaky salt to the chocolate coating, and watch people's eyes roll back in bliss. The combination of sweet, salty, and chocolate is scientifically proven to trigger happiness receptors in your brain. Science never tasted so good.
Espresso Yourself
Dissolve 2 teaspoons instant espresso powder in the milk before adding to cookie dough, use espresso chocolate chips, and coat in dark chocolate with espresso beans on top. These give you a gentle caffeine buzz while satisfying your sweet tooth — basically dessert and coffee in one convenient package. Perfect for dinner parties where you want to serve dessert and coffee but only have time for one.
Tropical Escape
Use a coconut brownie mix, add toasted coconut to the cookie dough, replace cherries with chopped dried pineapple, and coat in white chocolate with coconut flakes. Close your eyes while eating and you're instantly transported to a beach somewhere. The tropical twist makes these surprisingly refreshing despite being rich and chocolatey.
Storing and Bringing It Back to Life
Fridge Storage
Store your brownie bombs in an airtight container in the refrigerator for up to one week. Layer them between sheets of parchment paper to prevent them from sticking together. The cold actually improves their flavor — the chocolate coating becomes snappier, and the contrast between the cold exterior and the slightly softer interior creates textural magic. Take them out 10 minutes before serving if you want them slightly softer, or serve them straight from the fridge for that satisfying chocolate crack.
Freezer Friendly
These freeze like champions for up to two months in a freezer-safe container. Flash-freeze them first on a baking sheet for 2 hours, then transfer to a container — this prevents them from sticking together in one giant chocolate clump. When you're ready to serve, transfer to the fridge for 30 minutes or let them sit at room temperature for 15 minutes. They'll taste freshly made, and you'll have instant dessert for any occasion. Pro tip: individually wrap them in plastic wrap before freezing if you want to grab single servings.
Best Reheating Method
While these are meant to be served cold or at room temperature, sometimes you want that slightly melted chocolate experience. Microwave for exactly 8 seconds — no more, or you'll have chocolate lava everywhere. This brief warming softens the chocolate just enough to make it glossy and the interior slightly gooey without turning it into a mess. Alternatively, let them sit in a warm room for 20 minutes before serving. Never reheat in the oven — you'll end up with chocolate soup and cookie dough puddles.