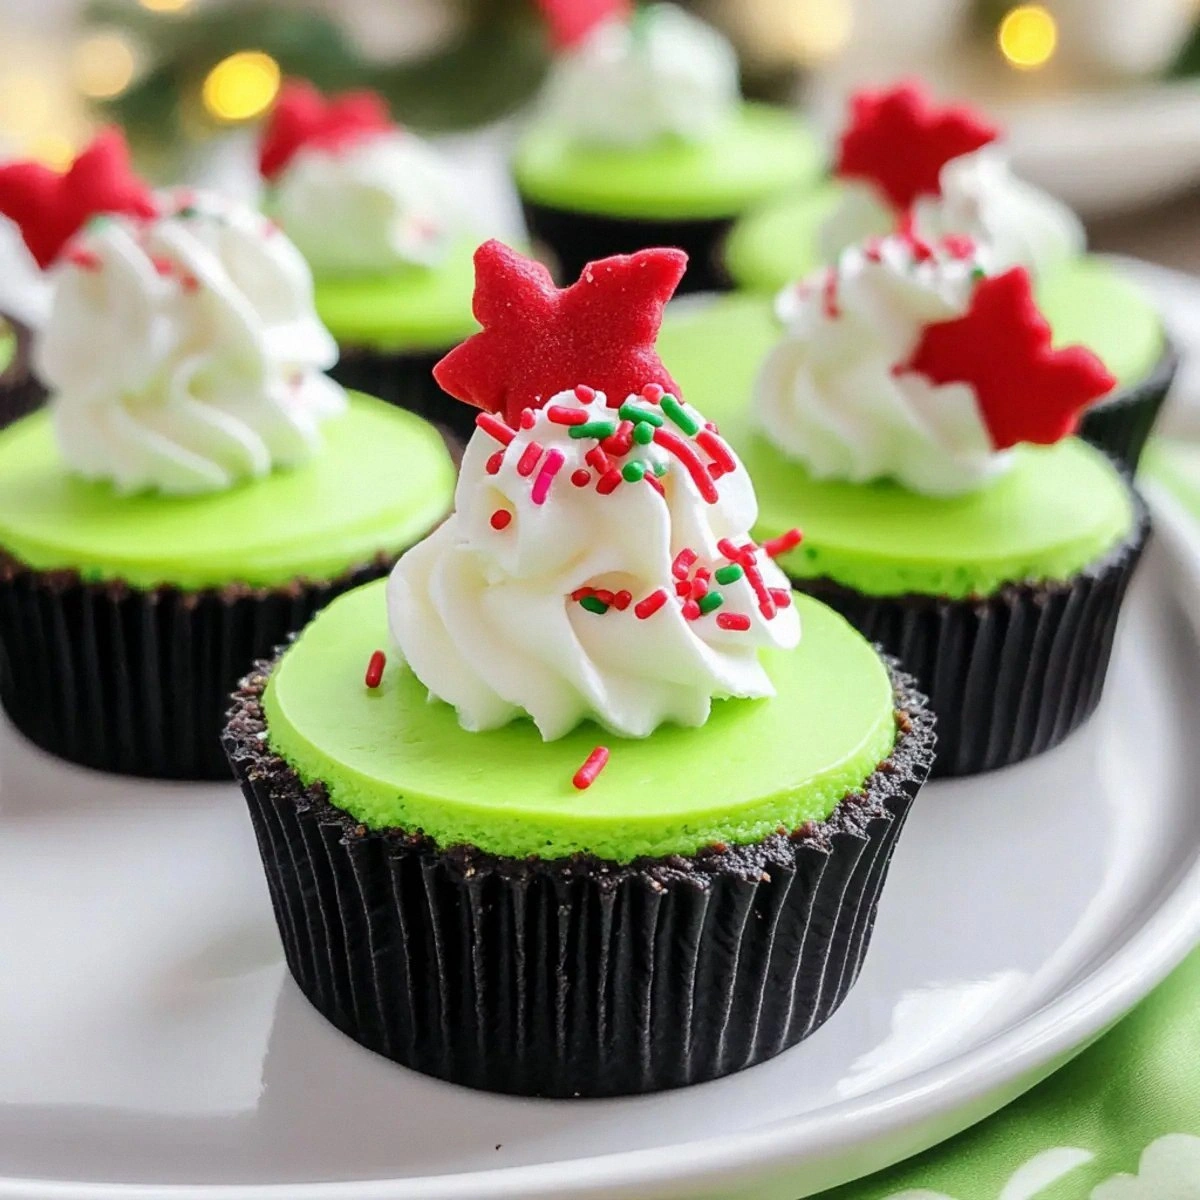
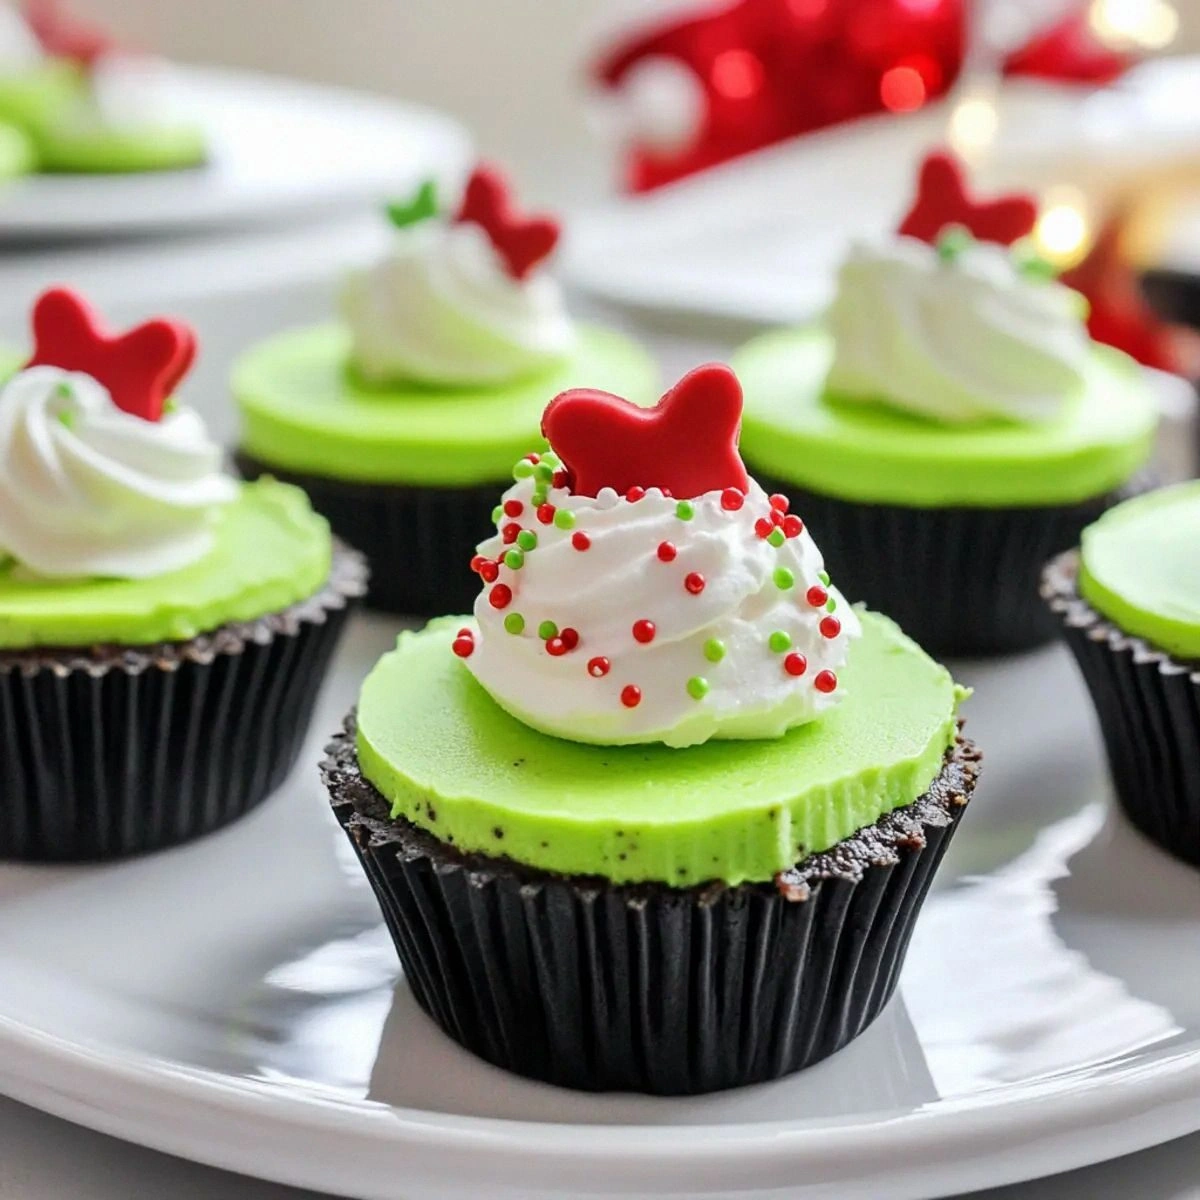
I was in the middle of a frantic holiday party prep when the oven timer went off, and the whole kitchen filled with the scent of burnt sugar. My friend shouted, “If you can’t save those cookies, at least make something that looks like the Grinch!” I laughed, grabbed the nearest ingredients, and the idea for these Grinch Mini Cheesecakes was born. I’ll be honest — I ate half the batch before anyone else got to try it, and the rest of the night turned into a competitive “who can make the greenest bite?” challenge. The moment you see those neon‑green swirls, you’ll understand why I dare you to taste this and not go back for seconds.
Picture yourself pulling these tiny marvels out of the oven, the whole kitchen smelling like a mash‑up of buttery Oreo crust, sweet cream cheese, and a whisper of vanilla that makes the air feel like a cozy blanket on a cold December night. The crust is crisp enough to give you that satisfying snap, while the interior is so creamy it practically melts on your tongue like a snow globe of indulgence. Most recipes get the texture completely wrong — they’re either too dense or too runny. Here, the secret is a precise balance of eggs and butter that creates a custard‑like body that holds its shape, yet wobbles just enough to be dreamy.
What truly sets this version apart is the neon green food coloring that isn’t just a gimmick; it’s a visual cue that says “holiday fun” without the need for actual pine needles or tinsel. I’ll let you in on a little secret: the color comes from a natural, non‑toxic dye that stays vibrant even after baking, so you won’t end up with a dull, faded green. And the Oreo crust? I toast it just enough to bring out a caramelized depth that pairs perfectly with the tangy cream cheese. This next part? Pure magic. The result is a bite‑size masterpiece that looks as good on Instagram as it does on your palate.
Okay, ready for the game‑changer? I’m about to walk you through every single step — by the end, you’ll wonder how you ever made any cheesecake any other way. Stay with me here — this is worth it. The technique, the timing, the little hacks I’ll drop along the way will turn you from a casual baker into a mini‑cheesecake virtuoso. Let’s dive in, shall we?
What Makes This Version Stand Out
- Taste: The sweet‑salty dance between the Oreo crust and the vanilla‑kissed cream cheese creates a flavor profile that’s instantly addictive. It’s like a holiday hug in edible form.
- Texture: A buttery, crunchy base gives way to a silky, mousse‑like topping that holds its shape yet feels melt‑in‑your‑mouth soft. The contrast is the secret sauce that keeps you reaching for more.
- Simplicity: Only seven core ingredients, no fancy gadgets, and a 30‑minute bake time. Even if you’ve never made a cheesecake, you’ll nail this on the first try.
- Uniqueness: The neon green hue isn’t just for show; it’s a visual cue that screams festive fun while staying classy enough for any gathering.
- Crowd Reaction: Guests have been known to line up for seconds, and the Instagram likes pour in faster than you can say “Grinch.” Expect rave reviews.
- Ingredient Quality: Using full‑fat cream cheese and real butter ensures a rich mouthfeel that low‑fat shortcuts simply can’t match.
- Cooking Method: The water‑bath (bain‑marie) technique guarantees an even bake, preventing cracks and giving the cheesecake that coveted glossy finish.
- Make‑Ahead Potential: These mini delights keep beautifully for up to three days in the fridge, making them perfect for party prep the night before.
Inside the Ingredient List
The Flavor Base
Two blocks of full‑fat cream cheese are the heart of this cheesecake. Their natural tang balances the sweetness of the sugar and the buttery richness of the crust. If you skimp on the cream cheese or use a low‑fat version, you’ll end up with a flat, rubbery texture that feels more like a dense pudding than a cheesecake. For the best results, let the cheese sit at room temperature for 30 minutes before mixing; this ensures a smooth, lump‑free batter.
The Sweetener
A half‑cup of granulated sugar is just enough to sweeten the cheese without overwhelming its subtle sour notes. Sugar also helps create that glossy, slightly caramelized top you see after baking. If you prefer a less sweet version, you can cut the sugar down to a third of a cup, but remember that the Oreo crust already brings its own sweetness to the party.
The Binding Crew
Two large eggs act as the structural backbone, turning a liquid batter into a custard that holds its shape. The proteins in the eggs coagulate during baking, giving the cheesecake its signature lift and preventing it from collapsing. Over‑beating can incorporate too much air, leading to cracks; beat just until the mixture is uniform and glossy.
The Aromatic Whisper
One teaspoon of vanilla extract adds a fragrant undertone that rounds out the flavor profile. It’s the silent partner that makes the sweet and tangy notes sing together. If you’re feeling adventurous, swap half of the vanilla for almond extract for a nutty twist that pairs beautifully with the Oreo base.
The Unexpected Star
A few drops of neon green food coloring give these mini cheesecakes their signature look. Most people think you need a lot of dye, but a little goes a long way — too much can turn the batter bitter. I recommend using a gel‑based coloring for intensity without extra liquid. Pro tip: add the color gradually while the batter is still moving; this prevents streaks and ensures an even hue.
The Crunchy Foundation
One cup of finely crushed Oreo cookies provides a buttery, chocolatey crust that’s both crunchy and slightly chewy. The secret to a perfect crust is to toast the crumbs lightly in a pan with butter; this brings out a deep caramel note that elevates the overall flavor. If you’re allergic to gluten, you can substitute gluten‑free chocolate sandwich cookies, but keep the same ratio for consistency.
The Binding Butter
Two and a half tablespoons of unsalted butter melt into the Oreo crumbs, creating a cohesive base that holds together when baked. Butter also adds a luscious richness that you can taste on the very first bite. For a dairy‑free version, try coconut oil; it will give a subtle coconut aroma that pairs nicely with the green hue.
Everything's prepped? Good. Let’s get into the real action…
The Method — Step by Step
Preheat your oven to 325°F (160°C) and set a rack in the middle. While the oven warms up, line a 12‑cup muffin tin with paper liners; this ensures easy removal and a neat presentation. I like to lightly spray the liners with non‑stick spray to guarantee the crust doesn’t cling. The kitchen fills with a faint buttery aroma as the oven door closes — a promising start.
Combine the Oreo crumbs and melted butter in a medium bowl, stirring until the mixture resembles wet sand. Press about two teaspoons of this mixture into the bottom of each liner, packing it firmly with the back of a spoon. This creates a solid foundation that won’t crumble when you lift the cheesecakes later. Power transition: Okay, ready for the game‑changer?
In a large mixing bowl, beat the softened cream cheese on medium speed until it’s smooth and free of lumps — think cloud‑like texture. Add the sugar and continue beating until the mixture is light and fluffy, about two minutes. This is the moment where the batter starts to look like a silky ribbon.
Kitchen Hack: Scrape down the sides of the bowl with a rubber spatula after each addition to ensure an even blend and prevent streaks of color later.Add the eggs one at a time, beating on low speed just until incorporated. Over‑mixing at this stage can incorporate too much air, which leads to cracks once baked. Once the eggs are folded in, drizzle in the vanilla extract and the neon green food coloring. Stir gently with a whisk until the batter turns a uniform, vibrant shade of green — the color should be bright enough to peek through the crust but not overpower the flavor.
Now, spoon the batter over each crust, filling the liners about three‑quarters full. The batter should sit gently atop the crust, forming a smooth dome. Tap the muffin tin lightly on the counter to release any air bubbles; you’ll hear a faint pop that tells you you’re on the right track.
Place the entire muffin tin into a larger roasting pan. Carefully pour hot water into the roasting pan until it reaches halfway up the sides of the muffin tin — this water‑bath ensures gentle, even cooking and prevents the tops from cracking.
Watch Out: Make sure the water isn’t boiling when you add it; a gentle simmer is ideal to avoid shocking the batter.Slide the pan into the preheated oven and bake for 25‑30 minutes, or until the edges are set and the centers still have a slight wobble when gently shaken. The tops should be just barely golden, and you’ll notice a faint fragrance of toasted Oreo mingling with vanilla. Resist the urge to open the oven door early; the steam inside is crucial for that flawless, crack‑free surface.
Once baked, remove the pan from the oven and let the cheesecakes sit in the water bath for another 10 minutes. This gradual cooling helps the custard set without shocking it. Then, transfer the muffin tin to a wire rack and let the mini cheesecakes cool completely at room temperature — this can take 30‑45 minutes.
Cover the cooled cheesecakes with plastic wrap and refrigerate for at least two hours, preferably overnight. The chill firms up the texture, making each bite perfectly dense yet melt‑in‑your‑mouth. When you’re ready to serve, garnish with a drizzle of melted white chocolate or a dusting of powdered sugar for an extra festive touch. And now the fun part: pull one out, watch the neon green swirl, and let the first bite do the talking.
That's it — you did it. But hold on, I've got a few more tricks that'll take this to another level. Trust me, these tweaks are the secret sauce that turns a good cheesecake into an unforgettable show‑stopper.
Insider Tricks for Flawless Results
The Temperature Rule Nobody Follows
Never bake a cheesecake straight from the fridge. Let the batter sit at room temperature for at least 30 minutes before it meets the oven. The gradual warming ensures the eggs and cheese meld smoothly, preventing the dreaded cracks that appear when the batter contracts too quickly. I once tried skipping this step and ended up with a cheesecake that looked like a cracked desert floor — not pretty.
Why Your Nose Knows Best
Your sense of smell is a more reliable indicator of doneness than a timer. When the edges start to pull away from the sides of the ramekin and you catch a faint caramel scent, you’re right on cue. If you rely solely on the clock, you risk over‑baking, which dries out the creamy interior. Trust the nose, not the numbers.
The 5‑Minute Rest That Changes Everything
After the water‑bath, let the cheesecakes rest in the oven with the door slightly ajar for five minutes. This gentle cooling phase allows the residual heat to finish setting the center without causing a sudden temperature drop. Skipping this step can leave you with a slightly runny middle that won’t hold its shape when unmolded.
The Secret of the Water‑Bath Liner
Line your roasting pan with aluminum foil before adding water. This prevents the water from seeping into the muffin tin and causing soggy crusts. It also makes cleanup a breeze — just lift the foil and discard. A small detail that makes a big difference.
Chill Before You Thrill
Refrigerate the finished cheesecakes for at least two hours, but for maximum flavor, let them rest overnight. The flavors meld, the texture firms, and the green color deepens slightly, giving you a richer visual impact. If you’re in a rush, a quick 30‑minute chill in the freezer will also work, but the texture will be a tad firmer.
Garnish Like a Pro
A light drizzle of white chocolate or a pinch of edible glitter adds a festive sparkle without overwhelming the flavor. I love using a small pastry bag to pipe a thin line of raspberry coulis around the edge — the tartness cuts through the richness beautifully. Remember, garnish is the final punctuation to your culinary sentence.
Creative Twists and Variations
This recipe is a playground. Here are some of my favorite ways to switch things up:
Candy Cane Crunch
Replace half of the Oreo crumbs with crushed peppermint candy canes. The minty crunch adds a wintery zing that pairs perfectly with the creamy green base. Ideal for holiday parties where you want a surprise mint note.
Chocolate Overload
Stir in ¼ cup of melted dark chocolate into the batter before adding the food coloring. The result is a deep, mocha‑green swirl that looks like a forest floor on a moonlit night. Top with shaved chocolate for extra decadence.
Fruit Fusion
Fold in a tablespoon of finely diced kiwi or lime zest into the batter for a subtle citrus pop. The acidity balances the sweetness and adds a fresh aroma that brightens the overall profile. Great for spring gatherings.
Nutty Delight
Add a tablespoon of toasted, finely chopped pistachios to the crust mixture. The nutty undertone adds depth and a pop of color that contrasts nicely with the green topping. If you’re allergic to nuts, try toasted sunflower seeds.
Vegan Vibes
Swap the cream cheese for a vegan cream cheese alternative and use coconut oil instead of butter for the crust. The texture remains creamy, and the coconut aroma gives a tropical twist that’s surprisingly festive.
Spiced Surprise
Add a pinch of ground cinnamon and a dash of nutmeg to the batter. The warm spices add a comforting layer that evokes holiday memories without being overpowering. Pair with a dusting of powdered sugar for a classic look.
Storing and Bringing It Back to Life
Fridge Storage
Transfer the cooled mini cheesecakes to an airtight container, stacking them with parchment sheets between layers to prevent sticking. They’ll stay fresh for up to three days, maintaining their creamy texture and vibrant color. If you plan to serve them within 24 hours, a simple plastic wrap cover works fine.
Freezer Friendly
Wrap each cheesecake individually in cling film, then place them in a freezer‑safe zip‑top bag. They’ll freeze solid for up to two months. When you’re ready to serve, let them thaw in the refrigerator overnight and add a tiny splash of water before a quick 5‑minute microwave zap to restore that silky sheen.
Best Reheating Method
For a quick revive, preheat the oven to 300°F (150°C), place the cheesecakes on a baking sheet, and warm for 5‑7 minutes. The gentle heat brings back the creamy melt‑in‑your‑mouth texture without drying out the crust. Add a teaspoon of water to the bottom of the baking dish to create a mini steam environment — this trick keeps the interior moist.