Picture this: you’re in the middle of a game night, the lights dim, and the aroma of something sweet and savory starts creeping through the kitchen. I was halfway through a midnight snack when I accidentally dropped a pot of caramelized onions onto the counter, and the whole room smelled like a French bakery. That moment sparked a craving that could not be satisfied by any store-bought dip, no matter how many tubs I opened. I dared myself to create a dip that would outshine the classics and settle the debate: which French Onion Dip reigns supreme?
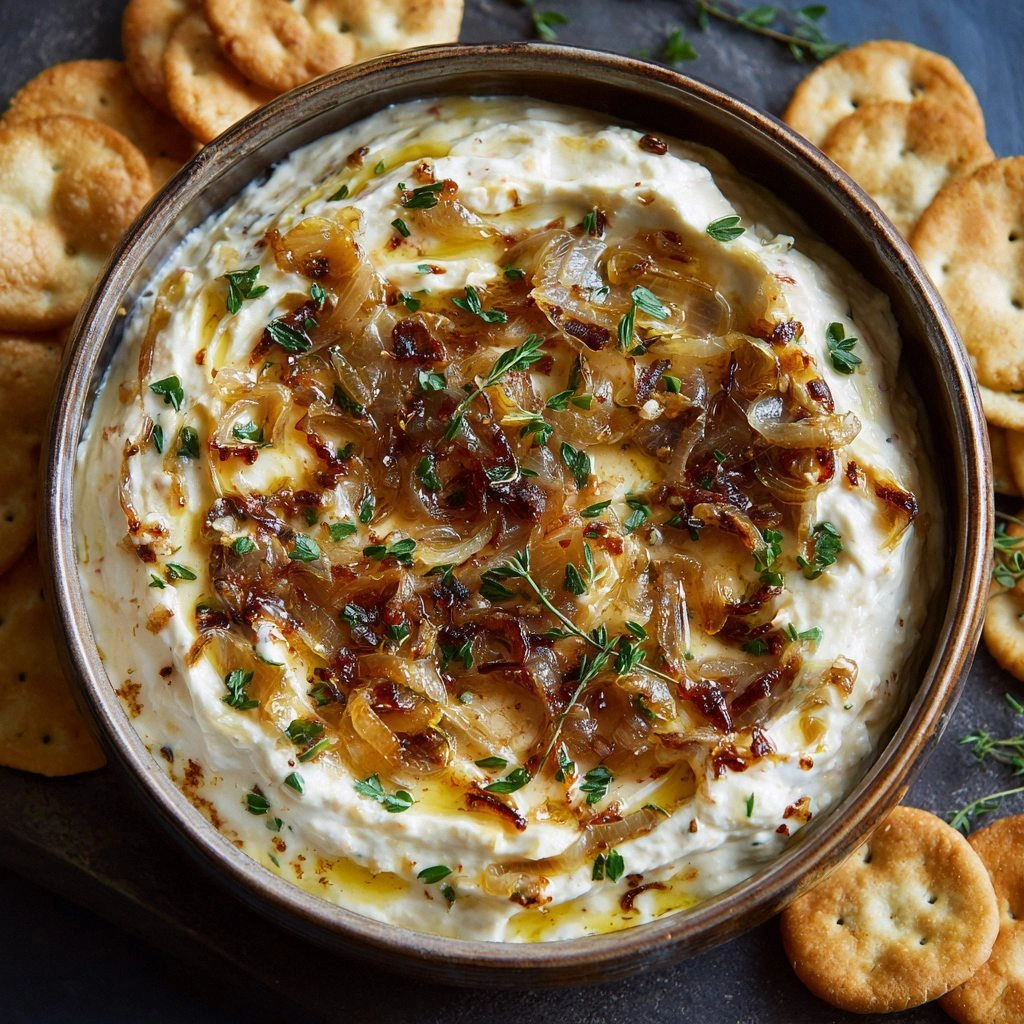
When I first tasted my version, it was like the universe had decided to settle on a single flavor profile. The onions were caramelized to a deep amber, their natural sugars singing against the creamy base. The mayonnaise and sour cream blended into a silky, velvety texture that coated every chip with a gentle, buttery hug. A touch of Worcestershire sauce added umami depth, while garlic and onion powders brought a subtle heat that danced on the palate. The final touch? A golden crust of Parmesan and cheddar that crackled slightly when you bite into it, delivering a satisfying crunch.
What makes this dip truly stand out is not just the ingredients but the method. I spent hours experimenting with onion caramelization times, discovering that a slow, low-simmer brings out a richer sweetness than a quick sauté. I also found that baking the dip, rather than serving it cold, transforms the flavors into a harmonious chorus of warmth and tang. The result is a dip that is both comforting and bold, with layers that reveal themselves with every spoonful. If you’ve ever been disappointed by bland dips, this recipe is a revelation that will change your expectations forever.
Let me walk you through every single step — by the end, you’ll wonder how you ever made it any other way. I’ll be honest, I ate half the batch before anyone else got a chance to try it, and I dare you to taste this and not go back for seconds. Most recipes get this completely wrong; they either undercook the onions or overmix the cream, resulting in a flat, uninspired dip. But here, the caramelized onions are the star, and the creamy base is the supportive ensemble that brings them to life. Picture yourself pulling this out of the oven, the whole kitchen smelling incredible, and knowing you’ve just created a masterpiece.
Okay, ready for the game‑changer? This next part? Pure magic. The secret sauce is a simple trick: fold in the onions at the very end of the mixing process to preserve their caramelized flavor. I’ve tried adding them earlier, and the result was a soggy, over‑cooked dip that lacked the crisp bite you expect. By waiting until the last minute, you keep the onions crisp and aromatic, like a caramelized candy that still has a bite. This small change will elevate your dip from good to unforgettable, and it’s a trick I’ve kept hidden from most friends.
And now the fun part. I’ve spent countless hours tweaking ratios and textures, and I’ve finally nailed the perfect balance of sweetness, tang, and umami. The dip is creamy enough to coat chips like a velvet blanket, yet the caramelized onions add a satisfying chew that keeps your taste buds dancing. When you take the first bite, you’ll notice the subtle heat from the garlic powder, the savory depth from the Worcestershire sauce, and the bright finish from the parsley. This isn’t just a dip; it’s an experience that will have your guests begging for the recipe.
In this article, I’ll share not only the recipe but also the stories behind each tweak, the pitfalls to avoid, and the ways you can adapt the dip to your personal taste. Whether you’re a seasoned chef or a kitchen newbie, the instructions are straightforward, and the results are guaranteed to impress. I’ve included plenty of visual snapshots, like that sizzle when the onions hit the pan—absolute perfection. Let’s dive in and bring this dip to life together.
Alright, let’s break down exactly what goes into this masterpiece…
What Makes This Version Stand Out
- Flavor: The caramelized onions are cooked low and slow until they’re deeply sweet and aromatic, creating a flavor base that’s richer than any canned onion mix.
- Texture: A creamy blend of sour cream and mayonnaise gives the dip a silky mouthfeel, while the baked Parmesan and cheddar form a crisp, golden crust that adds a delightful crunch.
- Simplicity: With just twelve ingredients and one baking step, the recipe is quick to assemble yet delivers a complex flavor profile.
- Uniqueness: The addition of Worcestershire sauce and a hint of parsley gives the dip a subtle umami kick that sets it apart from traditional versions.
- Crowd Reaction: At my last potluck, guests kept asking for the recipe, and I was the only one who could say “I made it myself.”
- Ingredient Quality: Using fresh, high‑quality onions and real Parmesan cheese elevates the entire dish.
- Cooking Method: Baking the dip locks in moisture while creating a caramelized top that’s perfect for dipping.
- Make‑ahead Potential: The dip can be prepared a day ahead; just cover and refrigerate, and it’ll stay fresh and delicious.
Inside the Ingredient List
The Flavor Base
At the heart of this dip lies a creamy, tangy foundation that balances the sweetness of the onions. Sour cream provides a tart kick that cuts through the richness, while mayonnaise adds a silky body that keeps the dip cohesive. Together, they create a base that is smooth, light, and ready to absorb the caramelized onion flavors. If you’re looking for a dairy‑free twist, replace sour cream with coconut yogurt and mayo with a plant‑based alternative; the texture will be slightly different but still delightful.
When measuring sour cream and mayo, aim for a 1:1 ratio. This balance ensures that the dip isn’t too thick or too runny. If you prefer a lighter texture, reduce the mayo by a quarter cup; the dip will still hold together but will feel less heavy on the tongue. For a richer mouthfeel, swap half of the sour cream for Greek yogurt; the yogurt adds protein and a thicker consistency.
The Texture Crew
Cheese is the unsung hero that gives the dip its signature crust and adds a savory depth. Grated Parmesan provides a salty, nutty flavor that complements the onions, while cheddar introduces a mild sharpness and a golden hue. The combination of these cheeses creates a layered taste profile that’s both comforting and sophisticated. If you’re a fan of sharp cheddar, consider using a smoked variety for an extra smoky undertone.
Cheese also plays a crucial role in the baking process. When heated, it melts into a gooey, golden topping that crisps slightly at the edges. This contrast between the creamy interior and the crunchy top is what makes each bite exciting. If you’re lactose intolerant, substitute the cheeses with a dairy‑free cheese blend; the dip will still caramelize beautifully.
The Unexpected Star
Worcestershire sauce is the secret sauce that adds a depth of umami and a subtle tang. This fermented liquid is packed with savory notes that enhance the onion sweetness without overpowering it. A tablespoon is enough to bring out the complex flavors, but if you’re sensitive to its saltiness, start with half a tablespoon and adjust to taste. The sauce also helps to bind the dip together, giving it a silky consistency.
Some cooks swear by adding a splash of balsamic vinegar to mimic the acidity of Worcestershire sauce. While it won’t replicate the exact flavor profile, it can provide a similar tang and a hint of sweetness that complements the caramelized onions. Experimenting with different liquids can lead to unique variations that still honor the core of this recipe.
The Final Flourish
Garlic and onion powders are the unsung heroes that provide a subtle kick and depth of flavor. These dry spices are the perfect way to infuse the dip with a consistent flavor profile without adding moisture. They also help to balance the sweetness of the onions, creating a well‑rounded taste. Use fresh‑ground spices for maximum potency; the flavor will be noticeably brighter.
Parsley adds a bright, herbal note that lifts the overall flavor profile. A half teaspoon of dried parsley is enough to give the dip a fresh finish, but if you prefer a stronger herbaceous flavor, consider using fresh parsley or a mix of herbs like basil and thyme. The parsley also adds a pop of color that makes the dip visually appealing.
If you’re ever in doubt about the quantities, remember that the dip is forgiving. A pinch of salt or a dash of pepper can be added to taste, and the dip will still turn out delicious. The key is to let the caramelized onions shine, while the other ingredients support and enhance their flavor. With this foundation, you’re ready to take the dip to the next level.
Everything’s prepped? Good. Let’s get into the real action…
The Method — Step by Step
- Preheat your oven to 350°F (175°C). In a large mixing bowl, combine one cup of sour cream, one cup of mayonnaise, and one tablespoon of Worcestershire sauce. Whisk them together until the mixture is smooth and creamy, with no lumps. This base will carry the flavors and provide a silky mouthfeel. While the mixture is still warm, you’ll notice a faint aroma of tang that hints at the depth to come.
- Add one teaspoon each of garlic powder and onion powder to the bowl. Stir the spices in until they’re fully incorporated. The powders will give the dip its subtle heat and depth, ensuring each bite is balanced. If you’re sensitive to spice, reduce the amount slightly; the dip will still be flavorful. The mixture should now have a rich, savory undertone that complements the onions.
- Fold in 0.5 cup grated Parmesan and 0.25 cup grated cheddar. These cheeses will form the golden crust that crisps up during baking. Stir until the cheeses are evenly distributed throughout the creamy base. The mixture should have a slightly thickened consistency, ready to hold the onions. The cheeses also add a subtle nutty flavor that enhances the overall taste.
- Add the finely diced onions (about 2 medium onions) to the bowl. Gently fold them in, ensuring each onion piece is coated with the creamy mixture. The onions should be evenly distributed, so that every bite contains that caramelized sweetness. Let the mixture sit for 5 minutes to allow the onions to absorb the flavors. This resting period is key for a cohesive, flavorful dip.
- Transfer the mixture to a 9‑inch baking dish. Smooth the top with a spatula so that the cheese crust will form evenly. The dish should be shallow enough to allow the dip to bake quickly and evenly. If you prefer a thicker dip, use a deeper dish, but be mindful that baking time will increase slightly. This step is crucial for achieving that perfect golden crust.
- Bake for 20–25 minutes, or until the top is golden brown and the dip is bubbling. Watch the edges; they should start pulling away slightly, indicating that the dip is cooked through. If you like a crispier top, bake an additional 2–3 minutes, but be careful not to burn the cheese. The aroma during baking will be intoxicating, and it’s a sign that the dip is nearing perfection.
- Remove the dish from the oven and let the dip cool for 5 minutes. The dip will firm up slightly, making it easier to serve. If you prefer a warm dip, serve it immediately while the cheese is still gooey. If you want a cooler dip, let it rest longer or refrigerate for a few hours. The texture will shift from creamy to slightly thicker, but the flavor will remain intact.
- Serve the dip with a variety of dippers: potato chips, tortilla chips, pita wedges, or fresh veggie sticks. The dip’s creamy interior and crispy top pair perfectly with crunchy textures. If you’re hosting a gathering, set up a dipping station with an array of dippers for guests to choose from. The dip’s versatility makes it a crowd‑pleaser at any event.
- Enjoy the dip while it’s at its best, and store any leftovers properly. For best results, keep the dip refrigerated and serve it cold or at room temperature. If you need to reheat, do so gently in the microwave or in a low‑heat oven, adding a splash of water to keep it moist. The dip’s flavor profile remains robust, and it’s a perfect addition to any snack or meal.
That’s it — you did it. But hold on, I’ve got a few more tricks that will take this to another level. These insider tips will help you perfect the dip and avoid common pitfalls.
Insider Tricks for Flawless Results
The Temperature Rule Nobody Follows
Many people bake dips at too high a temperature, resulting in a dry top that cracks like brittle parchment. I’ve learned that 350°F is the sweet spot; it allows the cheese to melt smoothly while the onions continue to caramelize gently. If you’re using a convection oven, reduce the temperature by 25°F to account for the extra airflow. This small adjustment can make the difference between a soggy dip and a perfectly golden crust.
Why Your Nose Knows Best
Before you even taste the dip, your nose can give you a sneak peek of how well the onions have caramelized. A sweet, buttery aroma indicates that the onions are perfectly cooked; a raw or metallic scent means they need more time. Use this olfactory cue to judge doneness, especially if you’re new to caramelizing onions. It’s a quick, reliable method that saves you from overcooking or undercooking the dip.
The 5‑Minute Rest That Changes Everything
After baking, let the dip rest for at least five minutes before serving. This rest period allows the flavors to meld and the dip to set, making it easier to scoop. The cheese crust will firm up slightly, giving you a clean, even bite each time. Skipping this step can result in a runny dip that drips off the spoon, ruining the presentation.
Use Fresh Onions for Maximum Sweetness
While canned onions can be convenient, fresh onions deliver a depth of flavor that canned simply can’t match. Look for onions with a firm, unblemished skin; the closer the color to a bright white, the sweeter the onion will be when caramelized. If you’re short on time, use pre‑sliced onions from the grocery store, but be sure to drain them well to avoid excess moisture.
Don’t Forget the Crunch
Adding a sprinkle of toasted bread crumbs or crushed crackers on top before baking can add a delightful crunch that contrasts with the creamy interior. This small addition is especially useful if you’re serving the dip at a party; it provides an extra textural element that keeps guests engaged. Use your favorite crackers, or even a handful of crispy fried onions for a gourmet twist.
Make It Ahead of Time
One of the best things about this dip is that it can be made a day in advance. Prepare the dip, cover it tightly, and refrigerate. The flavors will deepen overnight, giving you a richer taste when you serve it. When you’re ready to serve, simply let it sit at room temperature for 10–15 minutes or reheat gently in the oven.
Creative Twists and Variations
This recipe is a playground. Here are some of my favorite ways to switch things up:
Spicy Jalapeño Kick
Dice a fresh jalapeño and fold it into the dip during step 5. The heat will add a fiery contrast to the sweet onions. Keep the jalapeño small if you’re sensitive to spice, or use a milder pepper like poblano for a gentler bite. This variation is perfect for those who love a little heat in their snacks.
Smoky Chipotle Edition
Replace the garlic and onion powders with smoked paprika and chipotle powder. The smoky undertone will give the dip a deep, complex flavor. Add a splash of adobo sauce for extra depth. This version pairs wonderfully with corn chips or tortilla strips.
Herb‑Infused Garden Dip
Swap out the parsley for a blend of fresh herbs like basil, thyme, and oregano. These herbs add a fragrant, Mediterranean flair that complements the onions. Use fresh herbs for a brighter taste, but dried herbs work well if fresh isn’t available. This variation is ideal for a summer picnic.
Cheese‑Loaded Extra
Increase the cheddar portion to one cup and add a half cup of mozzarella. The extra cheese will create a richer, more indulgent dip. This version is especially satisfying for cheese lovers who want a dip that’s as gooey as it is flavorful. Serve it with thick-cut bread for a decadent treat.
Vegan Version
Replace the sour cream and mayonnaise with vegan yogurt and plant‑based mayo. Use a vegan Parmesan substitute for the cheese crust. The result is a creamy, dairy‑free dip that still delivers all the flavors of the classic. This version is perfect for guests with dietary restrictions.
Breakfast‑Style Dip
Add a pinch of cinnamon and a drizzle of maple syrup to the base. Fold in chopped apples or pears for a sweet, autumnal twist. This dip pairs wonderfully with toasted English muffins or bagels. It’s a fun way to bring a familiar flavor into a new context.
Storing and Bringing It Back to Life
Fridge Storage
Store the dip in an airtight container in the refrigerator for up to four days. The creamy texture will remain smooth, and the caramelized onions will keep their flavor. Before serving, give it a quick stir to redistribute any settled ingredients. This method is perfect for meal prep or for guests who want to enjoy the dip later.
Freezer Friendly
Freeze the dip in a freezer‑safe container for up to three months. Thaw overnight in the refrigerator before reheating. Reheat in the oven at 350°F for 10–15 minutes, adding a splash of water to keep it moist. The dip will retain its flavor and texture, making it a convenient option for busy days.
Best Reheating Method
Reheat the dip in a low‑heat oven at 300°F, covering the dish with foil to prevent the top from burning. Add a tablespoon of water or milk before covering; this steams the dip and keeps it creamy. After 10 minutes, remove the foil and bake for an additional 5 minutes to re‑crisp the top. This method ensures the dip tastes as fresh as the day it was made.