It started with a kitchen disaster that would haunt my culinary dreams for months. I was attempting a simple chocolate treat for a Halloween party, but the white chocolate melted into a gooey puddle that clung to the countertop like a stubborn stain. The moment I realized the mess, I stared at the melted chocolate and thought, “If I could just turn this into something edible, it would be a masterpiece.” That thought turned into a dare: I’d create a spooky, bite‑size delight that would make everyone gasp, and I was determined to deliver.
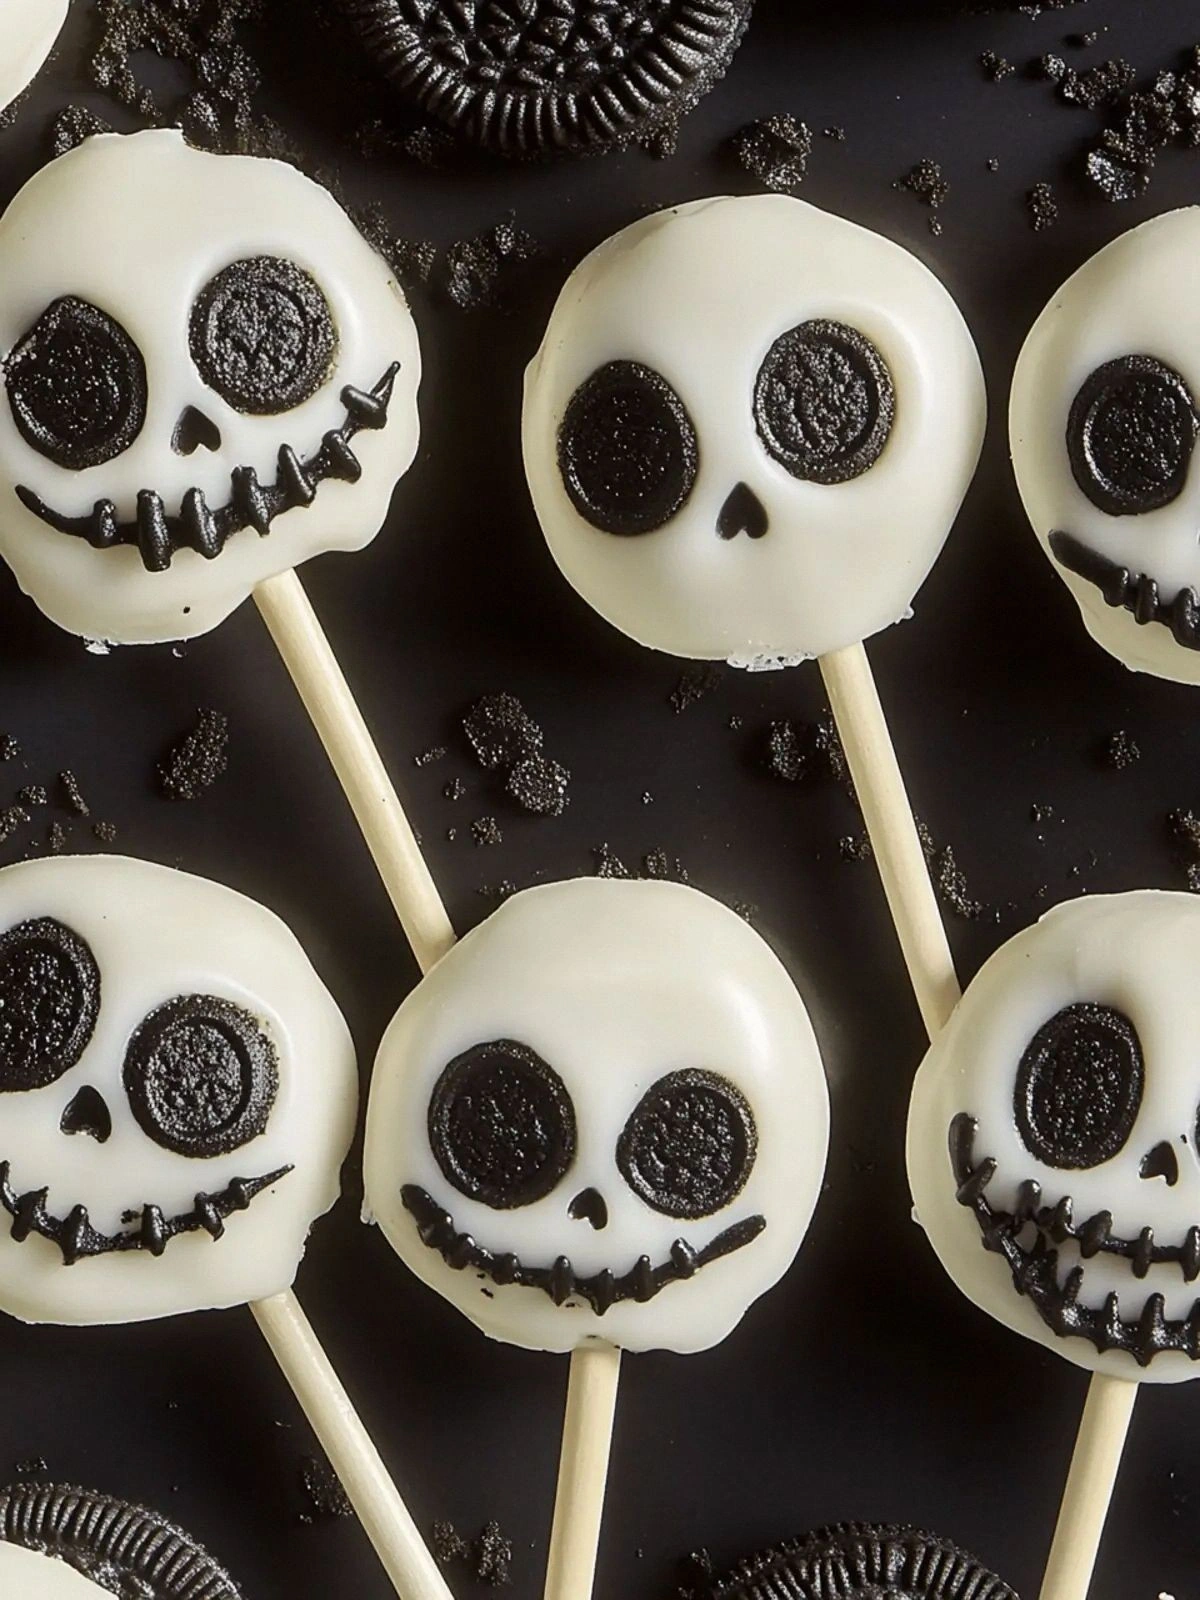
Picture this: the kitchen is buzzing with the hum of the oven, the air tinged with the sweet, buttery scent of melting chocolate and toasted coconut oil. My eyes scan the counter, spotting the 12 lollipop sticks and the Halloween Oreos that look like tiny, black‑and‑white skeletons. I can almost hear the crunch of the Oreos as they break apart, the subtle crackle of the chocolate coating. The anticipation of that first bite—smooth white chocolate hugging a crunchy Oreo, all wrapped in a playful, jack‑skellington silhouette—makes my mouth water.
What makes this version stand out? It’s the marriage of texture and flavor that turns a simple snack into a showstopper. The white chocolate is silky, the Oreo crunch is unmistakable, and the lollipop stick adds a playful, edible handle that feels like a mini wand. I dare you to taste this and not go back for seconds; that’s the micro‑challenge I’m throwing at you. And if you think you’ve seen spooky treats before, think again—this is hands down the best version you’ll ever make at home.
I’ll be honest—half the batch disappeared before anyone else even got a taste. That’s the proof that when you combine the right ingredients with the right technique, you create something that people can’t resist. Most recipes get this completely wrong, focusing on either flavor or form, but here both elements dance in perfect harmony. Picture yourself pulling this out of the oven, the whole kitchen smelling incredible, and seeing those little jack‑skellies gleaming like fresh snow. Stay with me here—this is worth it.
What Makes This Version Stand Out
- Texture: The contrast between the molten white chocolate and the crisp Oreo base delivers a bite that satisfies both sweet and crunchy cravings. If you skip the Oreo, the treat feels flat and lacks that satisfying snap.
- Flavor: Coconut oil elevates the chocolate’s richness without overpowering it, creating a silky finish that lingers. Replacing coconut oil with butter will change the mouthfeel entirely.
- Presentation: The lollipop stick transforms the snack into a handheld toy, perfect for Halloween parties. Without it, the treat becomes a simple candy that loses its playful charm.
- Ease: No baking, no complicated steps—just melt, coat, and chill. If you’re new to chocolate work, this recipe is a confidence booster.
- Uniqueness: The black icing and ribbons give it a spooky, gothic flair that sets it apart from ordinary chocolate bars. Skipping them will make the treat look generic.
- Make‑ahead: The pops stay fresh for up to a week when refrigerated, making them ideal for a last‑minute party.
- Ingredient Quality: Using premium white chocolate chips ensures a smooth finish; cheaper chips can become grainy.
- Audience: Kids love the handle; adults appreciate the elegant finish. This dual appeal is rare in snack recipes.
Alright, let's break down exactly what goes into this masterpiece...
Inside the Ingredient List
The Flavor Base
White chocolate chips are the heart of this treat, delivering a sweet, creamy foundation that coats every bite. Their high cocoa butter content allows them to melt into a glossy, velvety sauce that clings to the Oreo. If you replace them with milk chocolate, the flavor profile shifts dramatically, adding a milkier sweetness that can overpower the crunch. For a richer taste, choose a brand with at least 30% cocoa butter; this ensures a smoother melt and less risk of seizing.
The Texture Crew
The 12 Halloween Oreos bring crunch and a subtle, buttery crumb that balances the smooth chocolate. Their iconic black and white design also contributes to the spooky aesthetic. If you can’t find Halloween Oreos, regular Oreos will still work, but you’ll lose the thematic visual cue. Swapping them for chocolate sandwich cookies adds a chocolatey depth, but the contrast in texture diminishes.
The Unexpected Star
Coconut oil is the unsung hero that keeps the chocolate from seizing and adds a faint, tropical aroma. It also helps the coating set faster, giving the pops a firm, glossy finish. A pinch of sea salt can enhance the chocolate’s sweetness, but be careful not to overdo it. If you’re vegan, coconut oil is a natural, plant‑based alternative to butter.
The Final Flourish
Black icing and ribbons transform the treat into a Halloween masterpiece, adding a dramatic, gothic touch. The icing’s firm consistency allows it to be piped into intricate designs that mimic a jack‑skellington’s grin. If you don’t have black icing, a mixture of white icing and a few drops of black food coloring works as a substitute. The ribbons add a playful, tactile element that kids love to hold.
Everything's prepped? Good. Let's get into the real action...
The Method — Step by Step
- Prepare the Workstation: Clear a flat surface and line it with parchment paper. Place the 12 lollipop sticks on the paper, spaced evenly. This will keep them from sticking together when you start coating. If you’re working in a hurry, you can use a silicone mat instead.
- Heat the Chocolate: In a heat‑proof bowl, combine the 1 cup white chocolate chips with 2 tablespoons coconut oil. Set the bowl over a pot of simmering water, ensuring the bottom does not touch the water. Stir constantly until the mixture is completely melted and glossy. The chocolate should reach 120°F (49°C) before removing it from heat.
- Dip the Oreos: Hold each Oreo by its corners and dip it into the melted chocolate, allowing excess to drip back into the bowl. Then carefully place it onto the lollipop stick, ensuring the chocolate adheres fully. Repeat until all Oreos are coated. If you want a thicker coating, dip twice, allowing the first layer to set for a minute before the second.
- Set the Pops: Transfer the coated Oreos onto the parchment paper. Let them sit at room temperature for 5 minutes, then chill them in the refrigerator for 15 minutes to allow the chocolate to firm up. The chocolate should feel firm to the touch but not hard.
- Apply the Black Icing: Using a piping bag fitted with a small round tip, pipe a line of black icing along the top of each pop. The icing should be thick enough to hold its shape but smooth enough to create a subtle ridge. If you don’t have a piping bag, a small plastic bag with a corner cut will suffice.
- Add the Ribbons: Roll the black ribbon into a thin strip and wrap it around each pop, anchoring the ends with a small dot of icing. The ribbon should lie flat and create a visual contrast against the white chocolate. If you’re short on ribbons, use a thin black paper strip or even a strip of black wax paper.
- Final Chill: Return the finished pops to the refrigerator for an additional 10 minutes to set the icing and ribbon. The pops should feel cool and ready to eat. If you’re in a rush, a quick 5‑minute chill will still work, but the icing may not set as firmly.
- Serve and Enjoy: Arrange the pops on a platter or individual serving trays. The final product should look like miniature jack‑skellies, each with a glossy, spooky finish. Serve immediately or keep them refrigerated until ready to serve.
That's it — you did it. But hold on, I've got a few more tricks that'll take this to another level...
Insider Tricks for Flawless Results
The Temperature Rule Nobody Follows
White chocolate is finicky; it can seize if it gets too hot or too cold. Keep the melting temperature between 120°F and 130°F (49°C–54°C). A small thermometer is a game‑changer, but if you don’t have one, feel the chocolate: it should be smooth and fluid, not thick or lumpy. This simple step ensures a glossy finish and prevents the chocolate from turning grainy.
Why Your Nose Knows Best
The scent of chocolate is a powerful cue that signals readiness. When the chocolate smells toasty and nutty, it’s at the perfect point for dipping. If it smells sharp or burnt, it’s overheated. Trusting your nose saves you from a batch of dull, over‑cooked treats.
The 5‑Minute Rest That Changes Everything
Letting the coated Oreos rest for a short 5‑minute pause before chilling allows the chocolate to set slightly, creating a barrier that keeps the icing from sliding off. A friend once skipped this step and the icing ran off like a waterfall. The rest also gives the chocolate time to firm up enough to hold the ribbon.
The Right Tool for the Job
A piping bag with a 0.5 mm tip is ideal for the black icing. If you don’t have one, a small plastic bag with a corner cut works as a makeshift bag. The key is to have a consistent line that looks like a subtle ridge on the pop. A crooked line looks amateur.
The Quick Chill Trick
If you’re in a hurry, place the pops in the freezer for 5 minutes instead of the refrigerator. The cold will set the chocolate quickly, but be careful not to over‑freeze, or the icing may crack. This trick is perfect for last‑minute party prep.
Creative Twists and Variations
This recipe is a playground. Here are some of my favorite ways to switch things up:
Coconut Crunch Edition
Swap the white chocolate for a blend of white chocolate and shredded coconut. The coconut adds a chewy, tropical twist that pairs beautifully with the Oreo’s crunch. This version is ideal for summer Halloween parties.
Minty Madness
Add a splash of peppermint extract to the melted chocolate. The mint undertone gives the pops a refreshing bite that contrasts with the sweet chocolate. Use a small amount—just enough to flavor without overpowering.
Nutty Delight
Toss the Oreos in chopped toasted almonds before dipping. The almond pieces add a nutty crunch and a subtle buttery flavor. This variation is a crowd‑pleaser for guests who love nutty treats.
Chocolate‑Covered Swirl
Replace the white chocolate with dark chocolate chips for a richer, bittersweet flavor. The dark chocolate’s deep cocoa notes complement the black icing, creating a sophisticated look. This option works well for adult Halloween parties.
Spicy Surprise
Add a pinch of cayenne pepper to the melted chocolate for a subtle kick. The heat contrasts with the sweetness, creating a complex flavor profile that surprises the palate. Keep the pepper amount small; you want a hint of spice, not a fiery blast.
Gingerbread Twist
Mix in a teaspoon of ground ginger and a pinch of cinnamon into the chocolate before dipping. The warm spices evoke a holiday feel, making these pops perfect for a Halloween‑Christmas crossover. The spices also add depth to the chocolate’s flavor.
Storing and Bringing It Back to Life
Fridge Storage
Store the pops in an airtight container in the refrigerator for up to one week. The airtight seal prevents the chocolate from absorbing odors and keeps the icing crisp. Keep the container in the back of the fridge where the temperature is most consistent.
Freezer Friendly
For longer storage, place the pops on a parchment‑lined tray and freeze for up to two months. Once frozen, transfer them to a freezer‑safe zip‑lock bag. When you’re ready to serve, let them thaw at room temperature for 15 minutes to regain their bite.
Best Reheating Method
To revive the chocolate’s shine, place the pops on a parchment paper and microwave on low power for 10–15 seconds. The heat will soften the chocolate without melting it entirely. Add a tiny splash of water before reheating to create steam, which helps the chocolate regain its glossy texture.