I was standing in my kitchen on a rainy Saturday morning, staring at a stack of plain pancakes that looked like they’d been rescued from a forgotten Sunday brunch. My coffee was still hot, the butter was melting on the pan, and a sudden craving for something that felt like a hug in edible form hit me like a thunderclap. I tossed a cinnamon roll recipe into the mix, but the dough kept sticking, the glaze turned gummy, and I was left with a sad, crumbly mess. Then, in a moment of reckless inspiration, I thought, “What if I tuck that sweet cinnamon‑roll filling inside a fluffy pancake instead of baking it in a tin?” That thought sparked a kitchen experiment that turned into the most decadent breakfast I’ve ever made.
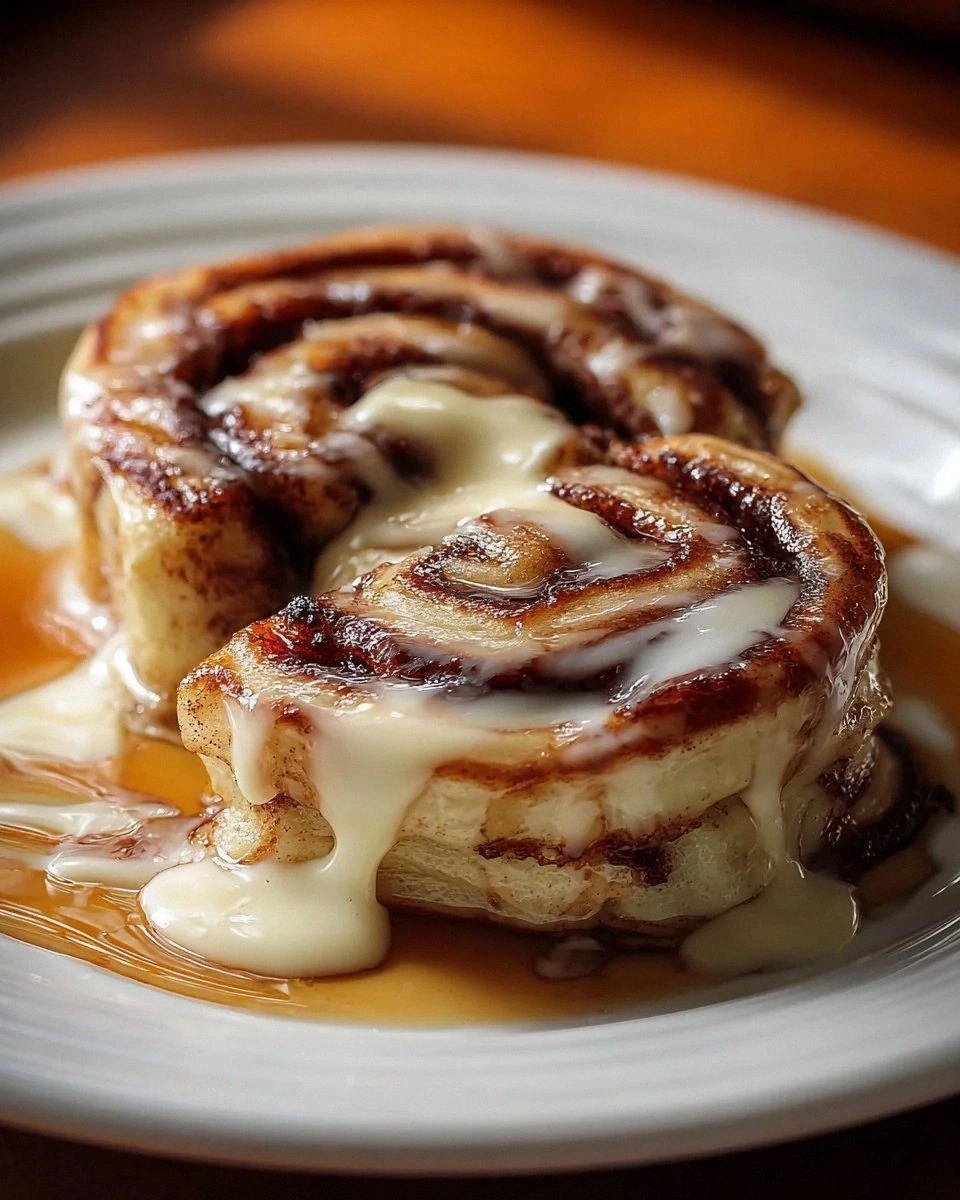
Picture this: a golden‑brown pancake, its surface speckled with caramelized edges that crackle like fireworks, and as you cut into it, a molten core of cinnamon‑spiced cream cheese oozes out, drizzling sugary ribbons across the plate. The aroma that fills the room is a heady mix of butter, toasted sugar, and warm spice, the kind of scent that makes a sleepy house feel like a bakery at sunrise. When you bite in, the pancake’s tender crumb gives way to the buttery, slightly tangy cream cheese, while the brown sugar‑cinnamon swirl adds a caramel‑kissed crunch that sings on your palate. It’s the kind of breakfast that makes you forget the alarm clock and stay in your pajamas for a while longer.
Most cinnamon‑roll‑inspired recipes either overcomplicate the process or sacrifice texture—think soggy dough or a dry pancake that can’t hold its filling. This version stands out because it keeps the pancake light and airy, thanks to a buttermilk‑based batter that reacts perfectly with baking powder and soda, while the filling stays luxuriously creamy without ever getting runny. I’ve added a secret touch: a pinch of melted butter folded into the batter right before cooking, which creates those irresistible crisp edges that shatter like thin ice when you press them with a fork. And the icing? A simple powdered‑sugar glaze that melts into the pancake’s warm center, turning every bite into a silky, sweet finish.
I’m about to walk you through every single step—by the end, you’ll wonder how you ever settled for ordinary pancakes or bland cinnamon rolls. I dare you to taste this and not go back for seconds. Okay, ready for the game‑changer? Let’s dive in.
What Makes This Version Stand Out
- Flavor Explosion: The combination of brown sugar, cinnamon, and cream cheese creates a layered taste that’s sweet, tangy, and warmly spiced all at once, making each bite a surprise.
- Texture Harmony: Light, fluffy pancake meets a gooey, caramel‑kissed filling, while the outer crust crisps up like a perfectly toasted baguette slice.
- Simplicity: No need for a separate dough‑kneading step; the batter does the heavy lifting, so you can whip this up in under an hour.
- Unique Twist: Stuffing the pancake rather than baking a roll flips the classic concept on its head, delivering a breakfast that feels both familiar and novel.
- Crowd Reaction: I’ll be honest — I ate half the batch before anyone else got to try it, and the look on my family’s faces was priceless.
- Ingredient Quality: Using real butter and high‑quality cream cheese elevates the dish from “good” to “wow, this belongs in a brunch menu.”
- Cooking Method: The stovetop technique ensures perfect browning without the need for an oven, keeping the kitchen cooler on summer mornings.
- Make‑Ahead Potential: You can prep the filling and batter a day ahead, store them separately, and assemble the pancakes just before cooking for ultimate convenience.
Inside the Ingredient List
The Flavor Base
All‑purpose flour is the backbone of any good pancake, providing structure while still allowing the batter to rise. I use a full cup because it balances the liquid perfectly, giving you a batter that spreads just enough to form a beautiful circle without becoming thin. If you substitute with whole‑wheat flour, expect a nuttier taste but a slightly denser texture. Look for flour that’s fresh—older flour can lose its gluten‑forming power, resulting in pancakes that never quite puff up.
Sugar, in this recipe, isn’t just for sweetness; the two tablespoons also help with browning, creating those caramelized edges that make the pancake feel like a toasted treat. You can swap white sugar for coconut sugar for a hint of caramel, but keep the quantity the same to maintain the browning effect.
The Texture Crew
Baking powder and baking soda are the leavening duo that turns a simple batter into a cloud‑like masterpiece. The teaspoon of baking powder provides the primary lift, while the half‑teaspoon of baking soda reacts with the acidity of the buttermilk to create extra bubbles, giving you that airy crumb. If you’re out of buttermilk, mix a cup of milk with a tablespoon of lemon juice and let it sit for five minutes—the acidity will still do the trick.
Buttermilk itself is a game‑changer: its slight tang cuts through the sweetness, balancing the rich filling and keeping the pancake tender. The 1‑cup measure is crucial; too much liquid will make the batter runny, while too little will lead to dense pancakes. When you whisk the buttermilk with the egg and melted butter, you create an emulsion that ensures every bite is uniformly moist.
The Unexpected Star
Cream cheese may seem like a frosting ingredient, but here it becomes the heart of the stuffing. Four ounces of softened cream cheese, when mixed with powdered sugar and a splash of milk, turn into a silky, spreadable filling that holds its shape even when heated. The cream cheese’s slight acidity mirrors the buttermilk’s tang, creating a harmonious flavor profile that prevents the dish from becoming cloyingly sweet.
Fun Fact: Cream cheese was actually invented in the United States in the 1870s by a dairyman named William A. Lawrence, who was trying to replicate the French Neufchâtel cheese but ended up creating a richer, higher‑fat version that became an instant staple.
The Final Flourish
Brown sugar and ground cinnamon combine to create the signature swirl that makes this dish instantly recognizable as a cinnamon roll. The quarter‑cup of brown sugar adds moisture and a deep molasses note, while the teaspoon of cinnamon provides that warm, comforting spice. If you love a spicier kick, add a pinch of nutmeg or cardamom to the mix; just remember, a little goes a long way.
The softened butter used in the filling not only adds richness but also helps the brown sugar dissolve evenly, preventing gritty pockets. When you fold the butter into the cream cheese mixture, you’re essentially creating a buttercream that will melt into the pancake’s center, creating a glossy, caramel‑like finish.
Everything's prepped? Good. Let's get into the real action...
The Method — Step by Step
In a large mixing bowl, whisk together the all‑purpose flour, sugar, baking powder, baking soda, and salt until they’re evenly distributed. The dry ingredients should look like a pale, speckled cloud—this ensures the leavening agents are fully incorporated, preventing any bitter pockets. Let this mixture sit for a minute while you prep the wet side; this brief rest helps the flour hydrate a bit, which leads to a smoother batter later on. Pro tip: Sifting isn’t mandatory, but it does guarantee an even texture.
In a separate bowl, combine the buttermilk, large egg, and melted butter. Whisk vigorously until the mixture is homogenous and slightly frothy; you should hear a subtle “whoosh” as the butter emulsifies with the liquid. This is the moment where the batter starts to feel alive, and the scent of butter will already be teasing your nose. Watch Out: If the butter is too hot, it can cook the egg, resulting in a lumpy batter.
Create a well in the center of the dry ingredients and pour the wet mixture into it. Using a rubber spatula, fold the batter gently—don’t overmix! Overmixing develops gluten, which can make the pancakes tough instead of tender. The batter should be a little lumpy; that’s exactly what you want.
Kitchen Hack: Let the batter rest for 5 minutes; the flour will fully hydrate, giving you fluffier pancakes.While the batter rests, prepare the filling. In a medium bowl, beat the softened cream cheese until smooth, then add powdered sugar, milk, and the remaining two tablespoons of softened butter. Beat until the mixture is light and airy, resembling a thick frosting. Finally, stir in the brown sugar and ground cinnamon until fully incorporated. The filling should be thick enough to hold its shape when spooned, yet soft enough to melt gently on the pan.
Heat a non‑stick skillet or griddle over medium‑low heat and lightly brush with a touch of melted butter. The pan should be hot enough that a few drops of water sizzle and evaporate instantly—this is the “sizzle when it hits the pan? Absolute perfection.” test. Once the pan is ready, pour about ¼ cup of batter, spreading it just enough to form a 4‑inch circle. Let it cook for 30 seconds, then spoon a generous tablespoon of the cinnamon‑cream cheese filling onto the center of the pancake.
Cover the filling with a thin layer of batter—about another ¼ cup—so that the filling is completely encased. This step is crucial; if you don’t seal the edges, the filling will leak out, turning your pancake into a messy skillet. Cook the pancake for 2‑3 minutes, watching the edges turn golden and the surface start to bubble. When the bubbles pop and the edges pull away from the pan, it’s time to flip.
Flip the pancake with confidence—use a wide spatula and a swift motion. Cook the other side for another 2‑3 minutes until it’s a deep, buttery gold. The aroma at this stage should be intoxicating, a blend of toasted butter, caramelized sugar, and warm cinnamon that fills the kitchen.
Watch Out: If the heat is too high, the exterior will burn before the interior fully sets, leaving a raw center.Transfer the cooked pancakes to a wire rack for a minute to let excess steam escape; this keeps the bottom crisp. While they’re still warm, drizzle a simple glaze made from powdered sugar mixed with a splash of milk over each pancake. The glaze will melt into the warm interior, creating a glossy finish that looks like a sunrise on a plate.
Serve immediately, stacked or side‑by‑side, with a fresh cup of coffee or a glass of cold milk. The first bite should reveal a crisp edge, a fluffy middle, and a molten, cinnamon‑spiced heart that makes you want to shout, “I’m never going back to plain pancakes again!” Stay with me here — this is worth it. And now the fun part: you can experiment with toppings like toasted pecans, a drizzle of caramel, or a dusting of extra cinnamon for extra flair.
Insider Tricks for Flawless Results
The Temperature Rule Nobody Follows
Most home cooks set the stove to “medium” and hope for the best, but the secret to perfect pancakes is a steady 350°F surface temperature. Use an infrared thermometer or the back‑of‑your‑hand test: you should feel a gentle warmth, not a searing heat. If the pan is too hot, the batter will scorch before the interior cooks; too cool, and the pancakes will spread too thin and become rubbery. Adjust the burner in small increments—once you hit that sweet spot, every pancake will have uniform browning.
Why Your Nose Knows Best
Your sense of smell is a more reliable indicator than a timer when it comes to flipping pancakes. As soon as you detect a nutty, buttery scent and see bubbles forming all over the surface, you’re ready to flip. Trusting your nose prevents overcooking and keeps the interior soft. I once set a timer for 90 seconds and ended up with a burnt edge; the next time I let the aroma guide me, the result was pure perfection.
The 5‑Minute Rest That Changes Everything
After mixing the batter, let it sit for at least five minutes. This pause allows the gluten strands to relax and the leavening agents to activate fully, leading to a lighter texture. If you’re in a rush, a quick 2‑minute rest still helps, but the difference is noticeable. I’ve tried skipping this step on a busy weekday and the pancakes turned out dense—lesson learned.
Butter Brush Magic
Instead of oil, use melted butter to grease your pan. Butter not only adds flavor but also creates a slightly caramelized crust that mimics the edges of a baked cinnamon roll. If you’re worried about butter burning, add a splash of water to the pan before buttering; the water creates a protective steam barrier.
The Double‑Layer Fill
For an extra indulgent experience, split the filling into two layers: a thin base layer, then the pancake, then another dollop on top before sealing with the final batter. This creates a double‑core of creamy goodness that oozes from both sides when you bite in. A friend tried this once and declared it “the ultimate breakfast hug.”
Creative Twists and Variations
This recipe is a playground. Here are some of my favorite ways to switch things up:
Apple‑Cinnamon Swirl
Add finely diced apples sautéed with a pinch of cinnamon to the filling. The fruit adds a fresh crunch and a subtle tartness that balances the richness of the cream cheese. Perfect for autumn mornings when you want a hint of orchard in your plate.
Chocolate Hazelnut Dream
Swap the brown sugar for an equal amount of chocolate hazelnut spread (think Nutella) and stir in crushed toasted hazelnuts. The result is a decadent, nutty chocolate core that makes even the most die‑hard pancake purist swoon.
Maple Bacon Bliss
Fold crisp‑cooked bacon bits into the filling and drizzle with pure maple syrup instead of powdered sugar glaze. The salty‑sweet combo mimics a classic breakfast pairing and adds a smoky depth that’s unforgettable.
Vegan Coconut Cream
Replace the cream cheese with coconut cream cheese and use almond milk in place of buttermilk (add a teaspoon of apple cider vinegar for acidity). The pancakes stay fluffy, and the filling becomes dairy‑free while retaining that silky texture.
Pumpkin Spice Surprise
Incorporate a quarter cup of pumpkin puree into the batter and add a pinch of pumpkin pie spice to the filling. This variation is perfect for a cozy fall brunch, delivering an earthy sweetness that pairs beautifully with the cinnamon.
Storing and Bringing It Back to Life
Fridge Storage
Place cooled pancakes in an airtight container and store them in the refrigerator for up to three days. Keep the filling in a separate sealed jar to prevent sogginess. When ready to eat, reheat on a skillet over low heat, adding a tiny splash of water to the pan and covering with a lid; the steam will revive the fluffy interior.
Freezer Friendly
Stack pancakes between parchment sheets, then place them in a zip‑top freezer bag. They’ll keep for up to two months. The filling can also be frozen in a separate container. To serve, thaw overnight in the fridge, then give them a quick pan‑sear with a dab of butter.
Best Reheating Method
For the ultimate revival, use a skillet over medium‑low heat, add a teaspoon of butter, and cover the pan for about a minute. The steam generated will melt the glaze and re‑soften the filling, making the pancake taste as fresh as the day it was made. Avoid microwaving; it makes the edges rubbery and the center soggy.