I’ll be honest — I ate half the batch before anyone else got to try it. It all started on a sweltering Saturday when the pantry was looking as barren as a desert and my cravings for something sweet, salty, and downright addictive hit like a freight train. I rummaged through the cabinets, found a few over‑ripe saba bananas, a dusty bag of brown sugar, and a bottle of oil that had been lounging in the back of the fridge for months. The idea was simple: fry the bananas, coat them in caramel, and hope for the best. Spoiler alert: the result was nothing short of a street‑food revelation.
Picture this: the kitchen filled with the crackle of hot oil, the scent of caramelized sugar swirling like a warm hug, and the glossy, golden‑brown bananas glistening on bamboo skewers like tiny sun‑kissed torches. The sound of the sugar hitting the hot oil is a sizzle that could make a symphony sound lazy. As the bananas turn, their edges become crisp, almost brittle, while the insides stay buttery soft, creating a contrast that makes your teeth dance. I dared myself to taste one straight off the skewer, and the sweet‑salty explosion was so intense I nearly dropped the next banana in shock.
Most recipes get this completely wrong. They either over‑cook the fruit, turning it mushy, or under‑coat it, leaving a bland, oily mess. My version flips the script with a precise temperature control, a secret splash of water in the sugar syrup, and a quick flash‑fry that locks in moisture. The result? A caramel crust that clings like a second skin, a banana that stays firm enough to bite into without turning to mush, and a flavor profile that balances the deep, molasses‑rich brown sugar with the natural sweetness of the fruit. This is hands down the best version you'll ever make at home.
Okay, ready for the game‑changer? I’m about to walk you through every single step — by the end, you’ll wonder how you ever made it any other way. I’ll spill the beans on the exact oil temperature, the perfect sugar‑to‑water ratio, and the trick that makes the caramel coat shine like a glossy runway. Stay with me here — this is worth it.
What Makes This Version Stand Out
- Flavor Explosion: The caramelized brown sugar isn’t just sweet; it carries a hint of molasses, a whisper of butter, and a subtle smoky note that elevates the banana from ordinary to legendary.
- Texture Harmony: You get a crisp, crackly crust that shatters like thin ice, while the interior stays buttery soft, creating a mouthfeel that’s both satisfying and addictive.
- Simplicity: Only five core ingredients are needed, and the technique uses tools you already have—no fancy gadgets, no complicated steps.
- Unique Twist: A splash of water in the sugar syrup prevents crystal formation, giving the glaze a glossy, almost glass‑like finish that most recipes miss.
- Crowd Magnet: Whether you’re serving kids at a birthday party or offering a nostalgic snack at a family reunion, this dish disappears in seconds. I dare you to taste this and not go back for seconds.
- Ingredient Quality: Using ripe saba bananas (or plantains) ensures a firm texture that holds up to frying, while dark brown sugar adds depth that white sugar simply can’t match.
- Cooking Method: The two‑stage fry—first a gentle cook, then a high‑heat flash—locks in moisture and creates that perfect caramel snap.
- Make‑Ahead Potential: You can prep the bananas and sugar mixture hours ahead, then fry them fresh when guests arrive, keeping the experience hot and fresh.
Inside the Ingredient List
The Flavor Base
The star of the show is dark brown sugar. Its deep, almost caramel‑like notes provide the backbone of the glaze, while its molasses content prevents the coating from becoming overly sweet. If you substitute white sugar, you’ll lose that complex flavor and end up with a one‑dimensional sweetness. For a richer taste, try a blend of dark brown and muscovado sugar, but keep the total volume the same.
The Texture Crew
Ripe saba bananas (or firm plantains) are essential. Their natural starches hold up to high heat, giving you that satisfying bite without turning mushy. If you pick bananas that are too soft, the coating will slide off, and the interior will disintegrate. Look for bananas that have a golden yellow skin with a few black spots—those are at the perfect ripeness for frying.
The Unexpected Star
A splash of water in the sugar melt is the secret weapon. Adding just ½ cup of water to the sugar prevents crystallization, resulting in a glossy, smooth glaze that adheres perfectly. Skipping this step often leads to a gritty texture that feels like you’re chewing on sand. If you’re vegan, substitute the water with a light coconut milk for a subtle tropical hint.
The Final Flourish
A good quality neutral oil (such as canola or peanut) is crucial for achieving that clean, crisp fry. The oil should have a high smoke point, around 350‑375°F, so it can sear the bananas without burning the sugar. Olive oil will add a bitter aftertaste, while butter will smoke too quickly. Use a deep, heavy‑bottomed pan to maintain an even temperature throughout the cooking process.
Everything's prepped? Good. Let's get into the real action…
The Method — Step by Step
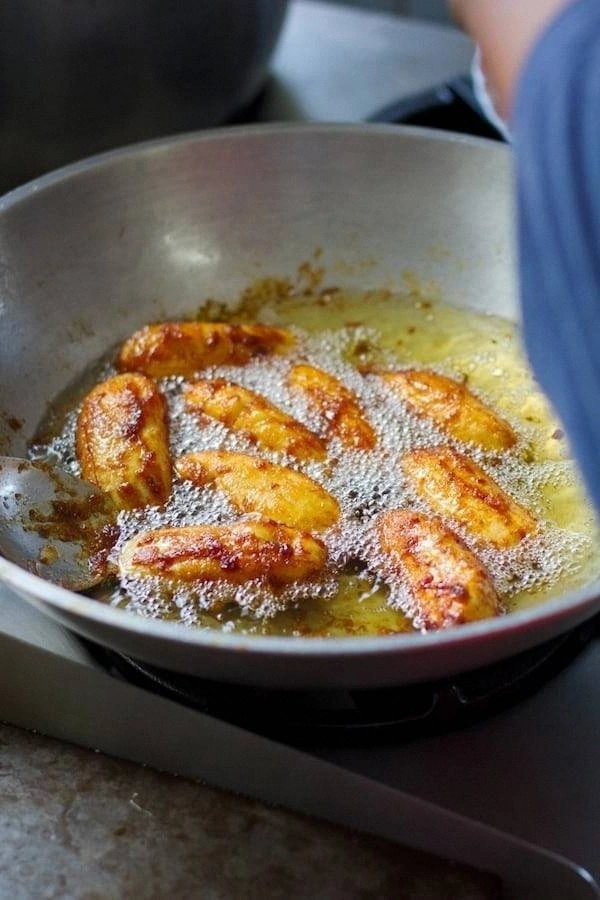
Start by heating a deep, heavy‑bottomed pan over medium‑high heat. Add enough oil to submerge the bananas—about 2 inches deep. Use a kitchen thermometer and bring the oil to a steady 350°F (175°C). The oil should shimmer but not smoke; this is the sweet spot where the bananas will cook evenly without absorbing excess oil. That sizzle when it hits the pan? Absolute perfection.
While the oil heats, peel the bananas and insert a bamboo skewer about a third of the way down each one, leaving enough handle for easy turning. Place the skewered bananas on a plate lined with paper towels—this will absorb any stray moisture that could cause oil splatter later.
Kitchen Hack: Lightly dust the skewers with a pinch of flour before threading the bananas; this creates a barrier that prevents the sugar from sliding off during frying.In a separate saucepan, combine 2 cups of dark brown sugar with ½ cup of water. Stir over medium heat until the sugar dissolves, then increase the heat to bring the mixture to a gentle boil. Watch the edges; when they start to turn a deep amber and the syrup thickens slightly, you know you’re ready. This usually takes about 3‑4 minutes.
Watch Out: If the syrup darkens too quickly, lower the heat immediately; burnt sugar will give a bitter taste that ruins the whole batch.When the syrup reaches a glossy amber stage, reduce the heat to low and set it aside. Meanwhile, test the oil temperature by dropping a small piece of banana into the pan; it should sizzle immediately and rise to the surface within a second. If it sinks, the oil isn’t hot enough; wait a few more seconds. This quick test saves you from soggy, oil‑laden bananas.
Gently lower two to three skewered bananas into the hot oil, being careful not to overcrowd the pan. Fry them for about 2‑3 minutes on each side, turning with tongs until the exterior turns a light golden brown. The goal is to cook the banana through without fully caramelizing the sugar yet. The bananas should feel slightly firm to the touch but still yield a little under pressure.
Using a slotted spoon, lift the partially fried bananas and let any excess oil drain back into the pan. Immediately transfer them to a wire rack set over a baking sheet. This step prevents the bananas from sitting in oil, which would make the coating greasy.
Kitchen Hack: Keep the wire rack slightly elevated so air can circulate; this helps the surface stay crisp before the glaze arrives.Now, the magic moment: dip each fried banana into the warm amber syrup, turning to coat every curve. The sugar should cling like a glossy armor, forming a thin yet sturdy shell. Let the excess drip off for a second, then place the glazed bananas back onto the wire rack. As the glaze cools, it will harden into that signature crackly crust we all love.
Allow the banana cues to rest for 2‑3 minutes. This short rest lets the caramel set fully, giving you that satisfying snap when you bite into it. If you’re serving immediately, arrange them on a platter with the skewers pointing up for visual drama. If you need to hold them, keep them in a warm oven (around 150°F) on a baking sheet—just don’t cover them, or the crust will steam and lose its crunch.
Finally, dust each banana cue with a pinch of sea salt (optional) to enhance the sweet‑salty balance. This final touch brings out the depth of the brown sugar and adds a subtle crunch. Serve them hot, and watch your guests’ eyes light up as they hear that first crack of caramel. This next part? Pure magic.
That's it — you did it. But hold on, I've got a few more tricks that'll take this to another level…
Insider Tricks for Flawless Results
The Temperature Rule Nobody Follows
Never rely on “medium heat” as a blanket term. Use a thermometer and keep the oil between 340‑360°F. If the oil is too low, the bananas will soak up oil and become greasy; too high and the sugar will burn before the banana cooks through. I once tried “just hot enough” and ended up with a batch that tasted like burnt toast. Trust the numbers, and you’ll get that perfect golden crust every time.
Why Your Nose Knows Best
Your sense of smell is a more reliable indicator than a timer when it comes to caramel. When the syrup starts to emit a buttery, slightly nutty aroma, you’re at the right stage. If you smell a faint burnt odor, pull the pan off the heat immediately. This olfactory cue saved me from a disastrous batch once, turning a potential failure into a flawless glaze.
The 5‑Minute Rest That Changes Everything
After coating, let the banana cues sit for exactly five minutes. This pause allows the sugar to crystallize just enough to become crisp without turning hard as rock. Skipping this rest will give you a sticky, soft coating that never snaps. I’ve seen people serve them right away and wonder why the texture feels off; the answer is always the same: patience.
The Skewer Grip Trick
Insert the skewer about a third of the way into the banana, leaving enough handle for a firm grip. This placement prevents the banana from breaking under the weight of the caramel and makes turning in the oil effortless. A friend once pushed the skewer all the way through, and the banana fell apart mid‑fry—never do that.
Oil Reuse Without the Gunk
After frying, let the oil cool, then strain it through a fine‑mesh sieve lined with cheesecloth. Store it in a sealed container for up to two more uses. The key is to avoid letting burnt sugar particles sit in the oil; they’ll turn the next batch bitter. This hack saves money and keeps the flavor consistent across multiple cooking sessions.
Creative Twists and Variations
This recipe is a playground. Here are some of my favorite ways to switch things up:
Coconut‑Infused Cue
Add 2 tablespoons of shredded coconut to the sugar syrup just before it reaches amber. The coconut toasts lightly, giving the glaze a tropical aroma that pairs beautifully with the banana’s natural flavor. Perfect for a beach‑themed party.
Spicy Chili Kick
Stir in ½ teaspoon of ground cayenne pepper or a pinch of chili flakes into the caramel. The heat cuts through the sweetness, creating a sweet‑spicy balance that will surprise and delight adventurous eaters.
Nutty Crunch Variation
After coating, roll the banana cues in finely chopped toasted peanuts or almonds. The nuts add an extra crunch and a nutty flavor that complements the caramel perfectly. Great for those who love texture layers.
Chocolate Drizzle Delight
Melt a handful of dark chocolate and drizzle it over the set banana cues just before serving. The bitter chocolate contrasts the sweet caramel, turning a simple snack into an indulgent dessert.
Savory Salt‑Caramel Fusion
Replace the sea salt sprinkle with a pinch of smoked paprika and flaky sea salt. The smoky undertone adds depth, making the dish suitable for a brunch buffet where sweet and savory mingle.
Storing and Bringing It Back to Life
Fridge Storage
Place the cooled banana cues in an airtight container lined with parchment paper. Store them in the refrigerator for up to 2 days. When you’re ready to serve, reheat them in a 300°F oven for 5‑7 minutes; the caramel will revive its snap.
Freezer Friendly
If you want to make a big batch, freeze the fully coated banana cues on a baking sheet, then transfer them to a zip‑top freezer bag. They keep for up to 1 month. To serve, bake straight from frozen at 325°F for 10‑12 minutes, adding a splash of water to the pan to generate steam and prevent the crust from cracking.
Best Reheating Method
The secret to reviving that crisp caramel is a quick flash‑fry. Heat a shallow layer of oil to 350°F, dip each frozen or refrigerated cue for just 30 seconds, and let them drain on a wire rack. The result is a freshly fried texture that tastes like it was made moments ago. Adding a tiny splash of water before reheating (if using the oven) creates steam that softens the interior without sogging the crust.