I was in the middle of a rainy Thursday night when my roommate challenged me to make something that would make us forget the thunder outside. I thought, “Why not a deep‑fried, cheese‑stuffed wonder that screams comfort?” Fast forward two hours, a mountain of golden chimichangas on the kitchen counter, and a lingering scent that could coax the most stoic cat out of hiding. That moment, when the first bite melted like a warm hug and the crunch echoed like fireworks, I knew I had stumbled upon a culinary revelation. This isn’t just another copy‑cat of a Mexican‑inspired snack; it’s a full‑blown love affair between beef, cheese, and that irresistible, buttery crunch that makes you swear you’ve never tasted anything quite like it.
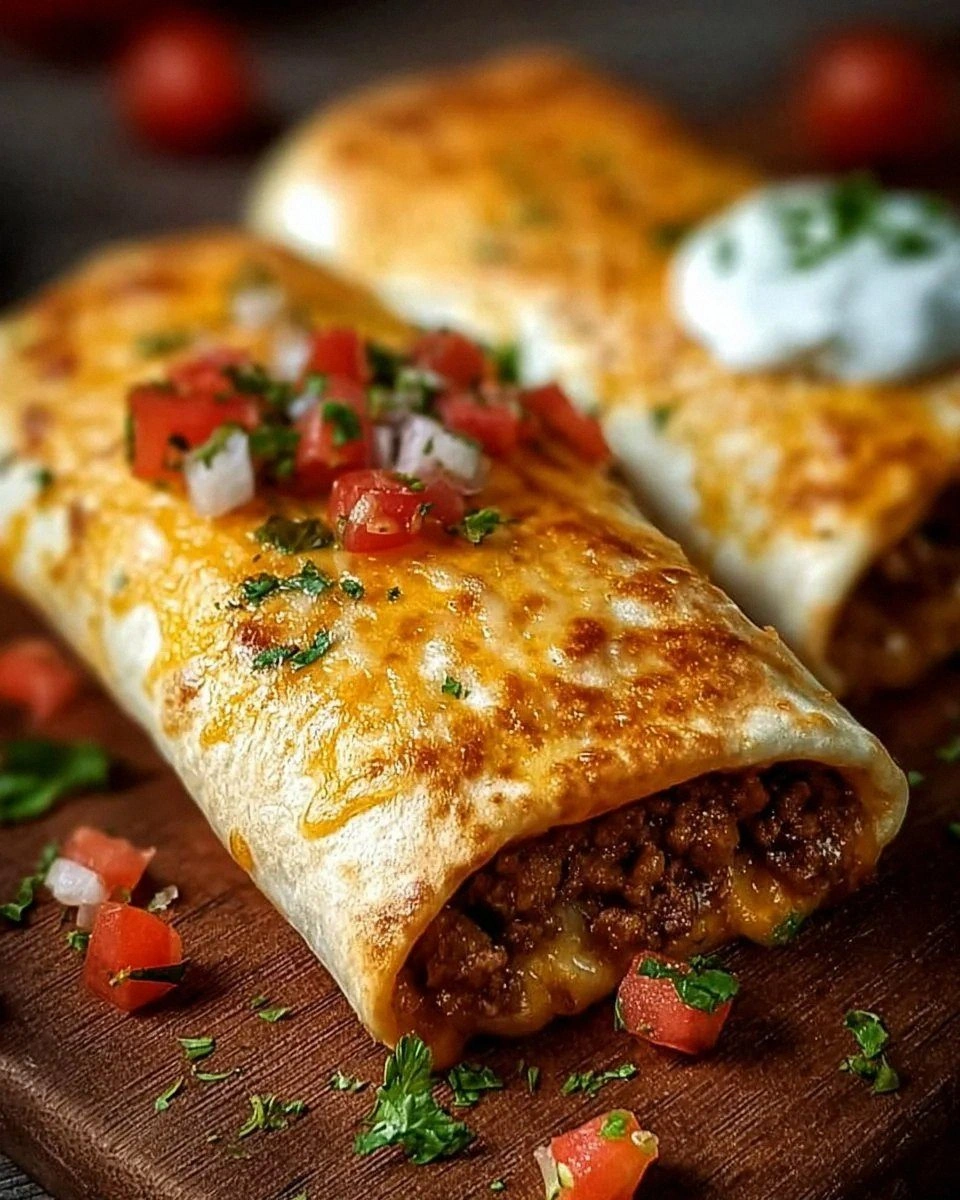
Picture this: a sizzling skillet where ground beef hits the heat and immediately releases a cloud of aromatic spices that makes your nose do a happy dance. The onions soften, the garlic whispers its buttery notes, and the chili powder and cumin join the party like a well‑rehearsed band. Then you fold in a generous cup of shredded cheese that melts into the meat like a velvety blanket, creating a filling that is both gooey and robust. You scoop that glorious mixture onto flour tortillas, fold them into neat parcels, and fry them until the edges turn a deep, caramelized amber that shatters like thin ice when you bite into it. The result? A handheld masterpiece that delivers a burst of flavor followed by a satisfying crunch, all while the guacamole, salsa, and sour cream wait on the side like loyal sidekicks.
Most recipes get this completely wrong. They either drown the beef in sauce, use limp tortillas, or skip the cheese entirely, leaving you with a soggy disappointment that feels more like a reheated burrito than a true chimichanga. My version flips the script: I keep the filling dry enough to stay inside the tortilla, I toast the tortillas just enough to get that golden crunch, and I never skimp on the cheese because that molten core is what separates “good” from “hands‑down the best version you’ll ever make at home.” I dare you to taste this and not go back for seconds; the combination is so addictive that you’ll be planning your next batch before the last bite even cools.
Let me walk you through every single step — by the end, you’ll wonder how you ever made it any other way. Okay, ready for the game‑changer? This next part? Pure magic. Stay with me here — this is worth it.
What Makes This Version Stand Out
- Flavor Explosion: The blend of chili powder, cumin, and fresh garlic creates a depth that feels like a fiesta in your mouth, while the cheese adds a creamy counterpoint that keeps the palate dancing.
- Texture Contrast: A crispy tortilla shell meets a molten, cheesy interior, delivering that satisfying snap followed by a melt‑in‑your‑mouth sensation.
- Simplicity: Only ten core ingredients, all pantry‑friendly, mean you can throw this together on a weeknight without a trip to the specialty store.
- Unique Twist: I fold the tortillas in a “double‑wrap” technique that locks in the filling and prevents any dreaded leakage.
- Crowd Reaction: Served at a recent game night, these chimichangas disappeared faster than the pizza slices, proving they’re a guaranteed crowd‑pleaser.
- Ingredient Quality: Using freshly grated cheddar (or a sharp cheese blend) makes the cheese stretch like a dream, unlike pre‑shredded that can taste powdery.
- Cooking Method: Shallow frying in vegetable oil gives you that restaurant‑level crisp without the mess of deep fryers.
- Make‑Ahead Potential: You can prep the filling and even pre‑assemble the chimichangas, then freeze them for a quick fry‑up later in the week.
Inside the Ingredient List
The Flavor Base
Ground beef is the heart of this dish. I use a lean‑to‑fat ratio of about 80/20 so the meat stays juicy without excess grease. If you skip the beef, you’ll lose that rich, umami backbone, and the chimichanga will feel flat. A good swap is ground turkey or even finely chopped mushrooms for a vegetarian spin, but remember to add a splash of soy sauce to mimic the beefy depth.
Onions, diced finely, bring a natural sweetness that balances the heat from the chili powder. When sautéed just until translucent, they release sugars that caramelize lightly, adding a subtle undertone. If you don’t have a yellow onion, a white onion works just as well, though the flavor will be a tad sharper.
Garlic, minced, is the aromatic glue that ties everything together. Its pungent bite mellows quickly in the pan, leaving behind a fragrant, almost buttery note. If you’re allergic or simply don’t love garlic, try a pinch of garlic powder; you’ll still get that familiar warmth.
The Texture Crew
Shredded cheese (cheddar or a blend) is the molten core that makes each bite a gooey delight. Choose a cheese that melts well; pre‑shredded cheese often contains anti‑caking agents that can affect melt‑ability, so I recommend shredding a block yourself for the best texture. If you’re feeling adventurous, add a sprinkle of pepper jack for a subtle kick.
Flour tortillas are the vessel that holds everything together. I opt for large, 10‑inch tortillas because they provide enough surface area to encase the filling without tearing. Warm them slightly before filling; this makes them pliable and reduces the risk of cracks during frying.
Vegetable oil is the frying medium that delivers that golden crust. I prefer a neutral oil with a high smoke point, such as canola or grapeseed, because it won’t compete with the spices. Using too little oil results in uneven browning, while too much turns the chimichanga soggy.
The Unexpected Star
A pinch of cumin might seem modest, but it adds an earthy, smoky whisper that elevates the overall flavor profile. It’s the secret that makes the filling feel layered rather than one‑dimensional. If you love smoky flavors, a dash of smoked paprika can be a thrilling addition.
Salt and pepper to taste are the final seasoning touches. They enhance every other ingredient, pulling the flavors forward. Don’t be shy—taste the mixture before you fold it into the tortillas and adjust as needed.
The Final Flourish
Guacamole, salsa, and sour cream are the trio of accompaniments that turn a good chimichanga into a legendary one. The cool creaminess of guacamole balances the heat, the bright acidity of salsa cuts through the richness, and the tangy sour cream adds a luxurious mouthfeel. Feel free to serve them on the side or drizzle them over the top for extra flair.
Everything's prepped? Good. Let's get into the real action...
The Method — Step by Step
Heat a large skillet over medium‑high heat and add a splash of vegetable oil—just enough to coat the bottom. Once the oil shimmers, crumble the 1 lb of ground beef into the pan. Let it sizzle; that sizzle when it hits the pan? Absolute perfection. Break it up with a wooden spoon, allowing the meat to brown evenly, which should take about 5‑6 minutes. When the beef is nicely browned, drain any excess fat, but leave a thin sheen of oil for flavor.
Kitchen Hack: Before adding the onion, sprinkle a pinch of salt over it. The salt draws out moisture, speeding up the softening process and intensifying the sweet flavor. Toss the diced onion into the beef, stirring until it becomes translucent and fragrant, roughly 3 minutes. Then add the minced garlic, cooking just until you smell that unmistakable aroma—about 30 seconds, no more.
Now, stir in 1 tsp chili powder and ½ tsp cumin, letting the spices toast lightly in the meat mixture. This step is crucial; it releases the essential oils in the spices, turning the mixture from flat to fireworks. Season with salt and pepper to taste, remembering that you’ll be adding cheese later, which also carries a bit of salt.
Reduce the heat to low and fold in 1 cup shredded cheese, letting it melt into the meat like a velvety river. Stir gently so the cheese doesn’t clump; you want a smooth, cohesive filling that holds together when you spoon it onto the tortillas. Once the cheese is fully incorporated, remove the skillet from the heat and let the mixture cool just enough to handle—about 2‑3 minutes.
- Watch Out: If the filling is too hot, the tortillas will start to soften and tear. Let it rest briefly; a cool filling ensures a tight seal and prevents leaks during frying.
Lay out a flour tortilla on a clean surface. Spoon a generous mound (about ¼ cup) of the beef‑cheese mixture onto the center, then fold the sides in and roll tightly, like a burrito. For extra security, double‑wrap: place a second tortilla over the first, aligning the edges, and roll again. Press the seam gently with your fingertips to seal; the flour coating will help it stick during frying.
Heat a deep skillet or Dutch oven with about ½ inch of vegetable oil to 350°F (175°C). Use a thermometer—if the oil isn’t hot enough, the chimichanga will absorb oil and become greasy; too hot and it will burn before the interior heats through.
Carefully place one chimichanga into the oil, seam side down. Fry for 2‑3 minutes per side, watching for that deep golden‑brown hue that signals crisp perfection. The edges should start pulling away from the pan, a visual cue that the seal is holding. Using tongs, flip gently to avoid tearing.
Once fried, transfer the chimichanga to a paper‑towel‑lined plate to drain excess oil. Let it rest for a minute—this allows the interior to settle and the cheese to firm just enough for slicing.
Serve immediately with generous dollops of guacamole, salsa, and sour cream. The contrast of hot, crunchy chimichanga with cool, creamy toppings creates a symphony of textures that will have everyone reaching for seconds. And now the fun part: watch your guests devour them with the kind of enthusiasm usually reserved for dessert.
That's it — you did it. But hold on, I've got a few more tricks that'll take this to another level...
Insider Tricks for Flawless Results
The Temperature Rule Nobody Follows
Most home cooks set the oil to “medium” and hope for the best, but the secret is a steady 350°F. Use a deep‑fat thermometer and adjust the heat as you add each chimichanga; the temperature drops a few degrees each time you submerge a piece. Maintaining that exact heat ensures a uniform crust without greasy pockets. A friend once tried to fry at “high” heat and ended up with burnt shells and raw centers—never again.
Why Your Nose Knows Best
Your sense of smell is a far better indicator than a timer when the filling is ready. When the beef mixture releases a deep, roasted aroma and the cheese becomes glossy, you’re at the perfect point to stop cooking. Trusting your nose prevents over‑cooking, which can make the beef dry and the cheese grainy.
The 5‑Minute Rest That Changes Everything
After frying, let the chimichangas rest for exactly five minutes on a wire rack. This short pause lets the steam redistribute, keeping the interior moist while the crust stays crisp. Skipping this rest leads to a soggy bottom, especially if you’re serving them with saucy toppings.
Double‑Wrap Seal
The double‑wrap technique isn’t just for show; it creates a barrier that locks in juices and prevents the filling from escaping. If you’re short on tortillas, you can use a single wrap but brush the seam with a thin layer of beaten egg before sealing; the protein acts as a natural glue.
Seasoning the Oil
Add a pinch of smoked paprika or a dash of chili flakes to the oil just before frying. The oil picks up these flavors and imparts a subtle smokiness to the exterior, giving you an extra layer of complexity without any extra work.
Creative Twists and Variations
This recipe is a playground. Here are some of my favorite ways to switch things up:
Spicy Chipotle Blast
Swap the regular chili powder for chipotle powder and add a tablespoon of adobo sauce to the filling. The result is a smoky heat that lingers pleasantly on the tongue. Chipotle lovers will thank you for the depth.
Southwest Veggie Delight
Replace the beef with a mix of black beans, corn, and diced bell peppers. Add a sprinkle of cotija cheese for a salty punch. This variation keeps the crunch but offers a lighter, plant‑based profile perfect for vegans (just swap the cheese for a dairy‑free melt).
Cheesy Jalapeño Pop
Dice two fresh jalapeños and fold them into the filling along with an extra half‑cup of pepper jack cheese. The jalapeños add a bright, fresh heat that cuts through the richness, making each bite exciting.
Breakfast Chimichanga
Add scrambled eggs and crumbled breakfast sausage to the meat mixture, then top with a drizzle of maple‑sriracha sauce after frying. It’s a brunch‑worthy twist that turns the dish into a hearty morning treat.
Sweet‑And‑Savory Mango
Stir in a handful of diced ripe mango and a splash of lime juice into the filling. The sweet mango balances the spice, while the lime adds a zingy freshness. This version shines at summer barbecues.
Storing and Bringing It Back to Life
Fridge Storage
Place cooled chimichangas in an airtight container lined with a paper towel to absorb excess moisture. They’ll stay fresh for up to three days. Reheat in a skillet over medium heat for 3‑4 minutes per side, adding a splash of water to the pan and covering briefly to steam the interior back to meltiness.
Freezer Friendly
Wrap each chimichanga tightly in plastic wrap, then place them in a zip‑top freezer bag. They freeze solid for up to two months. When ready, bake directly from frozen at 375°F for 15‑18 minutes, flipping halfway, until the crust is golden and the interior is piping hot.
Best Reheating Method
For ultimate crispness, use a preheated oven at 400°F for 8‑10 minutes. Before popping them in, spritz the tops with a light mist of water; this creates steam that revitalizes the interior while the oven’s dry heat restores the crunch. Avoid microwaving—while convenient, it makes the tortilla soggy.