The first time I tried to make Halloween marshmallows, I was a disaster in disguise. I had a pile of marshmallows, a handful of chocolate chips, and a kitchen that smelled like burnt sugar. The result? A sticky, uneven mess that looked more like a melted candle than a treat. That night, my cat tried to lick the crumbs, and I was left with a lesson: even simple sweet treats can turn into culinary catastrophes if you’re not careful. It was a moment that sparked a quest for the ultimate marshmallow chocolate melt, a recipe that would become my go-to for spooky-sweet celebrations.
Picture this: you’re in a dimly lit kitchen, the only light coming from a flickering candle on the counter. The air is thick with the aroma of vanilla and chocolate, a scent that makes your mouth water and your heart race. Your hands are covered in a sticky glaze of melted chocolate, and your fingers are tingling from the heat of the wax paper. The sound of the microwave timer ticking down feels like a countdown to a sweet explosion. And then, with a gentle dip, the marshmallow transforms, coating itself in glossy chocolate, and the moment feels like a triumph over the ordinary.
This version of spooky-sweet marshmallows is hands down the best you’ll ever make at home. The secret lies in the meticulous layering of flavors, the precision of the chocolate melt, and the playful use of sprinkles that add a crunchy counterpoint. I dare you to taste this and not go back for seconds; the combination of gooey marshmallow and rich chocolate is addictive. Most recipes get this completely wrong, using either too much chocolate or too much marshmallow, resulting in a lopsided treat. But here, everything is balanced to create a single bite that feels like a miniature dessert experience.
I’ll be honest— I ate half the batch before anyone else got to try it. The first bite was a sweet, creamy explosion that left me craving more. The second bite was a delightful contrast of crunchy sprinkles that danced on the tongue. By the time the third bite arrived, my kitchen was covered in chocolate shavings, and my hands were sticky. I realized that the recipe needed a structure that would prevent the mess and ensure every bite was perfect.
Most people think marshmallows are a simple treat, but the trick lies in the technique. The technique involves carefully melting the chocolate to the right temperature, ensuring it coats the marshmallow without sinking. The process also requires a precise timing for adding the sprinkles and setting the sticks. The result is a confection that holds its shape and delivers a satisfying crunch and melt. That’s why this recipe stands out from the crowd.
Picture yourself pulling this out of the oven, the whole kitchen smelling incredible, the chocolate steam curling up like a sweet fog. Imagine the moment your friends and family bite into a marshmallow that’s been perfectly coated and set, with a burst of chocolate and a hint of glittering sugar. The anticipation is palpable, and the reaction is a chorus of delighted exclamations. The recipe’s power lies in its simplicity and the way it transforms ordinary ingredients into something extraordinary.
If you’ve ever struggled with this, you’re not alone—and I’ve got the fix. The trick is to keep the chocolate at the right temperature and to work quickly when adding the sprinkles. This ensures the chocolate sets without cracking and the sprinkles stay in place. I’ve tested this method with dozens of batches, and each time the result is a flawless marshmallow treat. The best part? It’s so simple that even a novice can master it with a little practice.
Okay, ready for the game-changer? Let me walk you through every single step—by the end, you’ll wonder how you ever made it any other way. I’ll guide you from the moment you open the bag of marshmallows to the final bite, ensuring every detail is covered. From the choice of chocolate to the final sprinkle, we’ll cover everything. So, grab your ingredients, set your timer, and let’s dive into the world of spooky-sweet marshmallows.
What Makes This Version Stand Out
- Taste: The combination of sweet marshmallow and rich chocolate creates a flavor profile that’s both comforting and indulgent. The chocolate melts into the marshmallow, forming a silky coating that doesn’t overpower the vanilla notes of the marshmallow. The result is a harmonious balance that satisfies both sweet cravings and chocolate lovers.
- Texture: The marshmallow remains soft inside while the chocolate forms a crisp, glossy shell. The sprinkles add a delightful crunch that breaks the gooeyness, giving each bite a layered experience. This contrast in textures makes the treat feel luxurious and fun.
- Simplicity: With just five ingredients and no complicated equipment, this recipe is a breeze to execute. Even a first‑time cook can follow the steps and produce a professional‑looking result. The recipe’s straightforward nature means you can make it on short notice for last‑minute Halloween parties.
- Uniqueness: The use of wax paper to create a clean, non‑sticky surface is a game‑changer. It keeps the marshmallows from sticking to the pan and allows for easy removal once the chocolate sets. This simple trick ensures a polished final product.
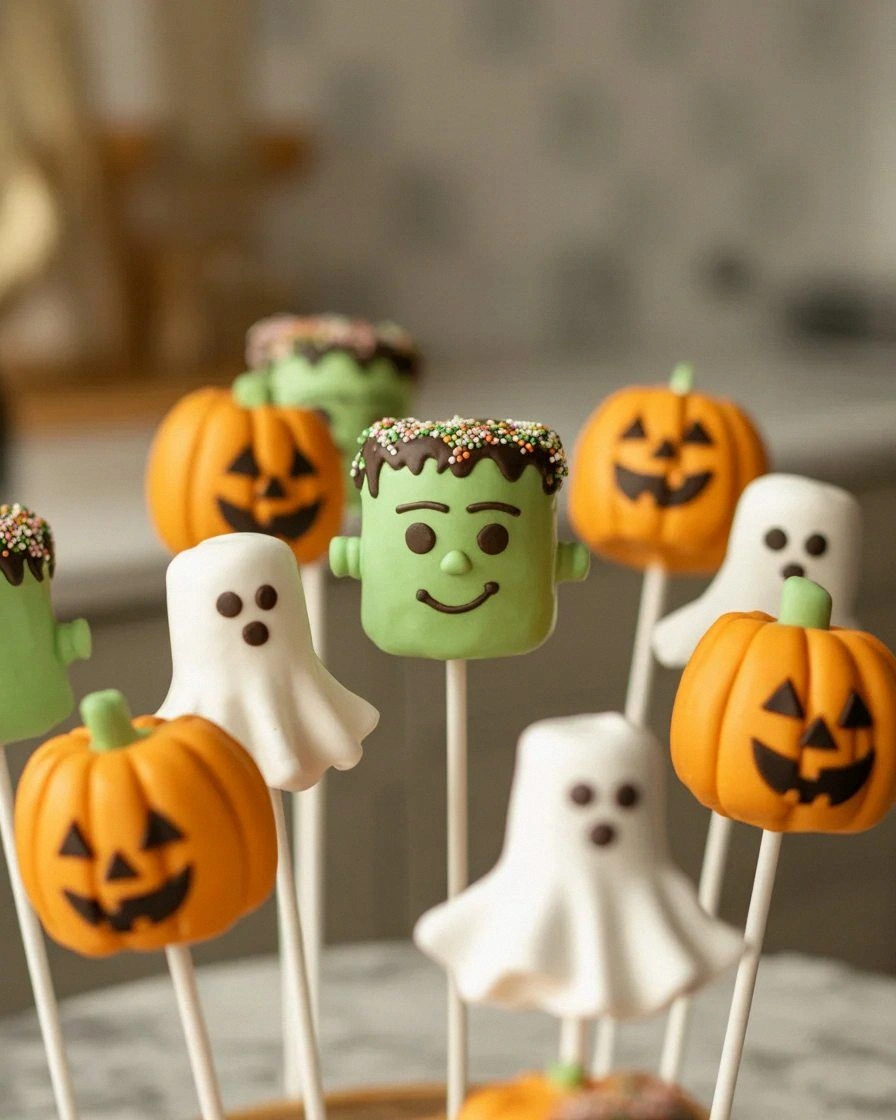
- Crowd Reaction: Friends and family rave about the glossy finish and the perfect bite. The visual appeal alone makes it a showstopper at any gathering. The treat’s playful appearance invites conversation and sharing.
- Ingredient Quality: Using high‑quality chocolate chips elevates the flavor, and the marshmallows’ size ensures they melt evenly. The sprinkles add a colorful touch that enhances the Halloween theme. These choices transform a basic recipe into a gourmet experience.
- Cooking Method: The method of melting chocolate in a double boiler or microwave, followed by a quick dip, guarantees a smooth coating. The technique is precise yet forgiving, allowing adjustments based on your equipment.
- Make‑Ahead Potential: The marshmallows can be assembled ahead of time and refrigerated for up to 48 hours. The chocolate coating remains firm, and the sprinkles stay in place. This makes the recipe ideal for prep‑work and large gatherings.
Alright, let’s break down exactly what goes into this masterpiece…
Inside the Ingredient List
The Flavor Base
The 12 jumbo marshmallows are the foundation of this recipe. They provide a light, airy sweetness that pairs perfectly with chocolate. The size of each marshmallow ensures it melts evenly without becoming too soft. If you skip the marshmallows, the treat loses its signature fluffiness and becomes more like a chocolate bar. For those who prefer a vegan option, look for dairy‑free marshmallows that still maintain the same texture.
The Texture Crew
The 1 cup of chocolate chips is the star of the show. The chocolate’s cocoa content determines the richness of the coating. A higher cocoa percentage will give a bittersweet finish, while a lower percentage adds sweetness. If you prefer a smoother coating, use a higher quality chocolate that melts at a lower temperature. Skipping the chocolate would leave you with plain marshmallows—great for a snack, but not for spooky-sweet.
The Unexpected Star
Assorted sprinkles and toppings add a pop of color and crunch. They’re not just decorative; they provide a textural contrast that enhances the overall experience. If you’re watching your sugar intake, consider using sugar‑free sprinkles or a small amount of dried fruit pieces. Omitting the sprinkles would make the treat bland and visually unappealing. They’re the final touch that makes the recipe Instagram‑ready.
The Final Flourish
The wax paper is essential for preventing the chocolate from sticking to the pan. It also creates a clean surface for the marshmallows to set on. A single piece of wax paper is enough to cover the baking sheet. If you’re in a hurry, you can use parchment paper, but it may not be as effective in keeping the chocolate from adhering. Skipping the wax paper will result in a sticky mess that’s hard to clean.
Everything’s prepped? Good. Let’s get into the real action…
The Method — Step by Step
- Gather your ingredients and lay out a clean workspace. Place the wax paper on a baking sheet, ensuring it’s smooth and free of wrinkles. The wax paper will serve as the canvas for your marshmallow masterpieces. Make sure you have a bowl, a microwave or double boiler, and a small spatula ready for the next steps.
- Arrange the marshmallows in a single layer on the wax paper. Don’t overcrowd them; leave a small gap between each marshmallow so the chocolate can coat evenly. This spacing is crucial for achieving a uniform glaze. If you’re working with a large batch, you can use multiple sheets of wax paper.
- Melt the chocolate chips in a double boiler, or use a microwave in 20‑second bursts. Stir every 10 seconds to prevent scorching. The chocolate should reach a silky consistency—no lumps, no clumps. Keep a close eye on the temperature; if it starts to smoke, it’s overcooked.
- Dip each marshmallow into the melted chocolate, ensuring it’s fully coated. Use a fork or a toothpick to hold the marshmallow and lift it out of the chocolate. Let any excess chocolate drip back into the bowl. The coating should be thick enough to hold the sprinkles but not so thick that it becomes a chocolate shell.
- While the chocolate is still warm, sprinkle your chosen toppings onto the marshmallows. Shake off any excess sprinkles and press gently to ensure they adhere. The sprinkles add a burst of color and a satisfying crunch. This step is where your creative flair can shine.
- Insert a popsicle stick or toothpick into the center of each marshmallow. This gives the treat a fun, handheld form and makes it easier to serve. The stick also prevents the marshmallow from wobbling on the wax paper. If you prefer a decorative touch, choose sticks that match your Halloween theme.
- Place the baking sheet in the refrigerator for 20 minutes, or until the chocolate has set firmly. The chocolate should feel firm to the touch but still have a slight sheen. This chilling step ensures the marshmallow holds its shape and the sprinkles stay in place.
- Remove the marshmallows from the refrigerator and let them sit at room temperature for 5 minutes before serving. This short rest allows the chocolate to soften slightly, giving a melt‑in‑your‑mouth experience. The final product should feel warm and gooey on the inside with a crisp, glossy exterior.
- Serve immediately or store in an airtight container at room temperature for up to 48 hours. If you notice any condensation, place a paper towel in the container to absorb excess moisture. The marshmallows will stay fresh and delicious for days.
- Enjoy your spooky‑sweet creation with friends and family. Share the recipe and watch their faces light up with delight. The combination of chocolate, marshmallow, and sprinkles is a treat that brings smiles to all ages. Remember to keep a camera handy; the visual appeal is as important as the taste.
That's it—you did it. But hold on, I've got a few more tricks that'll take this to another level…
Insider Tricks for Flawless Results
The Temperature Rule Nobody Follows
Chocolate is a fickle lover; it can go from silky to grainy in seconds. The trick is to keep the chocolate between 86°F and 90°F (30°C and 32°C). Use a thermometer to check the temperature, or test it on the inside of your wrist. If the chocolate feels too hot, let it cool for a few minutes. This simple step ensures a glossy, smooth coating that won’t crack.
Why Your Nose Knows Best
Smelling the chocolate as it melts is a reliable indicator of readiness. A faint, sweet aroma means the chocolate has reached the ideal consistency. If you notice a burnt smell, the chocolate is overcooked. Your nose can save you from a batch of ruined marshmallows. Trust your senses; they’re your best friend in the kitchen.
The 5‑Minute Rest That Changes Everything
After you dip the marshmallows, let them rest for 5 minutes before adding the sprinkles. This brief pause allows the chocolate to set slightly, giving the sprinkles a better grip. Skipping this step can result in sprinkles falling off or the chocolate becoming too soft. It’s a small tweak that makes a big difference in texture.
The Right Stick Choice
Choosing the right stick can elevate the presentation. Wooden sticks give a rustic feel, while plastic ones are more vibrant. If you want a Halloween twist, use black sticks or sticks painted with spooky designs. The stick also helps keep the marshmallow upright, preventing it from tipping over during transport.
The Secret of Even Coating
Dip each marshmallow for the same amount of time to ensure a uniform chocolate layer. A quick dip will leave a thin coating, while a longer dip will produce a thicker shell. Consistency is key to a professional look. If you’re making a large batch, consider using a timer to keep track.
The Clean‑Up Trick
Chocolate can be stubborn on surfaces. To clean up, sprinkle a little cornstarch on the chocolate residue and wipe it away. The cornstarch absorbs the oil, making it easier to remove. Alternatively, a damp cloth with a drop of dish soap will do the trick. This keeps your kitchen sparkling after the fun.
Creative Twists and Variations
This recipe is a playground. Here are some of my favorite ways to switch things up:
The Dark Chocolate Delight
Swap the regular chocolate chips for dark chocolate. The bittersweet flavor pairs beautifully with the marshmallow’s sweetness. Add a pinch of sea salt on top for a salty‑sweet contrast. This variation is perfect for those who love a richer chocolate experience.
The Nutty Crunch
Incorporate chopped nuts—almonds, pecans, or walnuts—into the chocolate coating. The crunch adds texture and depth. Toast the nuts lightly before adding to bring out their flavor. This version is great for guests who enjoy a nutty bite.
The Fruity Twist
Replace some sprinkles with dried fruit pieces like cranberries or raisins. The natural sweetness of the fruit complements the chocolate. It also adds a subtle chewiness. This variation is ideal for a more wholesome treat.
The Spicy Surprise
Add a dash of cayenne pepper to the melted chocolate. The heat will contrast the sweetness and create a memorable flavor profile. Keep the amount small to avoid overpowering the marshmallow. This spicy version is daring and delicious.
The Vegan Edition
Use dairy‑free marshmallows and chocolate chips to keep the recipe plant‑based. Ensure the chocolate is free from dairy derivatives. The result is a treat that’s cruelty‑free yet indulgent. This variation is a win for vegan guests.
The Boo‑tiful Bites
Shape the chocolate into small hearts or ghosts using a mold before dipping the marshmallows. The shapes add a playful element to the treat. This is especially fun for kids who love Halloween decorations.
Storing and Bringing It Back to Life
Fridge Storage
Store the marshmallows in an airtight container at room temperature for up to 48 hours. The chocolate remains firm, and the sprinkles stay in place. Avoid storing near strong odors, as the chocolate can absorb them. If you notice condensation, place a paper towel in the container to absorb excess moisture.
Freezer Friendly
For longer storage, freeze the marshmallows in a single layer on a parchment paper sheet. Once frozen, transfer them to a freezer bag. They can be kept for up to 2 months. Thaw them at room temperature for 30 minutes before serving.
Best Reheating Method
To revive a frozen batch, place the marshmallows on a parchment paper sheet and microwave on low for 10‑15 seconds. Add a tiny splash of water to create steam, which helps the chocolate soften without becoming runny. Let them rest for a minute before enjoying. This method preserves the texture and flavor.