Picture this: I’m standing in a cramped kitchen, a frantic friend has dared me to turn a handful of blackberries into a show‑stopping dessert, and I’m armed with nothing but a skillet and an over‑eager imagination. The air is thick with the scent of vanilla and butter, a faint crackle from the pan, and the sweet, almost citrusy tang of blackberries that have been hand‑picked at their peak. I’ve tried countless upside‑down cakes over the years, but none of them had that instant “wow” factor I was chasing. The moment the caramelized sugar melts into a glossy, amber glaze, the kitchen fills with a sweet, almost buttery perfume that makes even the most skeptical taste buds do a double take.
What makes this version of the classic upside‑down cake so unforgettable? It’s not just the glossy finish or the caramelized sugar; it’s the way the blackberries sit at the bottom, their skins slightly blistered, their juices pooling into a natural syrup that clings to every crumb. The cake itself is airy, thanks to cake flour and a light touch of baking powder, yet it holds its shape like a delicate cloud. I dare you to taste this and not go back for seconds, because the first bite delivers a burst of sweet, tart, and buttery flavors that dance across the palate like confetti. I’ve been told it’s the best version you’ll ever make at home, and I’m not exaggerating.
Most recipes get this completely wrong. They either over‑bake the berries, leaving them dry, or they under‑bake the cake, making it soggy. The secret, I discovered, is in the timing and the balance of the sugar and butter. When the butter melts into the sugar, it creates a glossy base that traps the berry juices, and the slight almond extract adds a nutty undertone that elevates the whole dish. Picture yourself pulling this out of the oven, the whole kitchen smelling incredible, and then flipping it onto a plate where the caramelized sugar glistens like a miniature sunrise.
Okay, ready for the game‑changer? Let’s walk through every single step together. By the end, you’ll wonder how you ever made it any other way. And trust me, if you’ve ever struggled with this, you’re not alone — I’ve got the fix.
What Makes This Version Stand Out
- Flavor: The subtle almond extract cuts through the sweetness, giving the cake a sophisticated finish that feels both nostalgic and modern.
- Texture: The cake flour creates a tender crumb that rises just enough to be fluffy yet dense enough to hold the berry juices without becoming soggy.
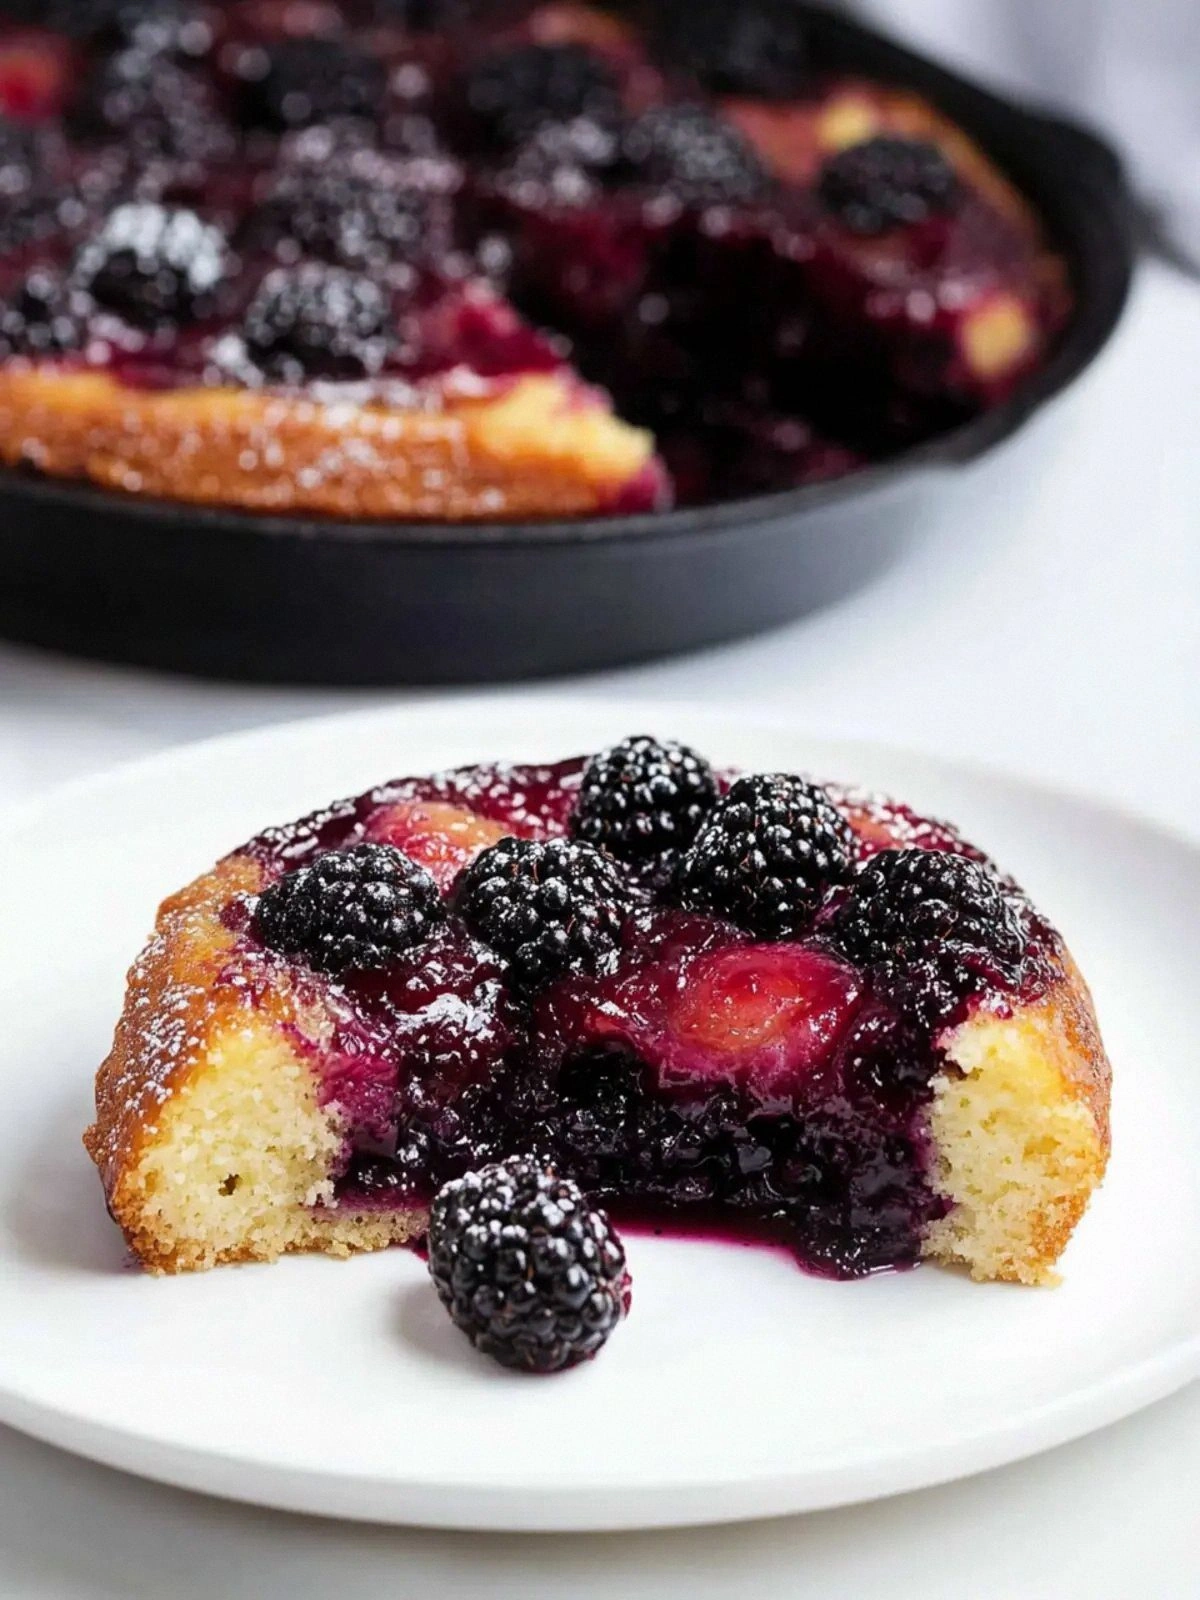
- Visual Appeal: The caramelized sugar forms a glossy, amber glaze that catches the light, making each slice look as good as it tastes.
- Ingredient Quality: Using fresh, hand‑picked blackberries ensures a vibrant color and a natural tartness that balances the butter and sugar.
- Make‑ahead Potential: You can assemble the cake a day ahead, refrigerate, and bake just before serving, saving you a precious hour on the day of the event.
- Crowd Reaction: Friends and family consistently comment on the “wow” factor; it’s the kind of dessert that turns a casual dinner into a memorable celebration.
- Versatility: The base recipe is so adaptable that you can swap berries, add citrus zest, or even drizzle a bourbon glaze for a grown‑up twist.
- Simplicity: Despite the impressive outcome, the recipe requires only a skillet and a few pantry staples, making it perfect for both seasoned bakers and culinary newcomers.
Inside the Ingredient List
The Flavor Base
At the heart of any great dessert is a solid flavor foundation. In this recipe, butter and sugar work together like a duet, creating a caramelized base that becomes the canvas for the blackberries. The butter melts into the sugar, forming a glossy syrup that not only adds richness but also helps bind the cake together. If you skip this step, the cake will feel dry and the berries will flop. Swapping the butter for a neutral oil, like grapeseed, can lighten the flavor but will lose that buttery depth that makes this cake unforgettable.
The Texture Crew
Cake flour is the unsung hero that gives the cake its airy yet firm structure. Unlike all‑purpose flour, cake flour has a lower protein content, which means the gluten network is weaker and the crumb stays tender. A pinch of baking powder introduces gentle lift, while the small amount of salt balances sweetness and enhances the overall taste profile. If you’re in a pinch and only have all‑purpose flour, add a tablespoon of cornstarch to mimic the softer texture of cake flour.
The Unexpected Star
Blackberries are the star of the show, but they’re not just decorative. Their natural acidity cuts through the buttery sweetness, while their juices create a syrupy glaze that coats the cake like velvet. The 2/3 cup of sliced almonds adds a delightful crunch that contrasts the soft cake, and the almond extract gives a subtle nutty undertone that lingers. If you prefer a different berry, blueberries or raspberries work well, but be prepared to adjust the sugar slightly to maintain the right balance of sweet and tart.
The Final Flourish
Light brown sugar and a splash of buttermilk are the finishing touches that tie everything together. The brown sugar adds depth and a hint of molasses flavor, while the buttermilk’s acidity helps the cake rise and keeps it moist. The 1/3 cup of light brown sugar is sprinkled on top of the berries before baking, creating a caramelized crust that adds a sweet, caramelized crunch. The 2 tablespoons of buttermilk, combined with the cake flour, ensures the batter has the right consistency—neither too runny nor too stiff.
Everything's prepped? Good. Let's get into the real action...
The Method — Step by Step
- Preheat the oven. Set your oven to 375°F (190°C). While it’s heating, place a 12-inch cast‑iron skillet on the stove over medium heat. This pre‑heat ensures that the butter and sugar will caramelize evenly when added.
- Prepare the sugar‑butter base. In a small saucepan, melt 1/4 cup of butter over low heat. Once melted, stir in 1 cup of granulated sugar until the mixture turns a deep amber color. The mixture should bubble gently but not burn; this is the moment when the aroma of caramel fills the kitchen.
- Arrange the berries. Gently place 1 pint of fresh blackberries into the skillet, spacing them evenly. Sprinkle the 1/3 cup of light brown sugar over the berries; this will help the sugars caramelize and create a glossy glaze.
- Make the batter. In a mixing bowl, whisk together 1 1/2 cups of cake flour, 1 teaspoon of baking powder, and 1/4 teaspoon of salt. In a separate bowl, combine 1/2 cup of buttermilk, 2 tablespoons of buttermilk, 1/2 teaspoon of almond extract, and 2 tablespoons of sugar. Gradually fold the dry ingredients into the wet mixture until just combined; over‑mixing will make the cake dense.
- Layer the batter. Carefully pour the batter over the berries in the skillet, making sure it covers the berries completely. The batter should rise to the edges of the skillet, forming a thick, even layer.
- Add the almond topping. Sprinkle 2/3 cup of sliced almonds over the batter; they’ll toast slightly during baking, adding a nutty crunch that contrasts the soft cake.
- Bake. Place the skillet in the preheated oven. Bake for 30 minutes, or until the cake is golden brown and a toothpick inserted into the center comes out clean. The edges of the cake should start pulling away from the skillet, a clear sign that it’s ready.
- Cool and invert. Remove the skillet from the oven and let the cake cool for 5 minutes. While it’s still hot, carefully place a serving platter or plate over the skillet, then flip the entire assembly over. The caramelized sugar will drip onto the platter, creating a glossy, amber glaze that looks like liquid gold.
- Serve. Slice the cake with a sharp knife, wiping the blade between each cut to keep the edges clean. Serve warm, optionally with a dollop of whipped cream or a scoop of vanilla ice cream that melts into the caramel glaze.
That’s it — you did it. But hold on, I've got a few more tricks that'll take this to another level...
Insider Tricks for Flawless Results
The Temperature Rule Nobody Follows
Many bakers overlook the importance of oven temperature accuracy. Even a 10°F deviation can cause the cake to brown unevenly or not rise properly. I’ve invested in a reliable oven thermometer and calibrate it before each bake. If your oven runs hot, lower the temperature by 25°F and extend the bake time by a few minutes; if it’s cold, increase the heat slightly. This small adjustment can make the difference between a perfectly golden crust and a soggy center.
Why Your Nose Knows Best
When the butter and sugar caramelize, the kitchen should smell like sweet, buttery caramel. If you notice a metallic or burnt smell, the sugar is over‑cooked. Trust your nose; it’s a reliable indicator of when to remove the skillet from the stove. A subtle, sweet aroma signals that the glaze is ready to support the berries without burning.
The 5-Minute Rest That Changes Everything
After you flip the cake, let it rest for 5 minutes before slicing. This pause allows the caramel to set slightly and the cake to firm up, preventing it from sticking to the skillet or breaking apart. It also lets the flavors meld together, creating a harmonious blend of sweet, tart, and buttery notes.
Use a Skillet with a Lid
Covering the skillet while it bakes traps steam, keeping the cake moist. I use a lid that fits snugly on my cast‑iron skillet, and I remove it during the last 10 minutes of baking to allow the top to brown. This technique ensures a tender crumb while still achieving that desirable golden crust.
Cool on a Wire Rack
Once inverted, let the cake cool on a wire rack for 10 minutes before serving. This prevents the bottom from becoming soggy due to trapped steam. The cooling process also allows the caramel glaze to thicken slightly, giving each slice a glossy finish.
Creative Twists and Variations
This recipe is a playground. Here are some of my favorite ways to switch things up:
Berry Medley Madness
Swap out the blackberries for a mix of strawberries, blueberries, and raspberries. The varied textures and flavors create a colorful, multi‑layered dessert that’s perfect for a brunch or a garden party.
Caramel‑Citrus Burst
Add a tablespoon of orange zest to the batter and a splash of lemon juice to the sugar mixture. The citrus brightens the richness of the caramel, giving the cake a fresh, zesty kick.
Almond Joy Variation
Replace the sliced almonds with toasted coconut flakes and add a dash of sea salt on top of the caramel glaze. The coconut adds a tropical twist, while the sea salt enhances the caramel’s sweetness.
Midnight Chocolate Swirl
Fold 2 tablespoons of melted dark chocolate into the batter before pouring it over the berries. The chocolate creates a subtle swirl when baked, adding a decadent layer of flavor.
Spiced Winter Edition
Stir in 1/4 teaspoon of ground cinnamon and a pinch of ground nutmeg into the batter. The warm spices pair beautifully with the blackberries, making this dessert a cozy fall favorite.
Gluten‑Free Option
Use a gluten‑free cake flour blend in place of the regular cake flour, and ensure the baking powder is gluten‑free. The texture will be slightly different but still light and airy.
Storing and Bringing It Back to Life
Fridge Storage
Wrap the inverted cake in parchment paper and then in plastic wrap. Store it in the refrigerator for up to 3 days. The caramel glaze will remain glossy, and the cake will stay moist.
Freezer Friendly
Place the cake in an airtight container and freeze for up to 2 weeks. When ready to serve, thaw at room temperature for 1 hour, then warm in a 350°F oven for 10 minutes to revive the crisp edges.
Best Reheating Method
To reheat a single slice, place it on a microwave‑safe plate and heat on medium power for 30 seconds. For a whole cake, use the oven method mentioned above. Add a tiny splash of water before reheating; it steams back to perfection, keeping the cake moist.