I was standing in my kitchen, staring at a half‑baked cake that smelled like disappointment, when my neighbor's kid shouted, “I want something that tastes like the campfire and a dessert at the same time!” That single sentence turned my culinary crisis into an obsession. I grabbed my trusty skillet, because why not? I started to experiment, layering gooey marshmallows, chocolate sauce, and a buttery pound cake base. The result? A golden‑brown slab that crackles like a campfire log when you cut into it. I dare you to taste this and not go back for seconds.
Picture the heat of a summer grill, the hiss of butter melting into the pan, and the sweet scent of toasted sugar drifting through the air. That aroma alone signals the beginning of something extraordinary. I could hear the crackle of the marshmallows as they melt into the batter, each bubble popping like tiny fireworks. The sound is music to a foodie’s ears, a promise of texture that will satisfy both the sweet tooth and the craving for a smoky bite. And the visual? A glossy, caramelized crust that invites you to slice with a fork that glides through the moist interior like a butter knife through butter.
What sets this grilled s'mores pound cake apart from every other recipe you’ve seen is the way it balances the classic campfire flavors with a refined baking technique. The batter is thick and dense, yet it rises just enough to create pockets of airy sweetness. The marshmallows aren’t just a topping; they’re an integral part of the crumb, melting into the cake and creating a velvety texture that feels like a warm hug. The chocolate sauce is drizzled in a way that coats the cake like velvet, providing a glossy finish that catches the light. And the cacao nibs add a subtle crunch that breaks the monotony of pure goo, giving a final pop of flavor. The combination of buttery cake, toasted marshmallows, chocolate drizzle, and cacao nib crunch creates a flavor profile that feels like a campfire sunrise and a dessert finale rolled into one.
I know you’re thinking, “Can I actually grill a pound cake?” Absolutely. The secret is using a cast‑iron skillet that distributes heat evenly and a low heat setting that allows the cake to bake through without burning the top. The technique is simple: preheat the skillet, pour the batter, add the marshmallows and chocolate, and cover with foil to trap steam. The result is a cake that feels like a toasted campfire log on the outside, but inside it’s soft, buttery, and bursting with sweet, chocolatey, marshmallowy goodness. Let me walk you through every single step — by the end, you’ll wonder how you ever made it any other way.
What Makes This Version Stand Out
- Taste: The combination of buttery cake, toasted marshmallows, chocolate drizzle, and cacao nib crunch creates a flavor profile that feels like a campfire sunrise and a dessert finale rolled into one. The sweet, caramelized edges contrast with the creamy interior, giving each bite a multi‑layered experience. The result is a symphony of sweet and smoky that lingers on the palate.
- Texture: The batter’s density yields a moist crumb that holds the marshmallows in place while still allowing them to melt into pockets of goo. The chocolate sauce coats the cake like a glossy glaze, adding a subtle snap when you bite through it. The cacao nibs provide a satisfying crunch that breaks the otherwise silky smoothness.
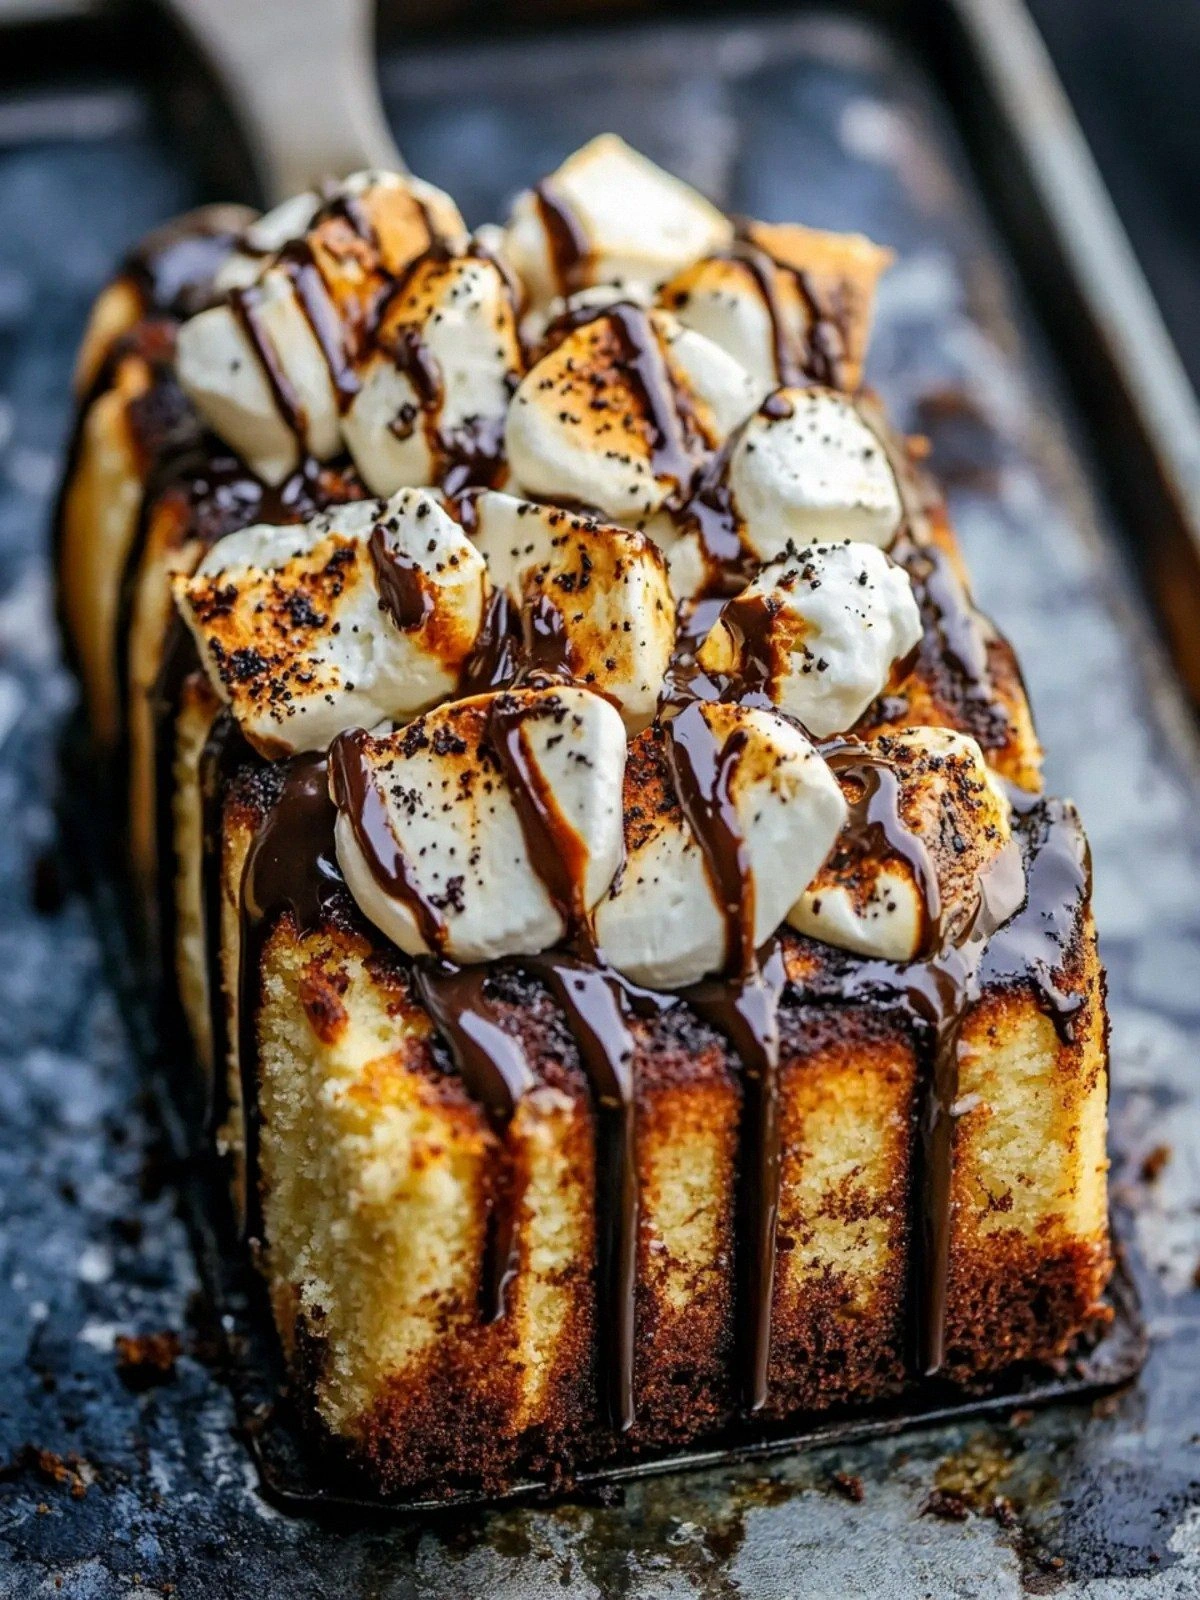
- Visual Appeal: The golden crust, speckled with melted chocolate and toasted marshmallows, looks like a campfire on a skillet. The glossy finish draws the eye, while the dark cacao nibs add a touch of elegance. When sliced, the interior reveals a light, airy crumb with visible chocolate streaks.
- Flavor Balance: The sweet notes of sugar and marshmallows are tempered by the slight bitterness of cacao nibs and the richness of chocolate sauce. The butter’s savory undertone keeps the sweetness from becoming cloying. The result is a perfectly balanced dessert that satisfies without overwhelming.
- Simplicity: No fancy equipment or obscure ingredients are required. All you need is a cast‑iron skillet, a few pantry staples, and a willingness to experiment. The method is straightforward enough for a novice, yet sophisticated enough for a seasoned chef.
- Uniqueness: Grilling a pound cake is unconventional, and adding marshmallows and chocolate sauce turns a classic into a showstopper. The method infuses the cake with a smoky depth that baked versions simply can’t match. It’s a conversation starter at any gathering.
- Crowd Reaction: Friends and family will gasp when they see the cake rise in the skillet, then marvel at the gooey center. The first bite will trigger a chorus of delighted exclamations. It’s a guaranteed hit at parties, BBQs, or any casual get‑together.
- Make‑Ahead Potential: The cake can be assembled ahead of time and refrigerated, allowing the flavors to meld. When ready to serve, a quick reheat in the skillet will bring back the fresh‑baked aroma. This convenience makes it ideal for busy hosts.
Alright, let's break down exactly what goes into this masterpiece…
Inside the Ingredient List
The Flavor Base
Butter, the cornerstone of any pound cake, brings a rich, silky mouthfeel that allows the sugar to dissolve smoothly. It also contributes to the caramelized crust that forms when heated in a skillet. If you skip butter, the cake will lack depth and will feel dry, especially after the marshmallows melt into the batter. For a slightly healthier twist, try substituting half butter with coconut oil; the coconut flavor will complement the chocolate sauce.
Sugar dissolves into the butter, creating a uniform batter that bakes evenly. It also caramelizes on the surface, giving that golden sheen that looks irresistible. Skipping sugar will make the cake bland and the marshmallows will not melt as uniformly. If you prefer a lower glycemic index, consider using a natural sweetener like maple syrup in a 1:1 ratio.
Eggs bind the batter, provide structure, and introduce a slight richness that balances the sweetness. They also help the cake rise, creating a tender crumb. Omitting eggs will result in a crumb that is too dense and may not hold the marshmallows properly. If you’re vegan, replace the eggs with flaxseed meal mixed with water (1 tbsp flaxseed + 3 tbsp water per egg) for a similar binding effect.
Milk adds moisture and helps dissolve the sugar and baking powder. It also contributes to a lighter texture. Cutting milk will make the batter too thick, leading to a dry cake. If you’re lactose intolerant, use almond milk or oat milk; the flavor profile will remain subtle.
Baking powder is the leavening agent that creates tiny air pockets, giving the cake a slight lift. Without it, the cake would be extremely dense and might not rise at all. If you only have baking soda, you’ll need an acid like yogurt or buttermilk to activate it.
The Texture Crew
All‑purpose flour provides structure and a slightly chewy texture that supports the marshmallows. It also absorbs the butter and milk, ensuring the batter stays cohesive. Skipping flour would turn the batter into a sticky mess that won’t hold together in the skillet. For a gluten‑free version, use a blend of rice flour, potato starch, and tapioca flour in a 1:1:1 ratio.
Cacao nibs add a subtle crunch and a hint of bitterness that cuts through the sweetness. They also introduce a nutty aroma that enhances the overall flavor profile. Removing cacao nibs will make the cake less complex; the chocolate sauce alone may become overpowering. If you want a smoother texture, reduce the nibs to a quarter cup.
The Unexpected Star
Marshmallows are the star of the show; they melt into the batter, creating pockets of goo that burst with sweetness when bitten. They also give the cake a signature campfire texture that is impossible to replicate with other ingredients. If you skip marshmallows, the cake will feel like a plain pound cake and will lose its unique character. For a more adventurous twist, try adding a handful of dried fruit like cranberries or raisins for a chewy surprise.
Chocolate sauce coats the cake like a glossy glaze, providing a rich, velvety finish. It also helps seal the surface, preventing the cake from drying out. Skipping the sauce will leave the cake bland; the marshmallows alone won’t provide enough sweetness. If you’re watching calories, use a sugar‑free chocolate sauce or a dark chocolate reduction.
Everything's prepped? Good. Let's get into the real action…
The Method — Step by Step
- Preheat a cast‑iron skillet over low heat for about ten minutes, then line it with parchment paper and lightly grease the paper with a thin layer of butter. The parchment ensures a clean release, while the butter keeps the surface from becoming too dry. This step is crucial for that perfect, non‑stick finish. When the skillet is hot, you’ll hear a faint hiss that signals it’s ready to receive the batter.
- In a large bowl, whisk together the softened butter, granulated sugar, and eggs until the mixture becomes pale and airy. The whisking action incorporates air, which is essential for a tender crumb. Keep whisking until the sugar is almost fully dissolved; this prevents grainy spots in the final product. The batter should feel smooth to the touch, like a rich custard.
- Fold in the all‑purpose flour, cacao nibs, and baking powder, mixing just until the dry ingredients are incorporated. Over‑mixing will develop gluten and make the cake tough. The batter should be thick enough to hold its shape on a spoon but still pourable. This is the stage where the texture starts to take shape.
- Pour the batter into the preheated skillet, spreading it evenly with a spatula. The batter should fill the skillet to the top edge, creating a uniform thickness. This ensures even cooking and a consistent crust. Don’t rush; let the batter settle for a minute before adding the toppings.
- Sprinkle the marshmallows over the batter, then drizzle the chocolate sauce in a lazy‑S pattern. The marshmallows will melt into the batter as the heat rises, creating a molten center. The chocolate sauce will pool in the gaps, forming a glossy, caramelized glaze. The visual effect is almost hypnotic.
- Cover the skillet with a tight‑fitting lid or foil to trap steam, and lower the heat to very low. This step is the trickiest because too much heat will burn the top, while too little will leave the cake undercooked. Watch the edges; they should start pulling away from the skillet after about 25 minutes. The cake is ready when a toothpick inserted into the center comes out clean.
- Remove the lid and let the cake bake for an additional 5 minutes, allowing the top to develop a golden crust. The final minutes should feel like a gentle simmer, not a boil. The aroma will intensify, signaling that the cake is nearing perfection. The edges will be slightly crisp, while the center remains silky.
- Transfer the skillet to a cutting board, let the cake rest for ten minutes, then slice with a serrated knife. Resting allows the steam to redistribute, preventing a soggy center. Slice into thick wedges to showcase the molten marshmallow pockets. Serve immediately, or drizzle with extra chocolate sauce for an extra indulgent touch.
That's it — you did it. But hold on, I've got a few more tricks that'll take this to another level…
Insider Tricks for Flawless Results
The Temperature Rule Nobody Follows
Many bakers think that higher heat equals faster baking, but with this skillet cake, low and slow is the name of the game. Maintaining a temperature between 250°F and 275°F ensures the batter cooks evenly while the marshmallows melt without burning. If your stove runs hot, keep a thermometer handy and adjust the flame accordingly. This trick guarantees a tender crumb and a caramelized crust.
Why Your Nose Knows Best
As the cake bakes, the aroma will change from buttery to caramelized to chocolatey. Trust your nose to gauge doneness; when the scent is rich and slightly smoky, the cake is nearly ready. If you’re still uncertain, insert a toothpick; it should come out clean but with a few moist crumbs clinging to it. The scent is a reliable indicator that the cake is at the perfect point of doneness.
The 5‑Minute Rest That Changes Everything
After you remove the cake from the skillet, let it rest for five minutes before slicing. This brief pause allows the steam to redistribute, preventing a soggy center and ensuring the edges stay crisp. During this time, the chocolate sauce will thicken slightly, creating a glossy sheen. The rest also lets the marshmallows set into a stable, gooey layer that won’t ooze out when you cut.
The Secret of the Foil
Covering the skillet with foil traps steam, which is essential for the cake to rise and remain moist. The foil also prevents the marshmallows from scorching on the surface. If you prefer a darker crust, remove the foil during the last five minutes of baking. The result is a beautifully caramelized top that still keeps the interior tender.
The Finish with a Light Brush of Butter
Right before you plate the cake, brush a thin layer of melted butter over the top. This simple step adds a glossy sheen and a subtle buttery aroma that elevates the entire dessert. The butter also helps the chocolate sauce cling, creating a richer flavor profile. Don’t overdo it; a light dusting is all you need.
Creative Twists and Variations
This recipe is a playground. Here are some of my favorite ways to switch things up:
Salted Caramel Swirl
Swirl a generous amount of salted caramel sauce into the batter before adding the marshmallows. The caramel adds a buttery sweetness that complements the chocolate. The result is a cake that feels like a caramel‑laden campfire treat.
Peanut Butter Crunch
Fold in a half cup of creamy peanut butter into the batter for a nutty depth. Top with chopped roasted peanuts before adding marshmallows. The crunch and peanut flavor make this version a crowd‑pleaser for peanut lovers.
Lemon Zest
Add the zest of one lemon to the batter for a bright, citrusy contrast. The lemon balances the sweetness and gives the cake a fresh finish. Pair it with a drizzle of lemon‑infused chocolate sauce for extra zing.
Berry Compote
Serve the cake with a warm berry compote made from fresh blueberries, strawberries, and a splash of balsamic vinegar. The tartness cuts through the richness, creating a harmonious flavor profile. The compote also adds a splash of color to your plate.
Espresso Infusion
Stir a tablespoon of instant espresso powder into the batter for a subtle coffee undertone. The espresso enhances the chocolate flavor and adds depth. The result is a cake that tastes like a mocha‑flavored campfire dessert.
Vegan Edition
Replace the butter with coconut oil, use flaxseed eggs, and swap the dairy milk for oat milk. Use plant‑based marshmallows and a sugar‑free chocolate sauce. The vegan version retains the same gooey, smoky character while being fully plant‑based.
Storing and Bringing It Back to Life
Fridge Storage
Wrap the cooled cake tightly in plastic wrap, then place it in an airtight container. Store in the refrigerator for up to five days. When you’re ready to serve, let it sit at room temperature for 30 minutes to soften the crust.
Freezer Friendly
Slice the cake into individual portions and wrap each slice in parchment paper, then place them in a freezer bag. Freeze for up to three months. Thaw overnight in the refrigerator before reheating.
Best Reheating Method
To restore that freshly‑baked aroma, reheat slices in a preheated skillet over medium heat for two minutes per side. If the cake feels dry, add a splash of milk or a drizzle of chocolate sauce before heating. The result is a warm, moist dessert that tastes as good as the first time.